This tutorial teaches you how to set exposure and white balance on your camcorder and DSLR for live and on-demand video production. This article was derived from a lesson in my Live Streaming Bootcamp course, which teaches you the skills and techniques that optimize the quality of your webinars and live streams. Click here for more detail on the course.
All camcorders have automatic exposure modes that you can use for interviews, meetings, performances, and the like. However, auto-exposure doesn’t always give you the best result, particularly under challenging lighting conditions. While auto exposure certainly has its place, for most meetings and talking head shoots, you’ll get a better result if you manually control exposure.
In this article, I’ll discuss how to “go manual” with a professional camcorder and DSLR. This means how to set shutter speed, gain, aperture for the camcorder, and shutter speed, aperture, and ISO for the DSLR. In both cases, your guiding light will be zebra stripes, so I’ll describe what they are, how they work, and how you can use them to achieve accurate exposure.
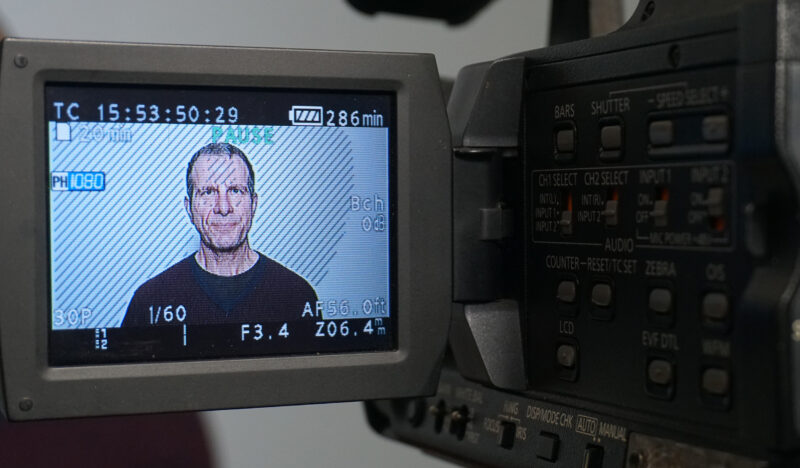
As a preview, zebra stripes are the stripes you see on my forehead in Figure 1. These tell me that the lighting is optimal for my face. Scattered around the LCD are the configuration options I set to achieve this lighting, with the 1/60 of a second on the lower left being the shutter speed, 0dB on the extreme right the gain, and F3.4 on middle bottom stripe the iris setting or aperture. These created an image that is crisp and clear, and that will look better after the encoding and transcoding that happens to all streaming videos.
Contents
Building Blocks of Good Exposure
Before getting to the camcorder, let’s discuss the non-camera-related things that you need to create a set that can achieve adequate exposure. First, you need lots of light. Anyone who’s ever been on stage or on a TV set knows how brightly the lights shine. That’s because even professional camcorders need lots of light to achieve good clarity. So, the first thing you should think about when shooting a presentation or webinar is to ensure adequate lighting. In most instances, you don’t need to go overboard; you just need to make sure that the faces are well-lit. Here’s a quick tutorial video you might find useful,
Be sure to use consistent lighting temperature between all of your light sources, which is a lot easier to do since incandescent bulbs largely went off the market. There’s a great tutorial on color temperature, here.
Next is choosing a good background and clothing for the subjects. This relates to the concept of “contrast ratio” which is a device’s ability to discern detail in both the darkest and brightest objects in the frame. Your eyes have a contrast ratio of around 1000:1, meaning that you can see detail in dark objects and objects that are 1000 times brighter.
However, a video camera has a contrast ratio of around 50:1, so it loses detail at the extremes of lightness and darkness. You see this in Figure 2, where the same speaker perches in front of the same bookcase using (presumably) the same lighting and camera. On the left, the black shirt is a blob because the exposure properly prioritized the face. On the right, in muted browns and blues, the detail is preserved over the complete frame.

This is why you should always ask those who are about to appear on camera to avoid black and white clothing in favor of gray, blue, or brown. That way, you limit the contrast ratio in the frame and can capture good detail in both the lightest and darkest regions. Ditto for your background, which should contrast with your subject but not contain any regions that are either very bright or very dark.
Long story short; if you don’t have adequate light, your color temperatures don’t match, or you have extreme bright or dark regions in your frame, the exposure, color, and retained detail in your shot will be suboptimal. Because the video will be compressed, you should also avoid fine details in either clothing or background, no pinstripes or checks, but that’s a different issue.
A Word on White Balancing
White balancing is the process of telling the camera what is white. This is necessary because the color temperature of the lighting impacts the color of objects in the frame, which, like contrast ratio, is a problem exacerbated by the difference between what your eyes see and what the camera sees.
For example, imagine a whiteboard in a classroom. If it’s lit with fluorescent light, the board will have a slightly bluish tinge; if lit with incandescent light, it will be slightly orange. Either way, your eyes see the whiteboard, understand that it’s white, and tell your eyes that it is white. However, your camcorder doesn’t have the same knowledge; so you have to tell it the color temperature of the lighting.
With a professional camcorder, you do this by lighting the scene, pointing your camcorder towards a white object in the scene, zooming in so that the entire frame is white, and then pressing the white balance button. The Sony a6300 DSLR contains a number of presets, plus you can measure your color temperature with the camera and load that into a custom preset.
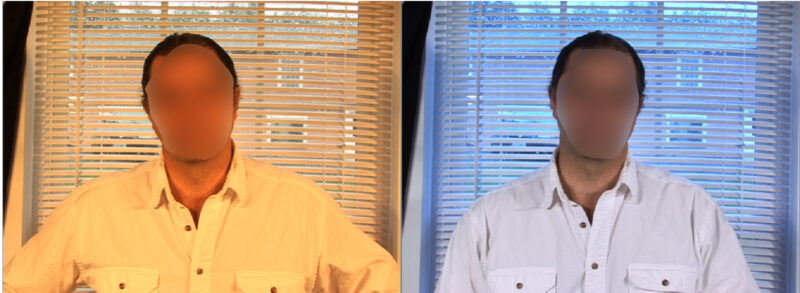
Just to close the loop, this white balance measurement is why it’s so crucial to use lighting with consistent color temperature. You see this in Figure 3, where incandescent light with a color temperature of about 3000 Kelvin mixes with late afternoon daylight with a color temperature of 6000 Kelvin or higher. If you white balance for daylight, as on the left, the scene out the window looks normal but the subject’s white shirt looks slightly orange. White balance for incandescent and the shirt looks white but the background looks blue. You can’t fix this in a live shoot or even in post.
Fortunately, most light bulbs and light kits now come with color temperature in the product specs if not listed on the bulbs themselves. This makes it easy to ensure that you don’t mix color temperatures. If you’re adding lights to existing lights in an office or meeting room, find out the color temperature of the existing lighting before purchasing or setting up the new lights. For more on color temperature, see this useful article on the Adobe UK website.
Fundamentals of Exposure
Now that we’ve perfected the scene, let’s discuss our goal. Simply stated, the goal of setting exposure is to make sure that the most critical element of the frame is optimally lighted. In almost all instances, when shooting interviews, webinars, and other presentations, the critical element is the subject’s face. You adjust lighting using different controls on the camcorder and DSLR, but in both cases, you measure what’s adequate using a tool called zebra stripes.
With the camcorder, the three controls are shutter speed, gain, and iris or aperture. Typically, you set your camcorder to shoot at 25 or 30 frames per second; shutter speed controls how long the shutter stays open when capturing each frame. The longer the shutter stays open the more light enters the camcorder, which allows you to shoot in lower light conditions. However, if there’s anything fast-moving in the frame, it might appear blurry.
According to the 180 degree shutter speed rule, you should set the shutter speed to twice the frame rate to mimic how humans experience motion in real life. So, if you’re shooting at 25p, the shutter speed should be 1/50th of a second; if 30p it should be 1/60th.
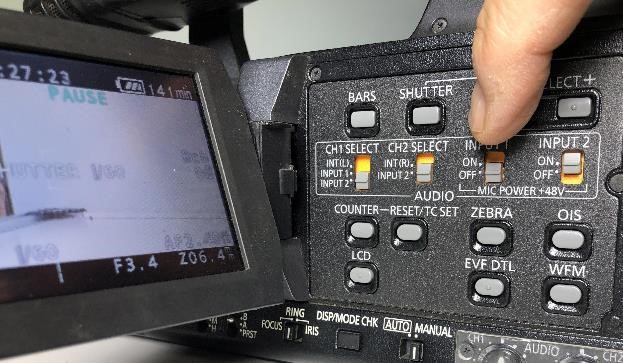
I’m setting the shutter speed on my Panasonic camcorder in Figure 4. One of the key features that sets professional camcorders apart from DLSRs are controls on the camera body, which simplifies accessing them during the shoot, particularly if you need to adjust them. You see the shutter speed buttons on the upper right; gain and iris are on the lower left though hidden slightly by the LCD panel. You see these in Figure 5.
White Balance, Gain, and Iris
Next, I set the White Balance as described above, then on to gain. Briefly, gain is the electronic amplification of the signal, which can inject noise into the image. Whenever possible, you should select zero gain, as you can see best in Figure 1 as the – dB under the Bch set for white balance. In Figure 5, you see gain set to low; in the camcorder’s menu system, I set this to 0 Gain.
Basically, you should use gain only as a last resort. If you can’t add lighting to a scene, or adjust the aperture to achieve your lighting target, then you should add gain. Typically, 3-6 dB won’t be that noticeable, but if you go above 9dB or so, the image will start to appear visibly noisy.

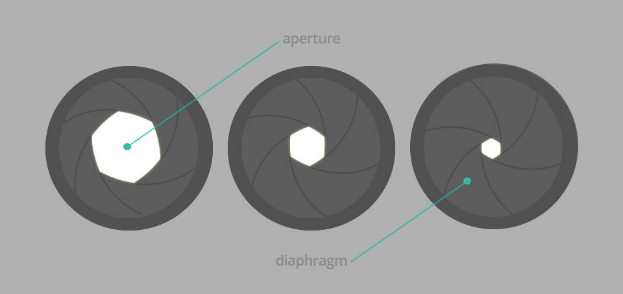
The last adjustment is the iris control or aperture. As explained in an excellent article on BHPhotoVideo.com, which included Figure 6, the aperture is the size of the hole that lets light into the camera and image sensor. It’s controlled by the lens diaphragm with settings referred to as F-Stops.
Aperture controls both lighting and depth of field which “is the distance between the closest and farthest objects in a photo that appears acceptably sharp.” The wider the aperture the narrower the depth of field, which means that if you open the aperture wide to let in as much light as possible, you may impact how much of the content in the frame is in focus. This typically isn’t a concern with traditional camcorders because the image sensors usually aren’t large enough to produce a significant depth of field. If you’re shooting with a DSLR, however, you probably need to double-check focus after setting the aperture to ensure that the subject is sharp and in focus.
Though depth of field is important for movies and other artistic shoots, for most streaming producers, the primary reason that you adjust aperture is to achieve optimal lighting on the main focal point in the frame. This takes us to zebra stripes, which tell you when the lighting is optimal.
Zebra Stripes
Zebra stripes are stripes in the camera that indicate a certain exposure level as measured by IRE, which stands for Institute of Radio Engineers. Briefly, 0 IRE is pure black while 100 IRE is pure white. If the exposure in your frame goes below 0 IRE or above 100 IRE, you lose detail, which is typically called clipping, or more specifically, “crushing the blacks” or “blowing out the whites.”
When shooting speakers you target different IRE levels for different skin tones, 70 for most caucasian faces, 60 for Hispanics and others with olive-colored skin, and 45-55 for Blacks (see the excellent tutorial, Lighting Darker Skin Tones | 7 Cinematic Techniques). Most traditional camcorders come with two zebra stripe settings, 70 and 100. The first is for Caucasian faces; the second to avoid exceeding 100 and blowing out the whites. In Figure 1, the zebra stripes are set to 70 IRE, and you see that this camera applies zebra stripes to all pixels with a value above 70 IRE.
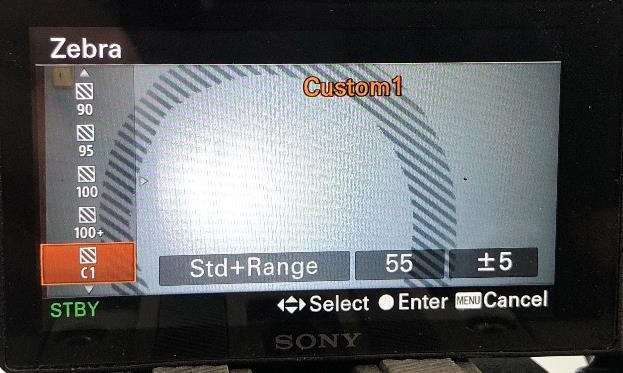
Figure 7 shows the zebra stripes on the Sony a6300, which allows me to create custom settings for the various target skin tones. You also see that the camera only displays zebra stripes to pixels within the target range, which is +/- 5 in the preset, as opposed to all pixels that exceed the specified IRE level. I find the Sony approach more useful. More to the point, if you’ll be filming many subjects with darker skin tones, be sure your camcorder has zebra stripes to support those skin tones or enables custom settings.
When would you use zebra stripes at 100 IRE? When exceeding 100 IRE would blow out the critical detail. When I shot my wife’s ballets, preserving the detail in the tutus was the order of the day, even if it resulted in faces that were too dark. For this reason, I set zebra stripes to 100 IRE and rode the iris to avoid losing detail in the tutus (Figure 8).

Summing Up
With all this as a prolog, let’s review the critical camcorder-related steps to achieving good exposure.
- Set the white balance
- Set the shutter speed to 2x frame rate.
- Set gain to zero
- Choose the zebra stripe IRE level (and range).
- Adjust the aperture to achieve proper exposure using the zebra stripes.
If you can’t achieve your target by adjusting the aperture, try adding lights. If that doesn’t work, you’ll have to start injecting gain, which should always be a last resort.
Working with DSLRs
In manual mode, most DSLRs let you control shutter speed, aperture, and ISO, which controls the image sensor’s sensitivity to light. ISO settings vary by the device; on the a6300 it ranges from a low of 100 to a high of 51200. The lower the numbers, the less sensitivity to light, which means a darker image but minimal grain. Higher settings are more sensitive to light but can introduce both noise and grain into the image.
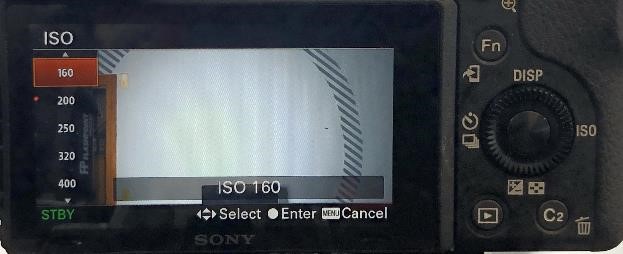
The interplay between aperture and ISO sets up three potential suggestions.
- If a clear, sharp image is your primary goal, set ISO to a relatively low value and use aperture to control exposure. This is where I live most of the time and how I derived the settings used to produce Figure 10.
- If your goal is to introduce film grain into your video, set the ISO to the desired value and control exposure via the aperture.
- If your goal is to control the depth of field, set the aperture at the desired value, and control exposure with ISO.
Figure 10 shows the finished exposure in the a6300. You see the shutter speed at 1/60, the aperture at F5.6, and the ISO at 100. For this shoot, I set zebra stripes at 70 IRE, and the stripes on my forehead and cheeks show these regions in that zone. Rule of thirds positioning isn’t bad, but that’s a different tutorial.
 Streaming Learning Center Where Streaming Professionals Learn to Excel


