Streaming Learning Center Where Streaming Professionals Learn to Excel

Related Articles


This article details how to plan, record, edit, and produce a lesson with screen recording software.
So, you’ve been charged with producing a screencam-based training lesson for your organization and you’re wondering where to start. Well, you’re in the right place, because this tutorial will tackle the hardware and software needed, plus the planning, recording, editing, and output of the lesson.
Holy cow, that’s a lot to cover in a short time. Let’s jump right in.
Contents
Planning and Kitting Up
Any well-executed project begins with planning, so let’s start there.
How long should my lesson be? Video hosting service Wistia analyzed 1.3 billion plays of 567,710 videos and says either two minutes (near 70% retention) or 6 – 12 minutes (stays around 50%) are the optimal durations (see Figure 1). Thereafter, viewers begin to drop off, though not precipitously.
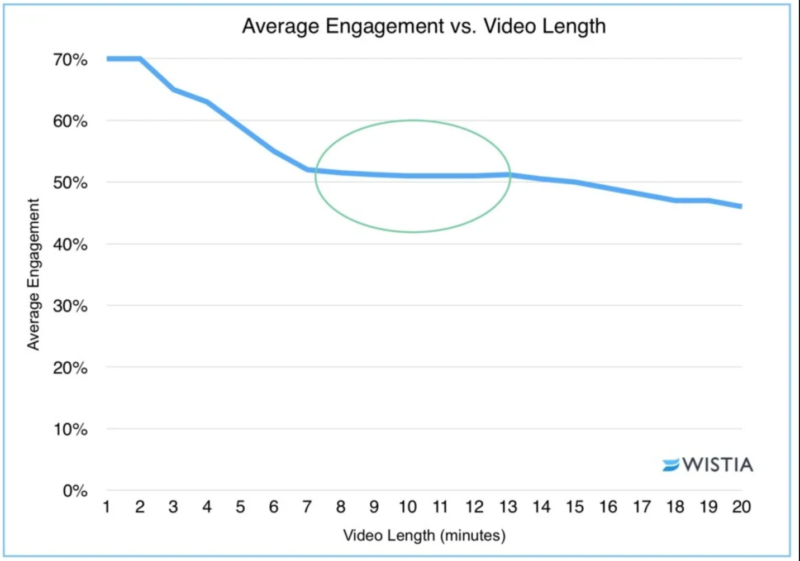
Learning platform Udemy is even more aggressive and recommends lessons that are between two to six minutes long. Not only are shorter lessons easier to watch, but they’re also easier to record and edit. So, the shorter you can make your lesson, the better it is for everyone. It’s better to create and consume four five-minute lessons than one twenty-minute lesson.
What software do I need? This depends upon a couple of factors. If you already have a video editor, you might be able to use a free tool to capture the screen (see a list here, plus QuickTime on the Mac), export an MP4 file, and edit in your existing program. However, if you need to add features like cursor effects, quizzes, or other interactivity, you may need a tool like TechSmith Camtasia or Telestream ScreenFlow.
I’ve probably created close to 100 hours of instruction over the years, and my go-to workflow is to record in Camtasia, piece together the different recordings in Camtasia’s editor, and export the rough lesson as a high-quality MP4 file. Then I input the MP4 into Adobe Premiere Pro to finalize the video edit, optimize the audio in Adobe Audition, and output using the Adobe Media Encoder.
I use the Adobe Creative Suite because I don’t need any of the aforementioned screencam-related features, because I’m faster in Premiere Pro, and because Audition’s audio filters, particularly compression, are more configurable and more effective. I wouldn’t buy the Creative Suite just to produce screencam-based lessons, but if you have it you can use it. On the other hand, Camtasia’s editor can certainly get the job done, is way easier to learn than Premiere Pro, and includes lots of content and templates to produce highly engaging lessons (see review here).
Should you include webcam video? Though this is my opinion only, not unless you absolutely have to. When I produce a lesson, my goal is to make it look like the audio and screen were flawlessly captured in a single take, which is relatively simple to do if you’re capturing audio and screencam, but nearly impossible to do if you add webcam video. Plus, if you add the webcam, you have to record in an environment with a suitable background and lighting, which might be tough for some producers. For example, I record my lessons in a closet off my office, which totally wouldn’t do for a webcam.
Audio workflow? Here I mean do you narrate while recording the screen or create the narration and recorded video separately, and merge them together while editing. Here I go one of two ways.
If I’m producing a lesson for a client that needs script approval, I finalize the script, get it approved, narrate it, and then insert it into a Premiere Pro timeline. Then I record the screencam while playing the audio in Premiere, so the audio and video are roughly aligned. If you’re producing a single short lesson that has to look its absolute best, try this workflow. If I’m creating a ten-hour course, scripting takes too long, so I ditch the script, record while I capture the screen, and edit the various takes into the lesson.
How to work well with others? What about if you’re in charge of editing and production, but not recording? Either ask the subject matter expert to record and create the rough cut or simply output individual files with editing instructions via timecode (file 1 through 3:12; file 2 through 2:06, and so on).
What computer do I need? This one’s easy; almost any computer will do. I have recorded hundreds of screencams on an HP ZBook Studio G3 with a 2.8 GHz Intel Xeon E3-1505M v5 CPU. Recently I bought a refurbished HP Elite 6300 Small Form Factor Business Desktop Computer with an Intel Quad-Core i7-3770 running at 3.9Ghz CPU with 16GB RAM, which cost a whopping $269, and works just fine. Of course, the computer has to have access to whatever program or content that you’re demonstrating; other than that, it has to run silent and be installed in a relatively quiet room.
What about a microphone? You’ll need a high-quality condenser microphone, which should cost around $100 or so. It’s simplest to get a USB microphone; otherwise, you’ll need a separate pre-amp to supply power and the USB connection to your computer. I have an old XLR-based Shure microphone that I pair with a $50 Behringer Audio Interface.
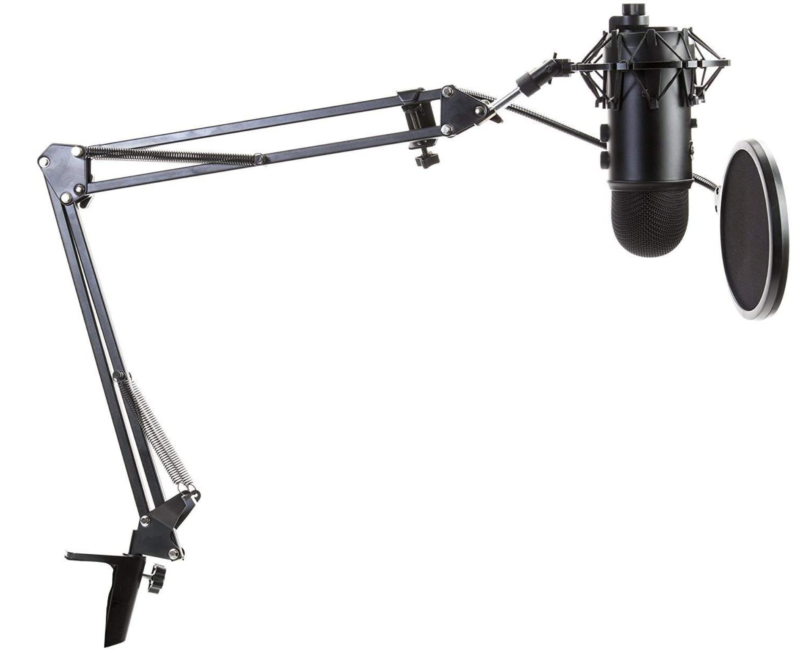
You want the microphone about six inches from your mouth, so mics with short desk stands won’t cut it. You’ll also need a pop filter to avoid plosive Ps and sibilant Ss. The bundle shown in Figure 2 checks all the boxes, pairing the highly-regarded Blue Yeti microphone with the Knox boom arm stand, pop filter, and shock mount and retails for $164.99, including the microphone. Wirecutter has a fabulous review of mini condenser microphones here, with the Blue Yeti microphone as its top choice.
Configuring the Capture
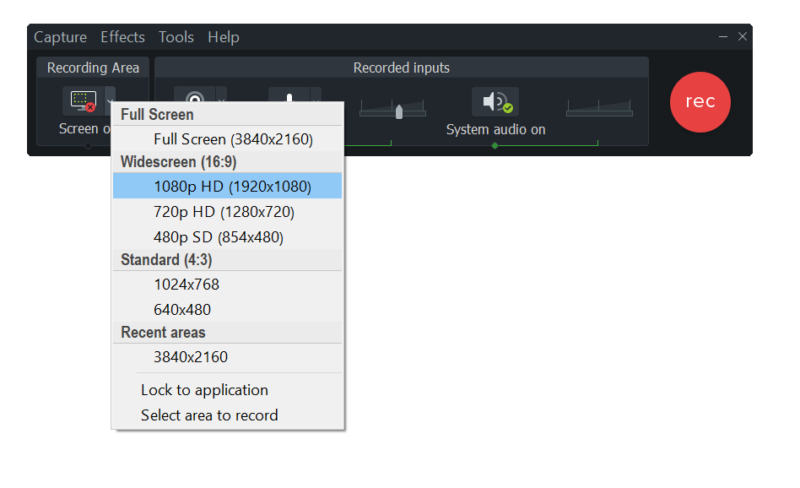
All capture tools will let you set some basic capture parameters like the resolution being captured, the frame rate, and the capture format. You see Camtasia’s Capture application and resolution selector in Figure 3. There are a gazillion factors that impact screen resolution, including how and where the video will be deployed and the application that you’ll be capturing.
I recommend that you capture at the smallest resolution that allows you to capture the critical action in the lesson since a 720p video will be much easier to discern on a phone or tablet than a lesson in 4K resolution. If you’re producing to deliver to a learning platform, check their recommendations; for example, Udemy recommends either 720p or 1080p.
While it’s possible to change resolution in your video editor, anytime you stretch or shrink a screencam you risk blurring or otherwise degrading the fine lines in applications and text. For this reason, you should capture, edit, and output at the same resolution. For the most part, whether I’m capturing an application or PowerPoint slide deck, I capture, edit, and render at 1080p.
Regarding the frame rate (Figure 4), most projects work well at 30 fps. From an encoding perspective, screencams are pretty efficient, so there’s really no reason to step down to 15 fps. Camtasia supports any frame rate up to 60 fps, though I’ve never yet had a project that required that frame rate.
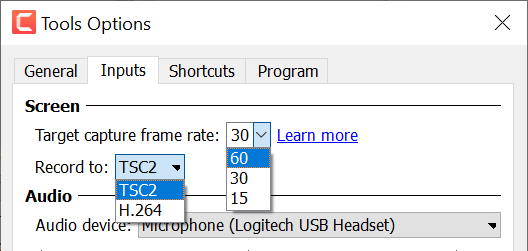
Camtasia 2020 captures all recorded videos in the proprietary .trec format using either the TSC2 or H.264 codecs, with the former delivering superior color quality but a larger file size. Of course, Adobe Premiere Pro can’t input .trec files, so as mentioned, I create my rough cut in Camtasia’s editor and output an MP4 file to input into Premiere Pro.
Capturing Audio and Video
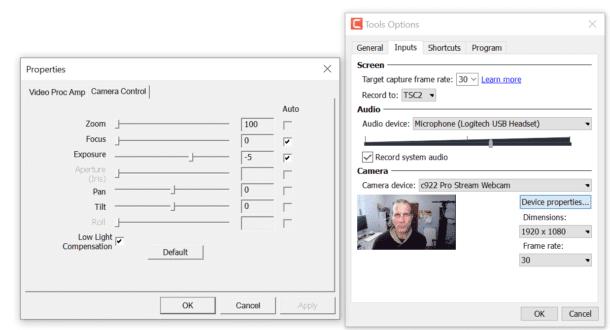
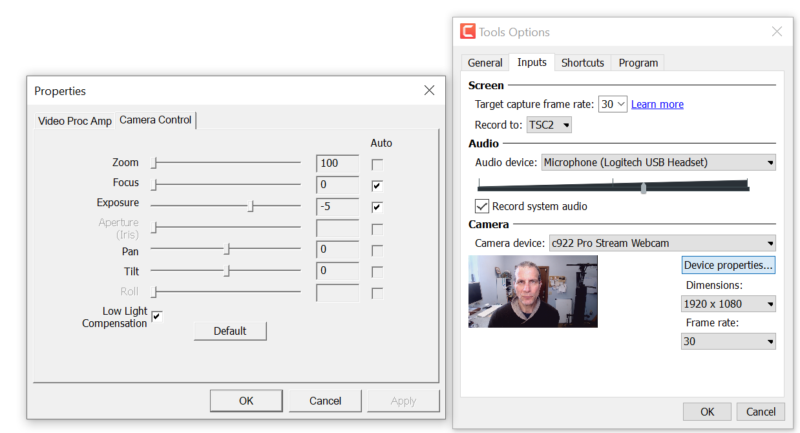
Most screen capture programs can capture audio from a microphone and system audio from the applications on your computer. If you have multiple audio sources attached to your capture station, you’ll have to choose the audio device in your capture software; you see Camtasia’s Audio device selection in the middle right in Figure 5 set to the Logitech USB Headset. You can set levels here in the slide below the Audio device selector or just before capture as shown in Figure 6.
You also see the Record system audio selected, which is necessary when the content you’re working with has an audio component. If you’re recording system audio, remember to disable other system sounds like incoming Slack or email messages, because these would be captured as well.
I mentioned that I typically don’t record video with my screencams because it adds recording and editing complexity and because for most of my lessons, learners are there to see what’s in the application or presentation, not my face. If your projects would benefit from video, you see the webcam selector and video configuration on the right, along with camera controls on the left, which you access by clicking Device properties. In Camtasia, video is captured as a separate content type that you can edit separately from the screencam and audio.
The final step before capture is setting audio levels, which you do with the slider located to the right of the microphone selector shown in Figure 6 which is within a levels meter. As you can see, the Camtasia meter turns yellow about slightly before 50% volume and then starts turning to red at about 75% volume. Any audio captured in the red will be “clipped” which can cause audio distortion. Try to keep the maximum volume in the yellow and you can boost the audio volume during editing if necessary.

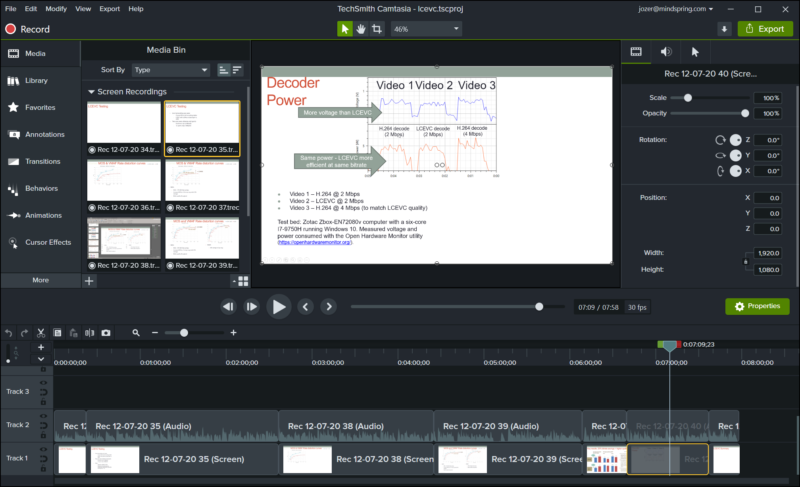
If you spy ahead to Figure 7, you’ll see that the audio on Track 2 is well below 50% volume, which I would typically boost in Adobe Audition later in the process.
Choosing a Recording Strategy
Figure 7 shows a recent project in the Camtasia Editor. Briefly, the Media Bin on the left shows all of the separate captures involved in this sub 8:00 minute project which highlights that you need a recording strategy to simplify the editing process, whether you’re producing a rough cut to edit elsewhere or the final version. More specifically, if you are narrating and recording simultaneously, you’re going to eventually flub and have to make a correction.
What I used to do was simply wait a moment, then say “Again” to alert myself that there was a repeat coming, wait another beat, and then restart the recording. During editing, however, you might edit 30 to 60 seconds of audio, then hit an “Again” and find that the section of the video you just edited was being updated, wasting the associated editing time.
Now if I’m recording a PowerPoint presentation for a lesson and I flub, I stop the recording, drag the associated media file into the timeline, trim the end to the last good slide, and then start recording the next slide again. I don’t try to piece components of a single slide together, I only insert full slides into the rough cut. Then I export an MP4 file to insert into Premiere Pro, where I clean up the presentation, shorten any delays, cut any “umms” or “ahhs,” replace any botched segments that I didn’t catch during recording and finalize the audio.
The strategy that you choose will depend upon multiple factors, including the content that you’re capturing and your tolerance for noticeable discontinuities. For example, if you’re showing how to complete an operation in a software program, you want the video to look like it was all captured in a single take; you don’t want any cursor jumps or screen present.
For 1-2 minute videos, the best strategy might be to capture multiple times until you get a perfect take. For longer videos, your capture strategy has to incorporate the ability to merge multiple captured files into a smooth completed presentation, with no glitches in program operation and minimal cursor jumps. This means that when you flub, you edit your rough cut to a point where it’s easy to restart the capture without an obvious jump. For example, if you’re showing different applications in different browser windows, or jumping from one application to another, these change points would be obvious edit points.
Ultimately, you’ll find the capture strategy that’s best for you and your project. The best way to do this quickly is to capture, edit, and finalize a video or two rather than capturing all your content, then editing, and then finalizing. Figure out the optimal workflow early, and then go into production.
Editing Your Lesson
The Camtasia Editor shown in Figure 7 has the same basic components as all other editors; with a Media Bin on the upper left, Timeline on the bottom, Preview window in the upper middle, and Properties window on the upper right. Here you’ll assemble the various recordings of your lesson into a cohesive whole, perhaps adding some of the transitions, animations, behaviors, titles, and other effects shown to the left of the Media Bin on the upper left.
Like most editors, Camtasia has a Split function that allows you to cut clips on the timeline, and a trim function you can use to grab the starting and ending edges drag to delete any unneeded frames. You can definitely finalize your project in the Camtasia Editor; I just find Premiere Pro faster and easier to use, and the audio filters accessible from both Premiere Pro and Audition better and more configurable.
Finalizing the Audio
In general, if you’re diligent, you should be able to get your video looking professional in a reasonable amount of time. Audio, on the other hand, can be absolutely vexatious, and you’ll get the absolute best results in the shortest period of time if you buy decent quality gear and record in a quiet environment.
If you record a little low to avoid clipping, you’ll have to boost the volume either during capture or editing. Camtasia has an “auto-normalization” option that can boost audio levels during capture, or you can use a manual Gain function in the Properties window.
One problem that I consistently encounter is slightly weak audio from a voice that gets reedy after lunchtime, which makes the narrations sound anemic. I fix this in Adobe Audition via the audio compression function, which reduces the volume of louder regions in a waveform and boosts the softer regions to make the audio more uniform (see a tutorial with samples here).
Camtasia has an Audio Compression filter in the Audio Effects tab, as you can see in Figure 8; if you encounter the same problem you can try that effect. Also notice the Noise Removal effect, which you can try to use to remove background noises, though you’ll almost certainly get much better results using a third-party program.
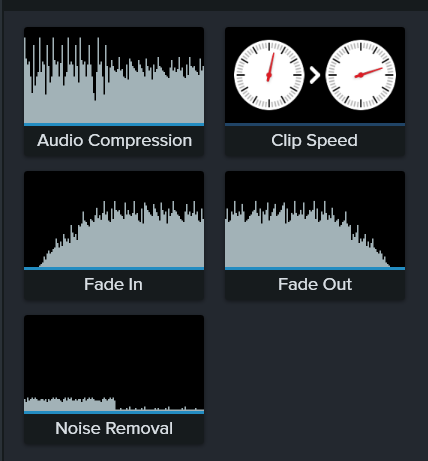
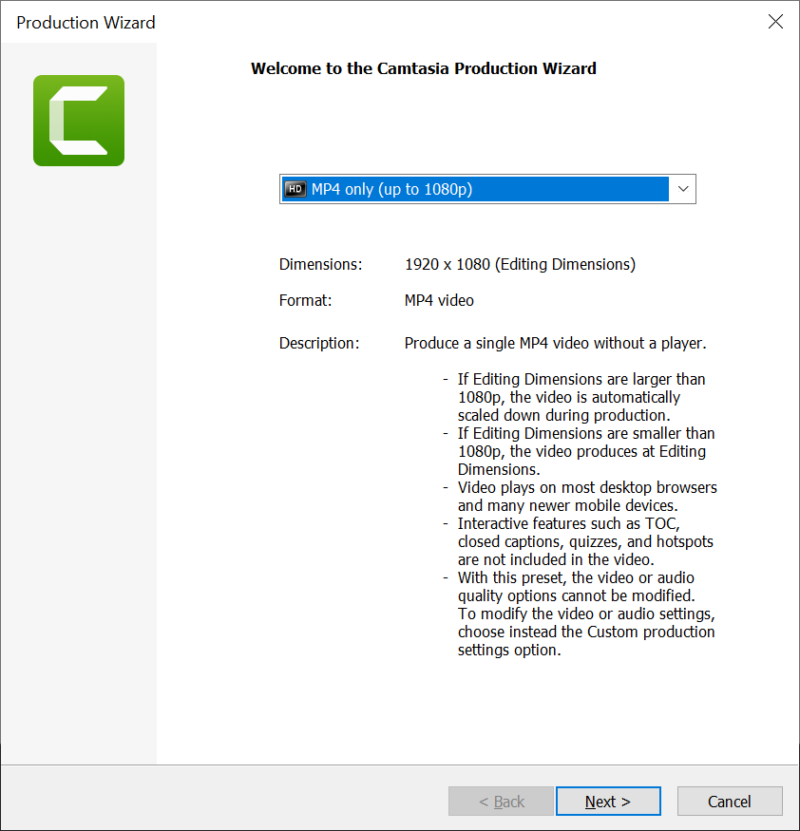
Whatever your audio workflow, you export your video via the control shown in Figure 8. Note that when you start capturing your lesson, the Editor inserts the first captured file into the timeline and then sets the project resolution to the resolution of the captured file, which is almost always what you want. By default, Camtasia produces the output file at the project resolution, which simplifies using the same resolution for capture, editing, and output.
So that’s it; hopefully, you have a good idea about the production decisions you have to make, the hardware and software that you need, and how to find the optimal workflow for your lessons.