 Streaming Learning Center Where Streaming Professionals Learn to Excel

Related Articles


This post presents a return on investment view of choosing an x265 preset that delivers the optimal blend of encoding cost and storage and bandwidth savings. The first chart, x265 Encoding Time/Quality Tradeoff, is from a lesson in my course Streaming Media 101: Technical Onboarding for Streaming Media Professionals.
Given the bandwidth and storage savings that higher-quality x265 presets deliver, you may want to rethink your preset selection.
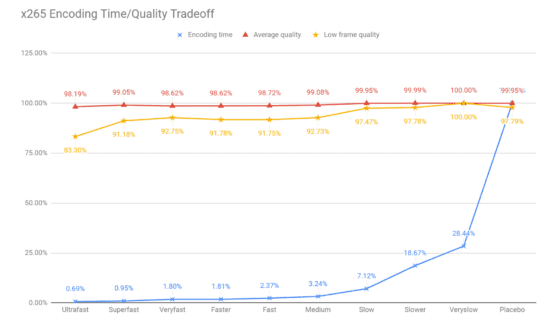
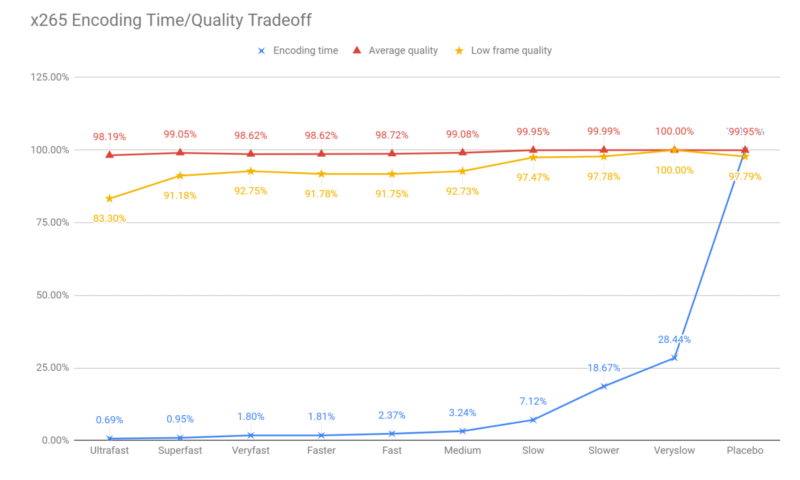
We all know that the encoding preset that you choose impacts encoding time and quality. The tradeoff for x265 is shown in Figure 1, where the blue line represents encoding time and the red line average VMAF quality. I compiled this data encoding the eight files included in my book Video Encoding by the Numbers, which includes a mix of movies, animations, and business clips.
All figures are presented as a percentage of the maximum, so the Ultrafast preset delivers 98.19% of the quality of the Very Slow preset in 0.69% of the encoding time of the Placebo preset. The yellow line represents low-frame VMAF scores, or the lowest frame in the encoded file, a harbinger of transient quality issues. This clearly makes Ultrafast a bad choice for VOD presets and weighs down the desirability of presets all the way through to Slow.
Looking at the choice between Medium and Slow, we see that Slow more than doubles the encoding time while delivering only 0.87% higher quality, which no one would notice (though the increase in low frame quality is alluring). Looking at these numbers, the CPA in you would probably ask, “do I want to cut my throughput by 50% to increase VMAF by less than a point?” Put that way, (and ignoring low frame quality) the answer would probably be no.
But what about if you framed the question differently? Specifically, rather than normalizing on file size (and adjusting quality), suppose you normalized on quality and adjust file size, which is almost certainly more appropriate. That was the schema I followed in a recent analysis designed to identify the optimum encoding ladders for some per-title encoding trials I am about to perform.
Finding the Ideal Encoding Ladder
Some background. Per-title encoding technologies create unique ladders for each input file or codec, so the ladder for a simple animation like Big Buck Bunny would look completely different than a ladder for a football match, American or European. To effectively judge third-party per-title technologies I had to first find the “ideal” ladder to compare it to.
I’ve already plowed this ground before, and you can read up on my use of the convex hull technique as explained by Netflix here. The bottom line is that you encode the same file a couple of hundred times and find the best ladder among the various alternatives. You see this below where I’m computing the ideal ladder for the same test clip with H.264 and HEVC.
The top rung for each ladder should be the rung that delivers a VMAF score of between 93-95; let’s say 95 to be conservative. The top rung would be 4200 kbps for H.264 and 2600 kbps for HEVC. Each subsequent rung should be about 60% the bitrate of the previous ladder to maintain Apple’s recommended data rate jump of between 150 – 200% per-rung. You encode at multiple resolutions at each data rate and choose the resolution that delivers the highest VMAF quality, which is highlighted in green.
Note the different “switch points” where the highest quality resolution switches from one to another. so, H.264 switches from 1080p to 720p at 3600 kbps, while HEVC switches at 2000 kbps. That’s because HEVC and all higher quality codecs are more efficient at higher resolutions lower in the encoding ladder (as explained here), and it’s why you need different ladders for H.264 and other codecs.
I stopped creating rungs once the data rate dropped below 300 kbps. For reasons I’ll discuss in a separate post that I’ll link to once written (see here in the interim), I created the “ideal” ladder with both a 720p and 360p rung, even if higher resolution rungs delivered higher quality. So, in the HEVC ladder below, the lowest rung would be 360p rather than 432p (if at 200 kbps) or 540p (if 300 kbps).

The ROI of Preset Selection
I created one set of files for x264 using the very slow preset, then x265 using the medium preset. Comparing the two, the difference wasn’t that great. I asked a buddy who runs a cloud encoding facility which presets his customers typically use for HEVC and he said either medium (the default) or slow. So, I tried again at slow and found a significant difference.
How significant? Table 2 shows the two ladders for Tears of Steel. Using the Slow preset reduced the top bitrate by 23%, allowing that highest quality rung to be served to a much greater number of viewers. For perspective, that’s more than the bandwidth savings I computed here for switching from H.264 to VP9.
Note that this doesn’t represent overall bandwidth savings since that depends upon which rungs your viewers typically watch. But if you’re in the US or Europe distributing over relatively fast connections you should be able to harvest quite of bit of this.
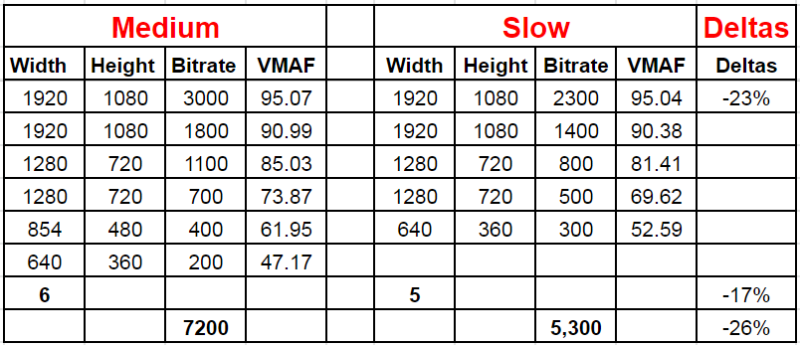
Beyond the top-line bandwidth savings, the slow preset delivers a ladder with an overall bitrate of 5,300 kbps, a 26% savings over medium, and one fewer rung than medium, which will offset the increased encoding time.
My per-title test suite has 23 files divided into entertainment (movies, concerts), animations, sports, and business (talking head, screencam, PowerPoint). Table 3 shows the overall results which were significant in all four content categories.

So, yes, switching over from medium to slow will double your encoding costs, but this may be partially offset by having to encode fewer rungs. Whatever the increase, this may be offset by decreased bandwidth and storage costs, which you have to factor into the breakeven computation. For some help on computing breakeven, check out this article Computing Break Even on Codec Deployments, which identifies factors to consider and includes a link to a Google Sheet that can speed your computations.


