Streaming Learning Center Where Streaming Professionals Learn to Excel


Related Articles


Your encoding ladder controls the visual quality of all video that you deliver, but there are few absolutes. Ask five experts to design the optimal encoding ladder, and you’d get five different answers.
That said, there are some tools and concepts you can use to identify where you may need to tweak our ladder, all providing a different lens to help reveal its strengths and weaknesses. I present them below.
Contents
The Apple View, Part 1; How Low and How High?
Love it or hate it, Apple TechNote TN2224 served as the Rosetta Stone for many streaming producers for HLS and even other adaptive bitrate technologies. Many producers used the TN2224 ladder “as is,” and even more used it as a starting point for their own ladder. When Apple deprecated some technology specifics in the Tech Note with the HLS Authoring Specification for Apple Devices, they changed the ladder to that shown below.
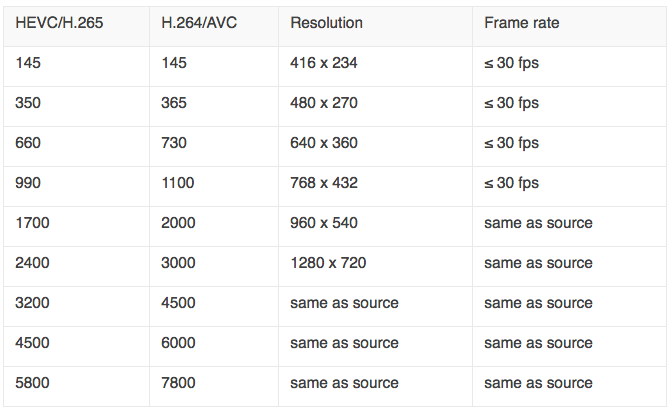
Table 1. The new encoding ladder from the HLS Authoring Specification.
Few use this ladder as is, but it does present the first two critical questions you should ask for your own ladder; how low will you go, and how high will you fly. The lowest quality stream is set in stone if you’re seeking App store approval for your app; you must offer a variant with a peak bandwidth of 192 kbps. If you’re not seeking App store approval, you can start much higher; some of the encoding ladders that I’ve seen start at 400 kbps and up.
The highest quality stream is a budget and a quality issue. For many videos, 7800 kbps delivers no perceptible quality advantage over 4500 kbps. Though bandwidth prices have plummeted lately, it never makes sense to incur an additional cost if there’s no benefit to the viewer. Many clients I’ve worked with use a peak bit rate of 4500 kbps or so; to see why you can take an advance look at Figure 2 below.
So, if your ladder is dramatically different from Table 1, you should ask yourself why. Then consider the go low and fly high questions.
The Apple View, Part 2; Optimal Spacing
While the specifics of TN2224 has been deprecated by the HLS Authoring Specs, the older document is still valid to understand the “practices and the rationale behind them.” Regarding the spacing of the adjacent data rates, TN2224 states.
“Adjacent bit rates should be a factor of 1.5 to 2 apart. You should keep adjacent bit rates at a factor of 1.5 to 2 apart. If you put them too close together, you will increase your number of variants unnecessarily. For example, it won’t help much if you’ve got both a 150 kb/s and a 180 kb/s stream. On the other hand, don’t make them too far apart either. If they are too far apart, the client may find itself in a situation where it could actually have gotten a better stream but there isn’t one available. An example of this is if the client has to go from 500 kb/s to 3000 kb/s. This is a factor of six difference.”
To assess this, I enter the ladder in a spreadsheet and calculate the distance between all rungs. This is shown in Table 2 for the H.264 recommendations in the Apple ladder.
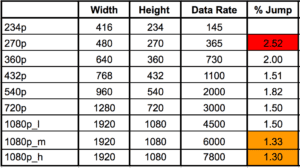
Table 2. Jumps from lower to upper streams.
The Apple ladder has issues at the bottom and the top, as shown by the nifty color coding. Unless your server logs showed lots of viewers on the bottom rungs, I probably wouldn’t add a layer there. On the other hand, the compressed jumps at the top really seem to indicate that you could cut at least one layer there. More on this below.
View 3: Higher Math and the Power of .75 Rule
I’m not sure who created the Power of .75 rule, but it was Ben Waggoner (then of Microsoft, now with Amazon) who brought it to my attention. Essentially, the rule mathematically expresses the concept that codecs get more efficient at higher resolutions. For this reason, if you’re doubling the resolution, you don’t have to double the data rate to achieve the same quality. Conversely, if you half the resolution, you’ll have to boost the data by more than 2x to achieve the same quality.
Here’s a snippet of the email Ben sent me many years ago explaining the formula.
Using the old “power of 0.75” rule, content that looks good with 500 Kbps at 640×360 would need (1280×720)/(640×360)^0.75*500=1414 Kbps at 1280×720 to achieve roughly the same quality.
So the next way to analyze your bitrate ladder is to apply the rule, and see if the quality is reasonably consistent through all ladders. Before doing so, you have to resolve two issues.
First, which stream serves as the starting point? Do you want all streams to have the same quality as the 360p stream or the 1080p stream? In the analysis shown in Figure 1, I want all streams to have the quality of the 1080p@4500 kbps stream. There’s no right or wrong answer, but you must pick the starting point before you can apply the formula.
The other issue is whether the Rule of .75, which was formulated for older codecs like WMV and VP6, still applies at the same ratio. For example, in this post on the Doom 9 forum, Waggoner commented that for VC-1, one generation past WMV, Microsoft used the Power of .71, not .75. Certainly, for HEVC/VP9 it would be lower, and lower still for AV1. In the graph shown in Figure 1, I used the power of .70, which is probably conservative.
To create Figure 1, I computed the Rule of .70 data rate values to make all lower ladders the same quality as the 1080p@4500 kbps stream. Then I computed the bits per pixel value for both the original ladder and the Rule of .70 and displayed them in the graph. Briefly, bits per pixel measures the amount of data applied to each pixel in the file, and is the easiest way to compare how much compression is applied to files with varying resolutions and data rates (read more on bits per pixel here).
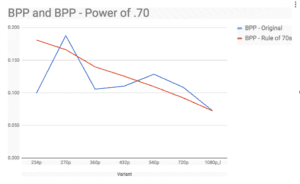
Figure 1. Bits per pixel of the original (blue) and Power of .70 (red) encoding ladders.
The red line is the bits per pixel value of the files as computed using the Power of .70. The slope downward from left to right reflects the theory that lower bits per pixel values are required at higher resolutions to maintain the same quality as lower resolutions. Again, codecs are more efficient at higher resolutions.
The blue line is the bits per pixel values from the original encoding ladder, and it shows that the bitrates in the original ladder are off in several key rungs. In particular, the 360p@730 kbps value is low; I’ve seen this as high as 1200 for mainstream sites like ESPN and CNN, and the rule of .70 value was 967 kbps. I would definitely bump the data rate here since the 640×360 stream typically has a high usage rate.
The 540p stream is about 300 kbps too high compared to the rule of .70 computed amount, while the 720p stream is about 450 kbps higher than needed. Nothing tragic, but I might reduce these slightly.
On the extreme left, at 145 kbps, the 234p stream is going to be ugly, even at 15 fps. Not really much you can do here if you’re submitting for App Store approval. If you’re not, the Power of .70 value would be 264 kbps.
Taking a step back, the macro view is that outside of the lowest quality stream, the Apple trend line moves from the upper left to the lower right, which is the right general direction. If you run the same calculation and don’t find a similar trend, you need to consider some serious changes.
View 4: Getting Objective with Quality Metrics
The fourth approach is to apply objective benchmarks like PSNR to the analysis to help customize the encoding ladder on a per-category or per-title basis. The analysis performed in Table 3 measures output quality at the different data rates at different resolutions. The analysis assumes that the producer has already chosen the data rates and is choosing the highest quality resolution for that data rate.
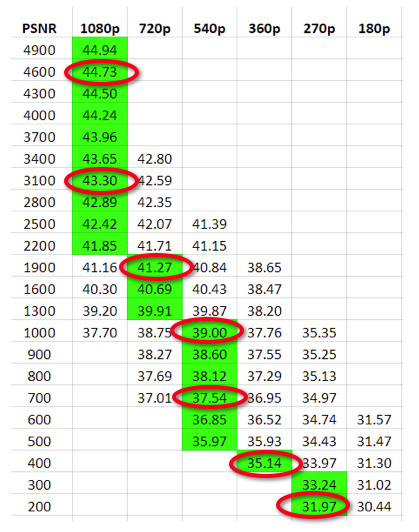
Table 3. An approximation of the Netflix method of creating the encoding ladder.
Netflix uses a much more complex variation of this approach to compute both the optimal data rates and resolutions in their per-title encoding approach. While per-title is certainly optimal, I’ve used the approach shown in Table 3 to create unique encoding ladders for different categories of video, like talking heads, multi-person training videos, and screencams.
Another way to use objective quality metrics is to define the upper limits of your encoding ladder (how high should you fly?). Looking at Figure 2, two of the three videos see very little improvement after the 4500 kbps rate, while the third, the New clip, increases by about 1.75 dB. Since 40dB is an already high value, it’s questionable whether improving from 40 dB to 41.75 dB would deliver a quality improvement that any viewer would notice. Anyone actually using the upper rungs of Apple’s recommended ladder should perform these tests on their hardest to encode clips to understand whether the additional bandwidth cost delivers any real visual benefit. After all, these are the clips that cost the most to deliver.
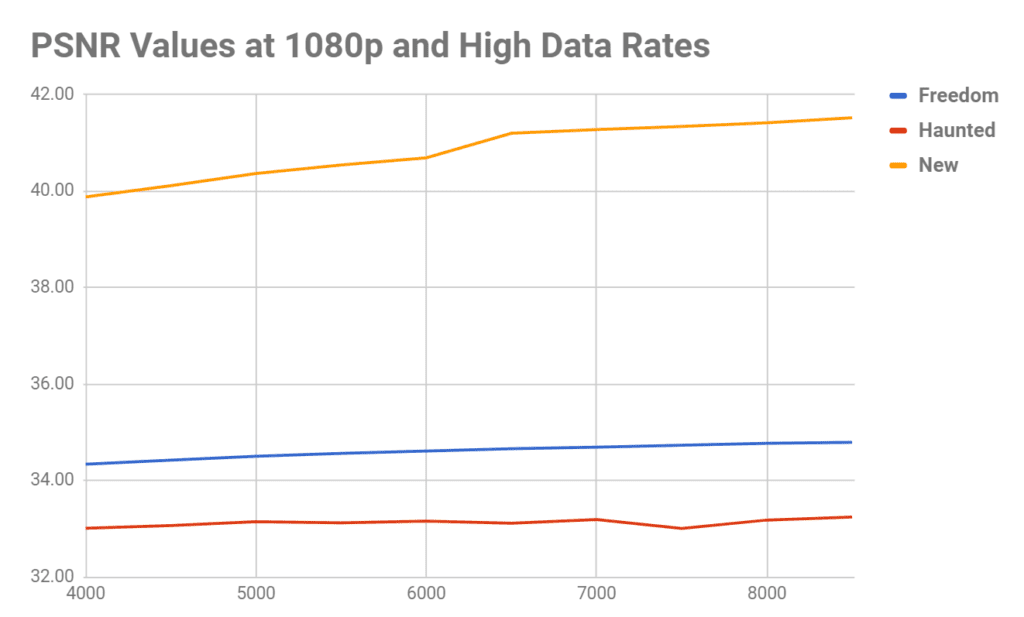
Figure 2. The (marginal) incremental benefit of higher data rates.
View 5: The Holy Grail: True Per-Title Encoding
Most major encoding shops like Netflix and YouTube have their own custom-built per-title encoding systems that evaluate the encoding complexity of each video and create a unique encoding ladder with varying resolutions and data rates. If you don’t have the cash for your own homegrown system, Capella System’s Cambria FTC has a per-title feature that worked quite well in my tests.
Online video platform (OVP) Brightcove has per-title encoding systems in the works, which they call context-aware profiles. Here’s the description from the Brightcove site.
Context-aware profiles is a technology developed by Brightcove to analyze the source video during transcoding and generate an optimum set of renditions and bitrates based on the complexity of the video and a set of bounding parameters provided (minimum number of renditions, max bitrate, etc.). A comparable industry term for this technology is “per title encoding”.
OVP JWPlayer uses an encoding technique called capped CRF that also customizes encodings on a per-title basis. Finally, companies like Beamr and EuclidIQ have video optimization technologies that don’t change the encoding ladder for different titles but reduce the data rate of each stream as low as possible without impacting the perceptual quality of the video.
Want to Learn More?
The Streaming Learning Center is hosting a series of webinars entitled Rebuild Your Encoding Ladder. You can attend five of six sessions for free (two have already occurred and you can view the archived versions). All involve various aspects of configuring your video; two may be of particular interest if you’ve made it this far.
On August 15, I’ll cover many of the topics addressed in this document in a webinar entitled Defining Your Encoding ladder. This webinar is free.
On August 29, I’ll cover implementing per-title encoding techniques. I’ll discuss what’s available, and show results from products/technologies that I was able to test, which will include capped CRF, Capella Systems Cambria FTC and one or two additional approaches, including Brightcove’s. This webinar costs $49.99.
Hope to see you there!