Streaming Learning Center Where Streaming Professionals Learn to Excel


Related Articles


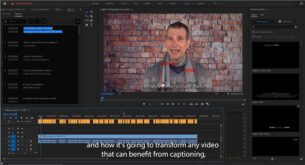
Just back from Streaming Media East where I was interviewed by Tim Siglin on Facebook Live about my new book. I downloaded the video file from Facebook and wanted to create a quick excerpt, but Premiere Pro crashed twice during my initial edits, so I updated to the newest release. That fixed the crashes, but when I tried to insert a title into the project, the Titler was gone. After a pressure-filled conference, I really needed an Easy-Button kind of a day and wasn’t that receptive to the change. But after a few minutes working with the new Essential Graphics function, I reached several key conclusions.
Contents
Yes, Adobe Bungled the Transition and Should Have Retained Full Title Functionality
Actually, you can run the Titler, just select File > New > Legacy Title, or click Ctrl+T. But you can’t access templates without a tortuous workflow described in a post entitled Steps For Using Legacy Title Templates in Premiere Pro 2017.1. IMHO, Adobe should have kept the Titler fully functional for at least a version or two before degrading it. There are lots of folks on a deadline, and this forced changeover is going to put every one of them behind the eight ball.
Don’t Try to Figure Out How to Use the New Function by Dragging in a Template
That’s what I did and I immediately found myself staring at the Effects Panel below. All I wanted was simple text over a black background, and staring at this complex screen nearly brought tears to my eyes. But it did make me realize one key fact.
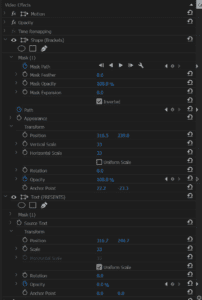
That is, while the Titler used a completely different set of (very easy to use and functional) tools to create titles, the new Essential Graphics function uses effects, motion, and other options from within Premiere Pro itself. It’s more native than the old Titler, so inherently more functional, though it will take you a while to get there.
The Easiest Way to Learn How to Use the Tool is by Starting From Scratch
The easiest way to learn the new graphics function is to create a new title, which the marvelous video below from Premiere Gal shows you how to do, starting at around 4:24. You should watch the entire video to learn the location of the new panels, but I found the last four minutes the most helpful. I’m embedding it here below, but if you find it useful, click over to YouTube and leave Premiere Gal a like or a nice comment.
I generally hate change, especially with a function that’s easy to use and working. In the end, though, I think this one will be a positive for most users.