 Streaming Learning Center Where Streaming Professionals Learn to Excel


Related Articles


There are two mostly vestigial problems that I didn’t address in Learn to Produce Video with FFmpeg in 30 Minutes or Less because so few people encounter them. These are deinterlacing and aspect ratio mismatches. Now I’m writing a textbook with a greater scope, so I had to learn how to deal with both in FFmpeg. These will make it into the next edition of my FFmpeg book, but for now, they are freebies.
Contents
Deinterlacing – You Have a Problem When Two Hands Appear
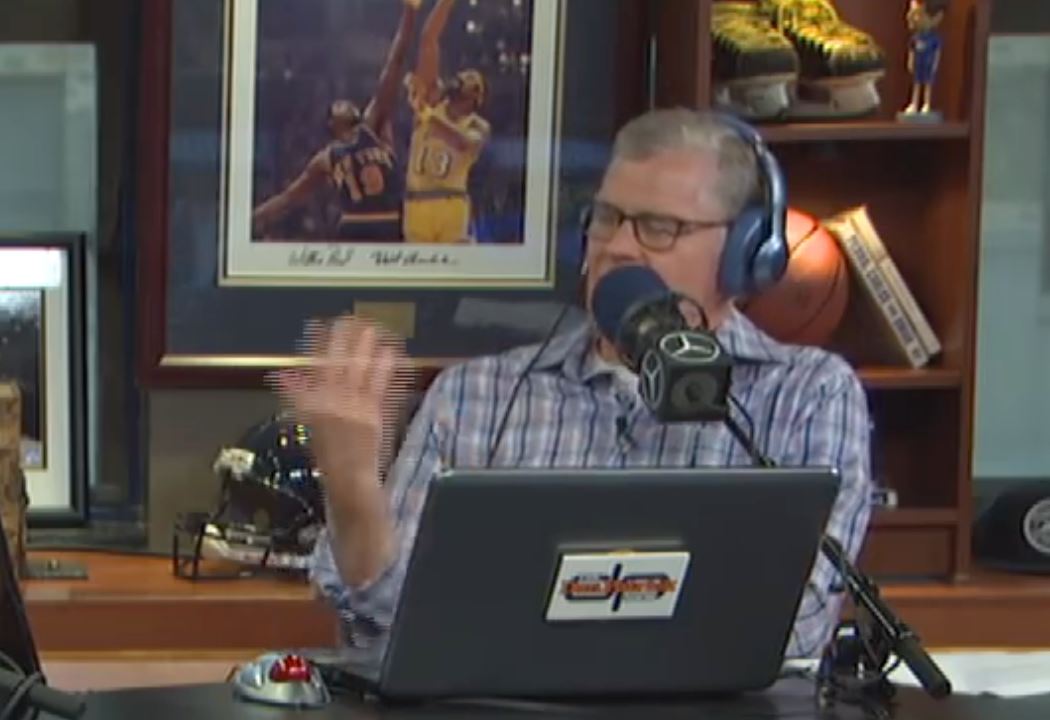
When working with DV footage back in the day, the artifacts seen in the speaker’s hand in Figure 1 was a frequent problem. However, this video was shot in 2018 in an interlaced mode for television distribution, and whoever produced it for the web didn’t de-interlace.
 Figure 1. Deinterlacing artifacts create two hands.
Let’s take a step back. Figure 2 is a frame from an excellent tutorial by Sony that distinguishes between interlaced and progressive formats. The figure defines interlacing, which involves two fields shot 1/60th of a second apart (for NTSC, 1/25 for PAL). Each field contains 1/2 of the scan lines from the video file, the first field the odd lines, the second field the even lines.
Figure 2. A Sony tutorial showing how two fields create a single frame.
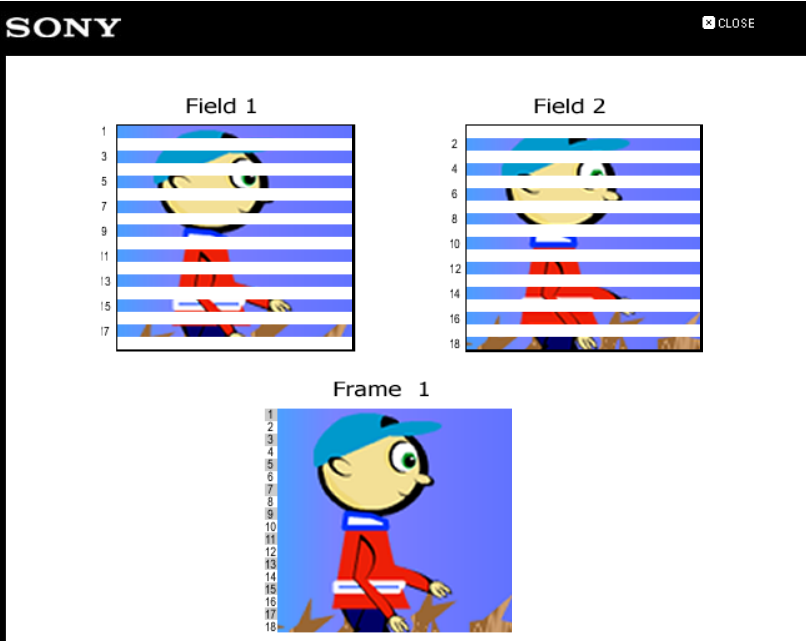
When displayed on an analog TV set, each field is displayed in sequence, so you’re actually seeing 60 impressions per second for NTSC, 50 for PAL, which enhances smoothness. However, computers can’t display interlaced video, they can only display complete frames. So, whenever you output for streaming, you have to combine the fields into a single frame.
However, the fields are not shot at the same time; they’re shot either 1/60th or 1/50th a second apart. When there is substantial motion during that period, as there was in Figures 1 and 3, you see interlacing artifacts.
Deinterlacing to the Rescue
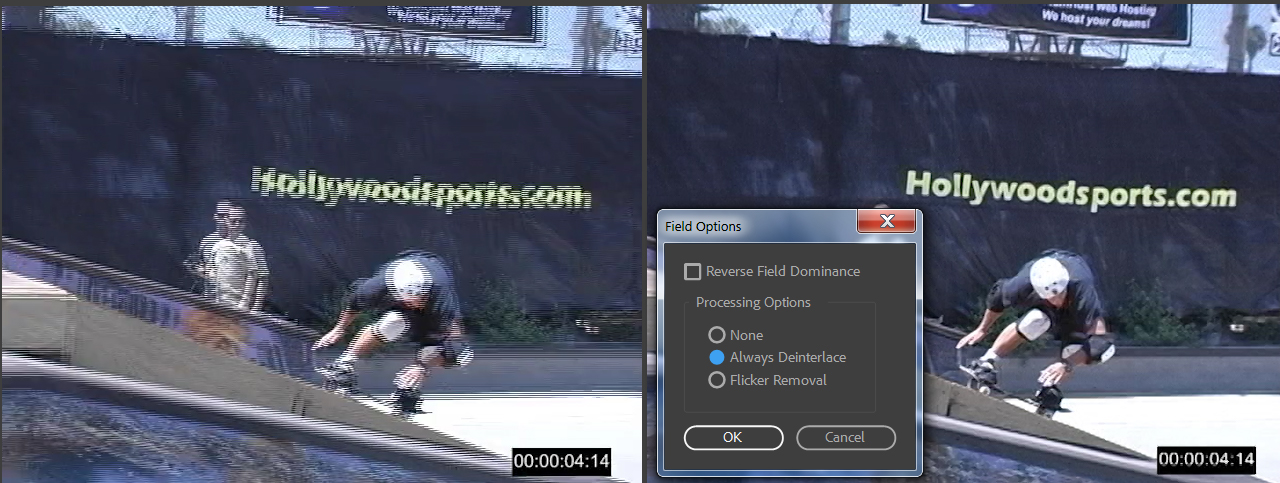
A technique called deinterlacing is the cure and it’s a simple function provided by most editors and/or encoders. On the left, you see the interlaced footage in the Premiere Pro preview window. On the right, you see the Field Options dialog set to Always Deinterlace, which largely resolves the problem. In Handbrake, there’s a Filters tab that offers two options (Decomb and the preferred Yadif, for Yet Another De-Interlacing Filter).
Figure 3. Deinterlacing in Adobe Premiere Pro.
There are multiple de-interlacers in FFmpeg; the one I use is the YADIF filter. If you were using the filter solo, here’s the command string.
ffmpeg -i int_source -vf yadif deint_output.mp4
There are no parameters, just name the filter.
Aspect Ratio Issues – You Have a Problem When Tiger Looks Fat
Interlacing issues can arise whenever you work with interlaced source footage. When working with DV source footage, which can be progressive or interlaced, but usually was the latter, you also have to deal with a different issue; a fundamental pixel aspect ratio mismatch between the source footage and the streaming output.
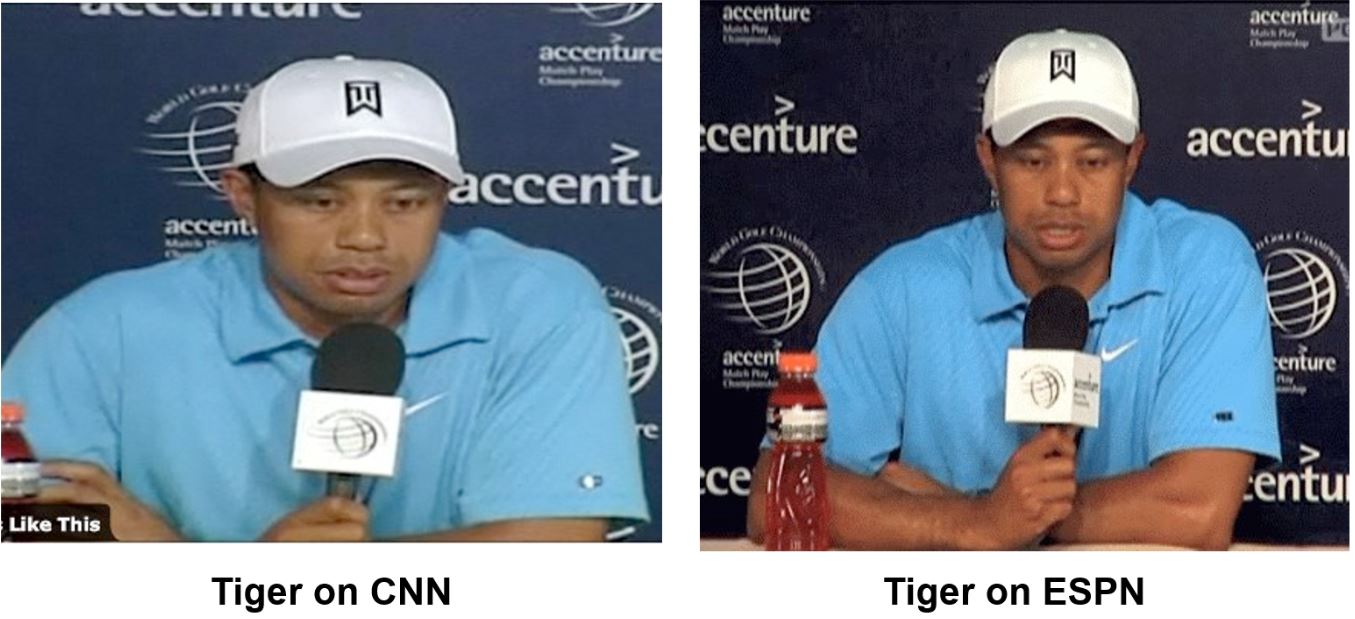
You know you have a problem when your video looks about 10% wider than it should, as it does in the CNN video shown on the left in Figure 4. Both networks displayed roughly the same video, but you can see that the CNN video is distorted. For some reason, it took CNN, in particular, a very long time to diagnose and fix this problem.
Figure 4. Aspect ratio problems on CNN in 2010.
Down the Aspect Ratio Rabbit Hole
It all goes back to two aspect ratios, pixel aspect ratio, and display aspect ratio. Let’s go back to 1996 and the launch of the first DV cameras. TVs were analog and could display pixels that weren’t square, causing a fundamental mismatch between the pixel aspect ratio used by TVs and computers. You can see this in Figure 5, where the video had a pixel aspect ratio of 0.900 and a display aspect ratio of 4:3.
Figure 5. 4:3 videos had an aspect ratio of 0.900.
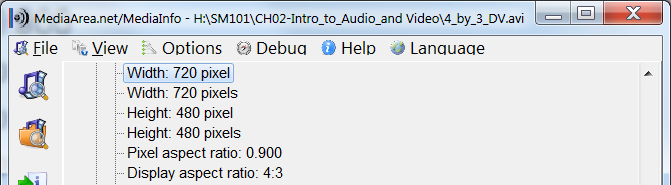
A pixel aspect ratio of 0.900 means that you have to shrink the horizontal display resolution to 90% of the original when displaying the file. If you multiply 720 x .900 you get 648, which means that the correct resolution to display this file is 648×480. This gets adjusted to 640×480 in practice for technical reasons I won’t get into (see here for an explanation of Mod16). Moreover, when displaying the file, you would shrink the horizontal resolution from 720×480 to 640×480 as opposed to cropping the left and right edges of the file.
The display aspect ratio is the ratio of horizontal and vertical pixels in the displayed file. Since the file will be displayed at 640×480, the display aspect ratio is 4:3, because if you divide the width and height by 160, you get 4:3. Note that 720×480 isn’t 4:3, it’s 4:2.66. So, the only way to get to a 4:3 display aspect ratio from a 720×480 source file is to shrink the horizontal pixels, which analog TVs automatically do.
Recognizing the Problem
Problems resulted when DV footage shot in 4:3 mode was displayed at 720×480 resolution on computers. As mentioned, in the late 90’s when DV cameras launched, most videos were displayed on analog television sets that could squeeze or elongate a pixel to display the appropriate pixel aspect ratio. So, you could send a 720×480 signal to an analog TV set, identify the pixel aspect ratio, and the television would display it correctly.
However, every pixel on a digital display is square, or 1:1. Though computers can’t display a horizontally adjusted pixel, they can scale videos to the proper resolution before display. However, problems like that shown in Figure 4 appeared when producers encoded files at 720×480 resolution without signaling to the player to shrink the video to 90% of its original width before display. That is, they produced the 720×480 file with a pixel aspect ratio of 1.0, not 0.900.
Fixing Aspect Ratio Issues
Fixing this problem is simple once recognized. First, you have to change the file resolution to the appropriate target using the display aspect ratio (DAR) as a guide. So, if the DAR is 4:3, the target resolution should be 640×480, 480×360, 320×240, or some other 4:3 resolution. If the DAR is 16:9, your target should be 854×480, 640×360, or some other 16:9 resolution. Second, you have to change the pixel aspect ratio from .9 to 1, or square pixels.
One of the clearest interfaces for doing this is again the Adobe Media Encoder, so I’ll show you there (Figure 5). Note that on the right, I’ve configured the width as 640×480, a change from 720×480 that required me to deselect the little toggle on the right of the resolution that maintained the aspect ratio of the video. Then, I had to select Square Pixel (1.0) output, which is almost always the right answer when outputting for computer display. Finally, on the upper left, I had to choose Scale to Fill to reduce the slight letterboxing around the video.
Figure 5. Converting to 4:3 square pixel output. Click the figure to view it at full resolution.

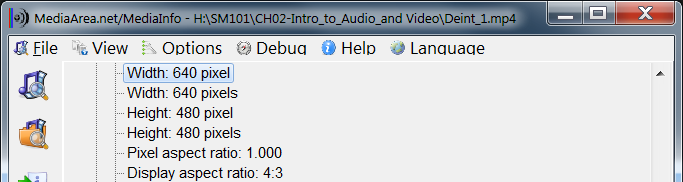
This produces a file with the following characteristics; 640×480 resolution, pixel aspect ratio of 1.0, and a display aspect ratio of 4:3. If you were working with a 16:9 DV file, you would typically choose 854×480 or 640×360 resolution and again square pixels.
Figure 6. This file will look normal when displayed on a computer monitor, phone, or Smart TV.
Fixing the Problem in FFmpeg
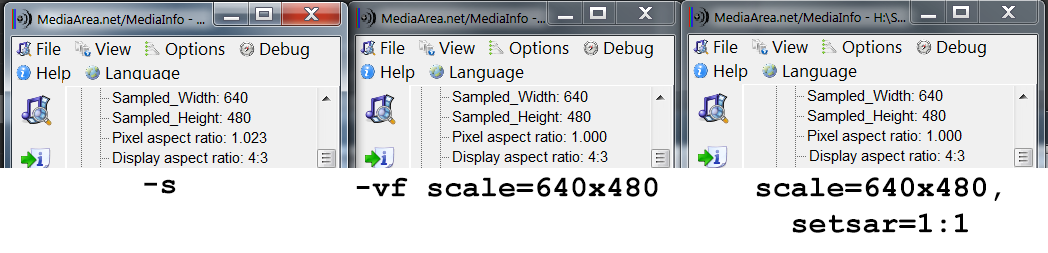
If you’re rendering DV footage with FFmpeg, you have (at least) the three alternatives shown below. To test these, I ran the following encodes on the same DV 4:3 source footage.
ffmpeg -i DVinput.mov -s 640x480 sq_output.mp4
 ffmpeg -i DVinput.mov -vf scale=640x480 sq_output.mp4
 ffmpeg -i DVinput.mov -vf scale=640x480,setsar=1:1 sq_output.mp4
Figure 7 shows the outputs of the three approaches. The -s switch came close to the correct answer, changing the aspect ratio to 1.023 and hitting the target resolution and display aspect ratio. You probably couldn’t tell the difference between this file and the other two, but obviously, the second and third approaches nailed the aspect ratio exactly.
The latter two were identical in MediaInfo and had the same exact file size, so I’m not sure if the setsar switch adds anything, though this seems to be the recommended approach. If was doing this for a client or in my own production, I would use the third approach.
Figure 7. The three approaches to scaling and the results. Click to view at full resolution.
Scaling and Deinterlacing
If you were scaling and deinterlacing, here’s the command string.
ffmpeg -i int_source.mov -vf scale=640x480,setsar=1:1,yadif deint_output.mp4
This shows the proper form for using multiple filters, which is a single -vf to call all filters, and then list each filter and its parameter, separated by a comma. See here for more details.
-vf effect=parameter,nexteffect=parameter,nexteffect=parameter
FFmpeg implements the filters in the order listed, so in the second string we are scaling, then adjusting the aspect ratio (really just a notation in the file header) and then deinterlacing. If there were residual artifacts, which there weren’t in my tests, you could try deinterlacing first a
Resource:

Learn to Produce Video With FFmpeg in 30 Minutes or Less:2018 Edition teaches you how to encode videos from a single file to ABR packages for HLS and DASH using FFmpeg, Bento4, and Apple’s HLS tools. Covers all critical encoding parameters (bitrate control, resolution, GOP size, B-frame, etc for x264, VP9, and x265) and includes instruction on the optimal encoding parameters from one of the most respected compression authorities around.
All batch files shown in the book can be downloaded for immediate use.
Eliminate the searching and trial and error and get it done right the first time.


Which book is this going into? 🙂
Next version of this one- http://www.streaminglearningcenter.com/learnffmpeg – which is going to be awhile. This edition just finished a couple of weeks ago.
Thanks for your interest.
Jan