Streaming Learning Center Where Streaming Professionals Learn to Excel


Related Articles


This article describes how to buy a light kit for live streaming, webinars, and web conferences. It was derived from a lesson in my Live Streaming Bootcamp course, which teaches you the skills and techniques that optimize the quality of your webinars and live streams. Click here for more detail on the course.
Lighting is the single most important determinant of video quality. Fortunately, the cost of quality lighting gear has plummeted over the last few years, so with a little bit of knowledge, which I’ll supply here, and a very modest budget, you can provide great lighting for your web conferences, webinars, and presentations.
Contents
Lighting Theory
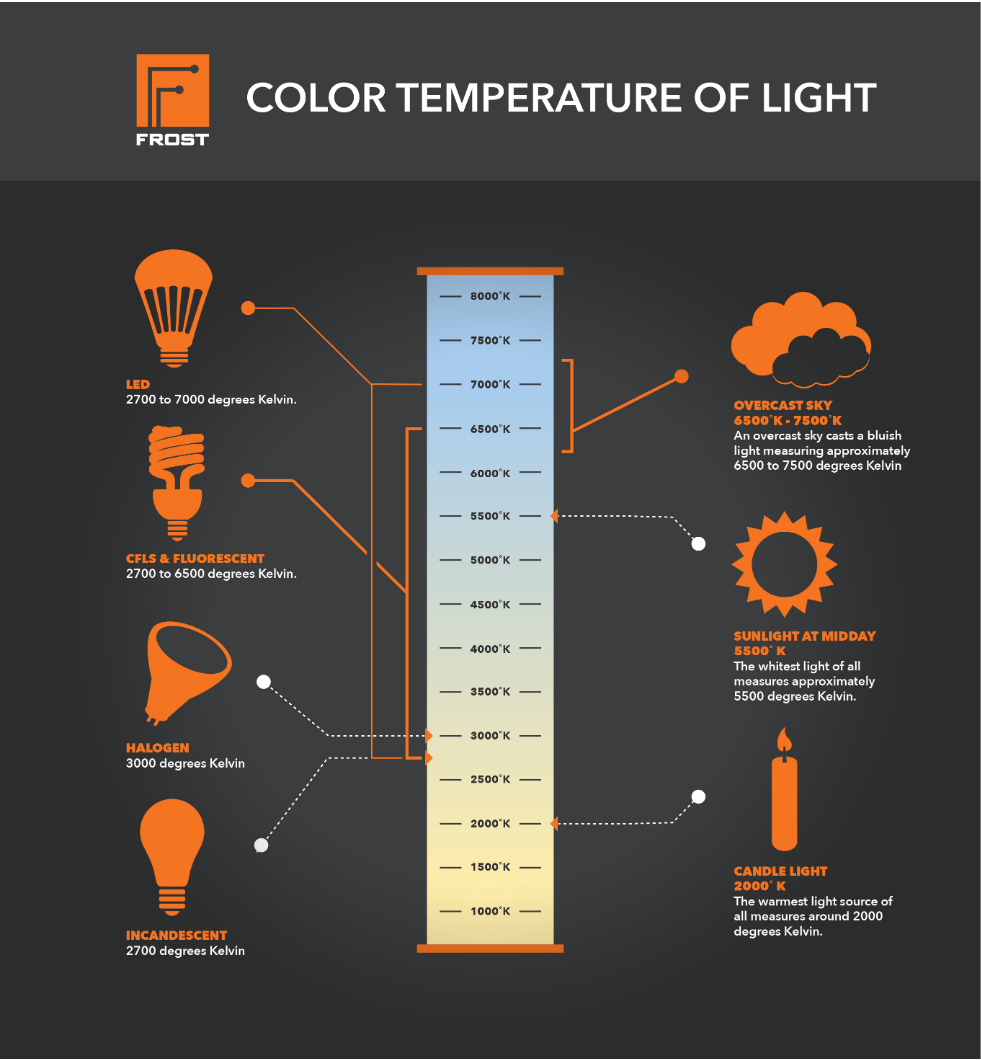
There are two factors to consider when buying lighting gear. The first is color temperature.
All light bulbs have a color temperature defined on the Kelvin scale (Figure 1). These range from “warm” light sources like candles and incandescent bulbs to cooler temperatures typically delivered via fluorescent, compact fluorescent (CFL) or LED lights. If you’re a filmmaker, you might choose a color temperature to set a mood or create an impression. However, if you’re shooting for business use your primary concern is to make sure that all light sources share the same color temperature. Otherwise, you won’t be able to white balance effectively and a portion of your frame could be off-hue.
Fortunately, this shouldn’t be an issue for most producers because incandescent lighting fixtures with really warm tones are no longer prevalent. Most offices use fluorescent lighting in the 4000K – 5600K range and so long as you supplement this with bulbs of similar color temperatures you should be in good shape. As shown in the Figure, you can buy CFL, fluorescent, and LED bulbs in multiple color temperatures. If you’re buying a light kit to work with existing office lights, identify the color temperature of the bulbs you’ll be matching before you purchase.
Color Rendering Index
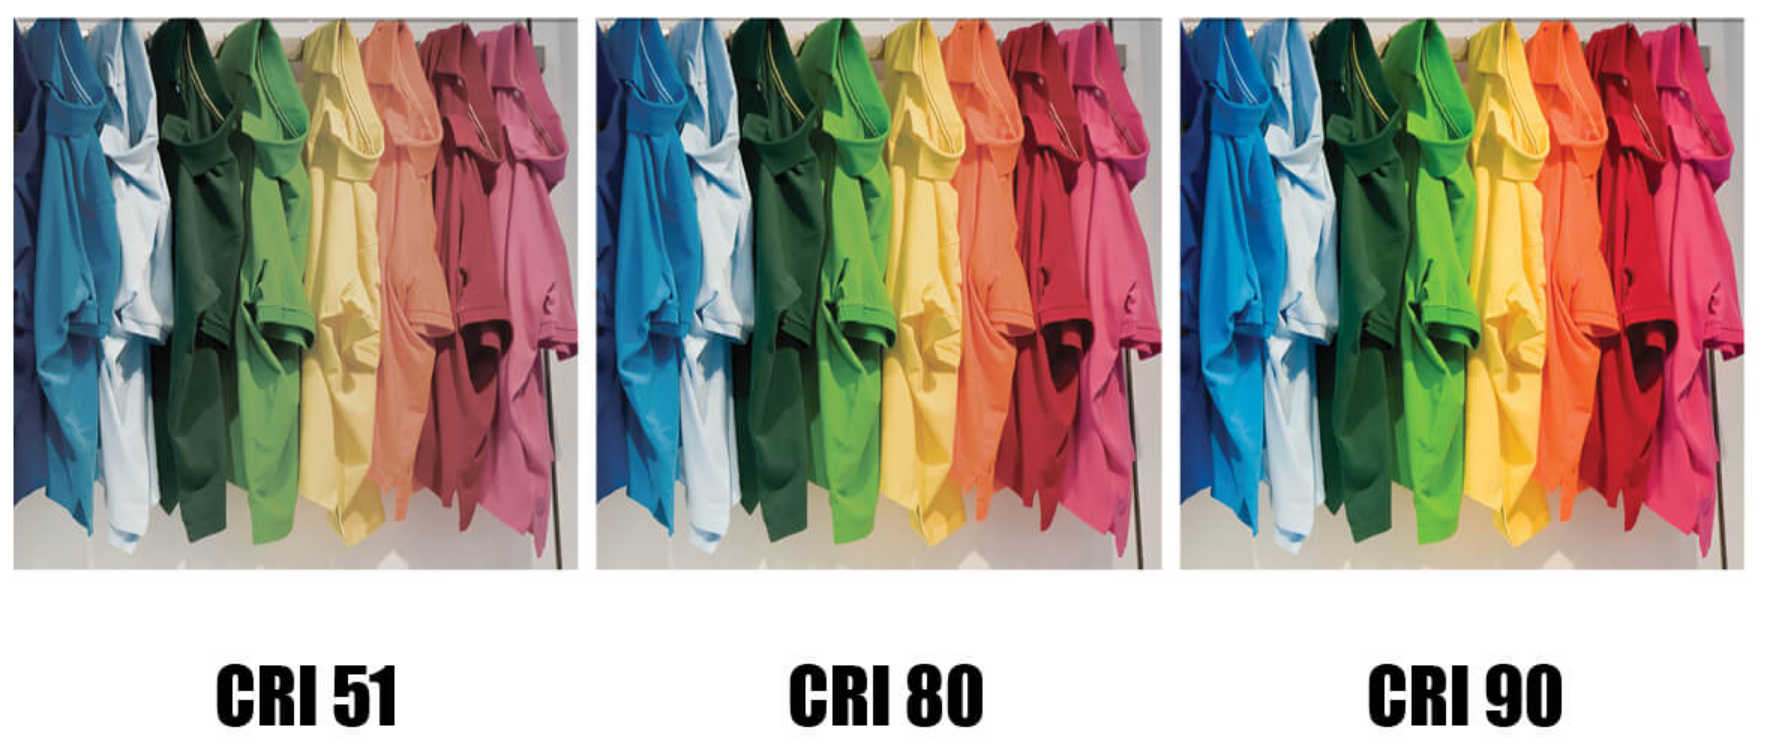
The other bulb-related feature is the Color Rendering Index (CRI) score which measures the ability of an artificial light source to accurately reveal colors in comparison with a natural light source. Higher scores are better than lower scores, with a score of 80 deemed acceptable and 90 considered “high-CRI.”
You see the impact in Figure 2; as the CRI increases the colors get more vivid. The bottom line is that whenever you buy a light kit or light bulb, you should track down the CRI value, and make sure it’s as high as possible.
Lighting Implements
With these basics in place, let’s look at how affordable lighting has evolved over the years. Back around 2005 or so, most light fixtures were incandescent, like the Lowel Tota Lite shown in Figure 3 (now available as an LED). These smallish fixtures used tungsten incandescent bulbs that generated intense light but also intense heat. Think back to shop lights you might have used during that time period and you get the idea.
Incandescent bulbs have a fixed color temperature that you could only change by applying a gel, essentially a colored piece of thin plastic, over the light fixture. You also typically had to diffuse the light with some kind of material or fixture; otherwise, the light was too strong and harsh. Overall, the power of these lights made them a great light source, but the heat made them very hard to work with. Today, few if any light kits use incandescent bulbs.
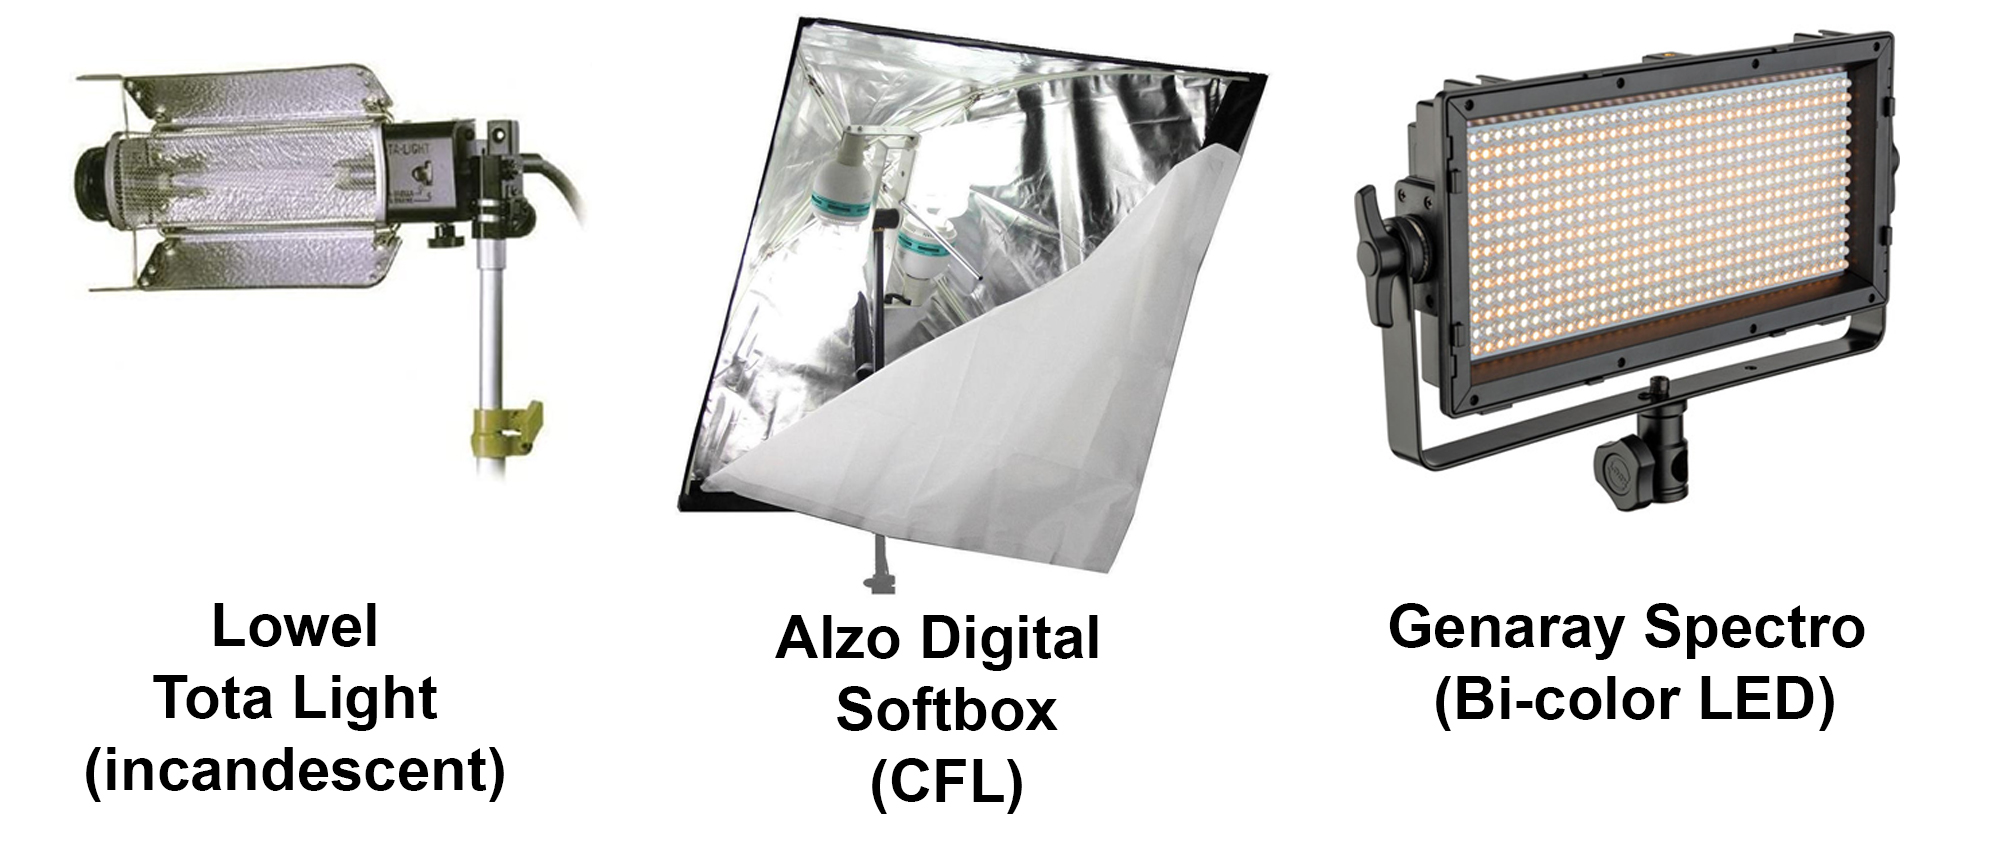
Next up were compact fluorescent fixtures which included the bulb (shown in the middle of the softbox) and a softbox to focus and soften the light. These implements were much larger than incandescent fixtures but generated much less light and, fortunately, much less heat. The softboxes were cumbersome and top-heavy on their stands, so they tended to fall over if accidentally pushed, and had to be placed closer to the subject because of the comparatively weak output.
Like incandescent bulbs, CFL bulbs have a fixed color temperature, but the sheer size of the softbox complicated applying gels. The light was also hard to direct because it’s very difficult to apply fixtures like the barn doors shown on the Tota Light to a softbox. While there still are many kits that use CFL bulbs and softboxes, LED lights are taking over.
Though not as powerful as incandescent, LED lighting fixtures are much smaller than CFL fixtures and more rigid, which simplifies attaching gels and barn doors if needed. They’re also less cumbersome than softboxes and less easy to tip over.
LED lights all have a single color temperature, but by combining both 3200K and 5600K bulbs on a single fixture, you can dial in any color temperature between the two by adjusting the relative intensity of the different colored bulbs. That’s why you see both orange and white bulbs in the Genaray Spectro shown on the right in Figure 3. The downside of this approach is that you split the bulb strength and the amount of generated light. That is, if you bought a 500 lamp fixture with a 5600K temperature, you would get twice the output of a fixture that mixed 250 3200K and 250 5600K bulbs.
With LED lights, the number of bulbs roughly translates to the intensity that each fixture produces. As you’ll see, the lights you’ll consider to boost your webcam image feature 60 – 70 bulbs, which should be plenty because the light will be so close to your face. Larger lights for traditional shoots will typically include 480 – 1000 bulbs.
With these basics covered, let’s look at two very common lighting scenarios for businesses.
Webcam Lighting
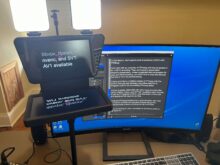
One common scenario relates to webcam use for conferencing or webinars. If you’re in an office, you probably have fluorescent light fixtures on the ceiling. Using this light alone can lead to the “forehead looks fine but the lower face is too dark” look on the left in Figure 4.

On the right, I’ve boosted the light with a 160 bulb 5600 LED lamp that’s probably just a touch too hot on my forehead but does a great job illuminating the bottom of my face, providing additional detail to the webcam encoder that will help the image stay crisp after compression. This is the setup I use for all my video meetings and webinars. The light is a Neewer CN-160 on-camera LED lamp that I’ve repurposed for webcam use by mounting it on a small tripod behind my 4K HP monitor. If you already have a battery-powered on-camera light, perhaps you can do the same.
Otherwise, there are multiple solutions you can use to achieve the same effect (Figure 5). On the left in Figure 5 is the Pixel G1s RGB Video Light with Tripod. This USB-powered unit comes with 70 LEDs that you can adjust to temperatures ranging from 2500K to 8500K with infinitely adjustable brightness.
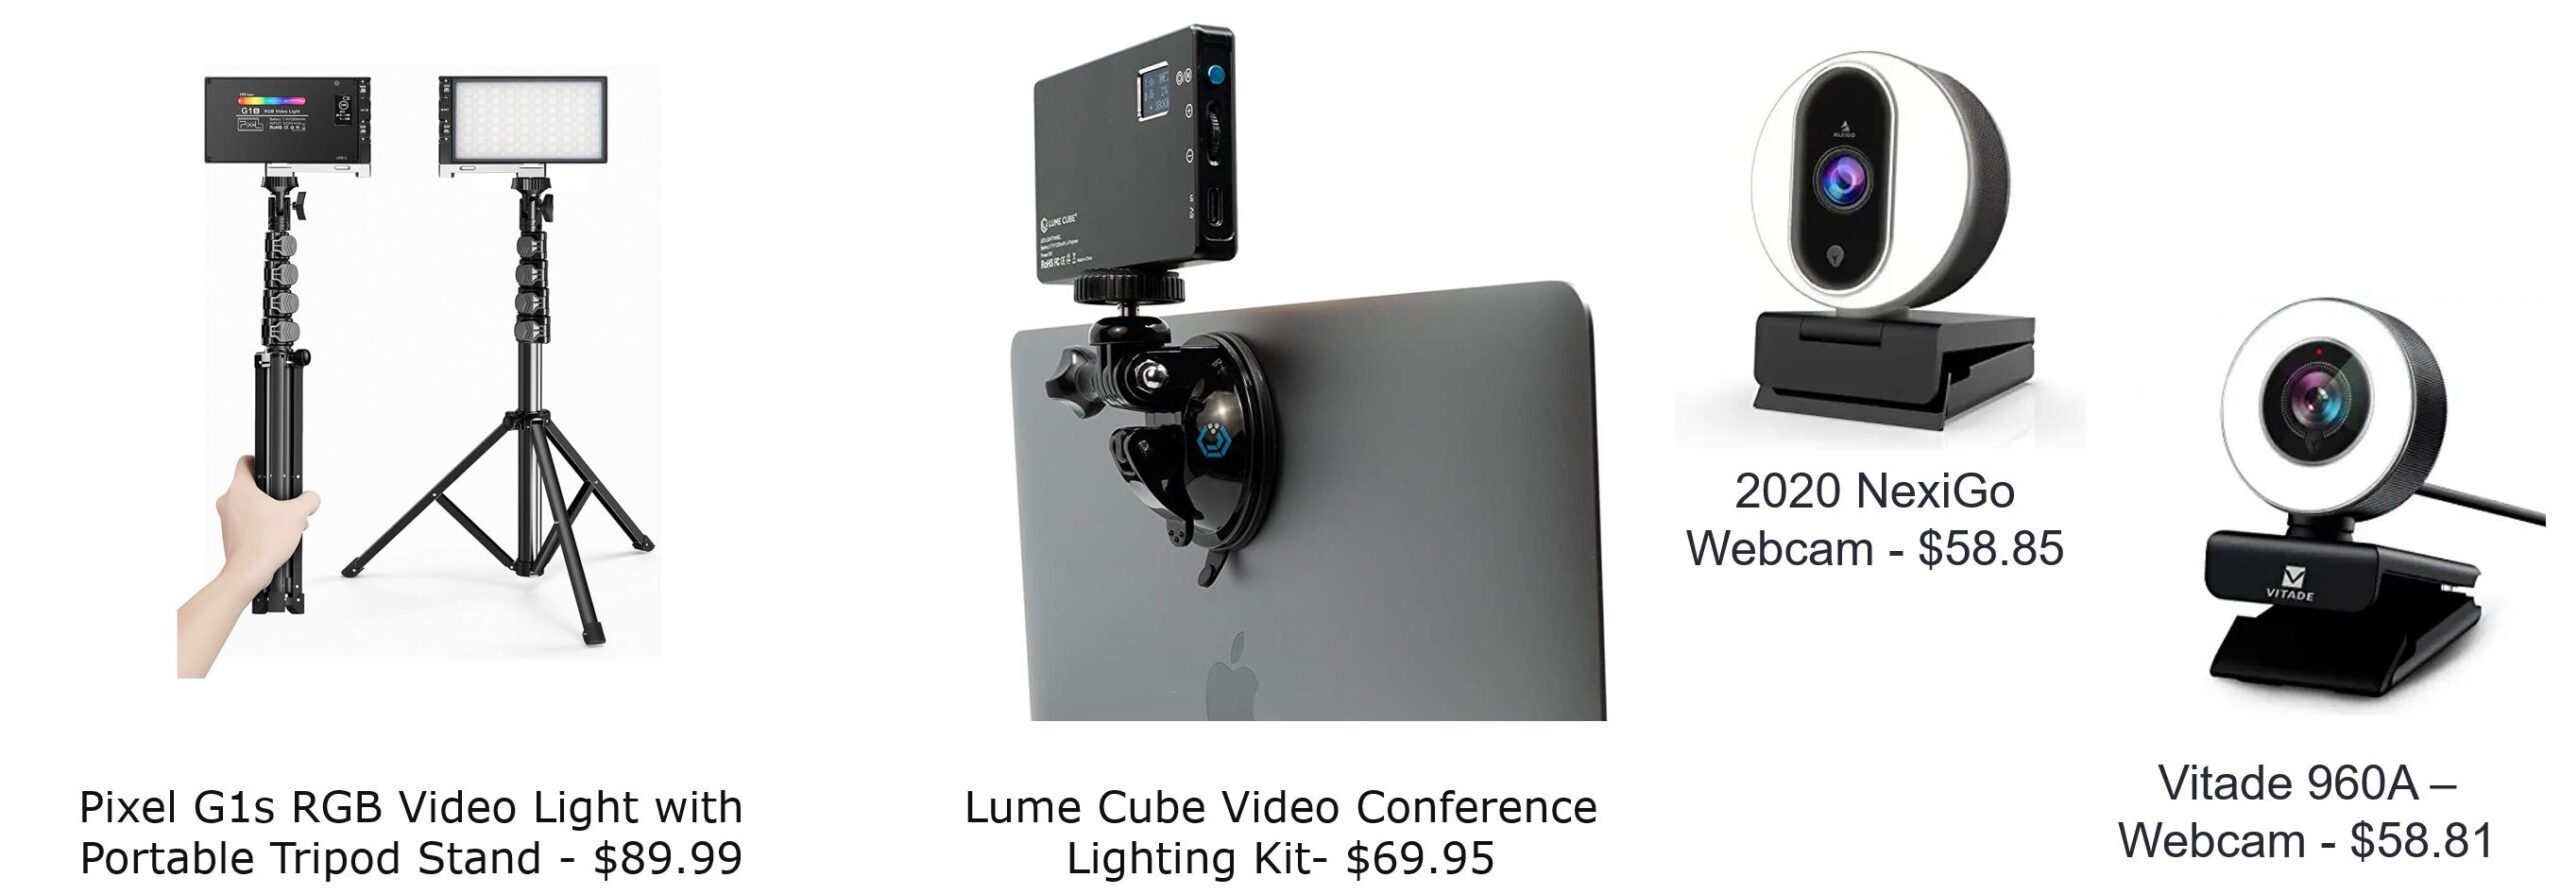
In the middle of Figure 5 is the Lume Cube which attaches to your notebook via a suction cup. The unit has 60 LEDs that you can adjust between 3200k — 5600k. Or, if you’re not happy with your current webcam, you see two webcams with integrated lights on the right. There are also many ring lights originally designed for smartphone use that you can repurpose behind your webcam.
Whatever the light you choose, if you’re looking for a light to augment your existing webcam, make sure that it extends high enough for your setup. I use a standing desk with a large 4K monitor, so I need a light that’s about 27”high from my desk. While the Pixel G1S light shown in Figure 5 can extend this high several other similar products max out at about 11 inches, which is way too short.
In all cases, you’ll want a light that has infinite brightness adjustments as opposed to three or four steps. If you’ll be broadcasting from multiple locations and lighting conditions, you’ll probably want a dual-color LED unit so you can dial in the necessary color temperature. If you’ll be broadcasting from a single location, be sure to get a unit that matches the color location there.
Most units will come with some kind of frosted diffuser that you can slide in to soften the light from the individual bulbs, which is necessary since it will be within 2-3 feet of your face. Finally, consider how the unit is powered, with USB power a nice convenience and battery-powered operation essential.
Other Kits
Once you transition from webcam to camcorder or DSLR there are dozens of different lighting techniques that require anywhere from 1 – 3 lights or more, depending upon how many subjects that you’re lighting and whether you’re lighting the background as well as the subjects. Beyond the items that we’ve already discussed, like the number of bulbs, color temperature, and CRI, here are some additional factors to consider.
Using the Neewer kit shown in Figure 6 as a reference, note the barn doors on the light fixtures which can be useful when you need to focus the light. Note also that these units can be battery-powered as well as AC-powered, which can be convenient for some shoots. Another consideration is noise; if the lights have a fan, it may be too noisy for video shots, a factor Amazon or other reviews will typically disclose. Also check reviews for the sturdiness of the light stands; if too flimsy, you may want to consider buying some sandbags or other weights to steady the stand.
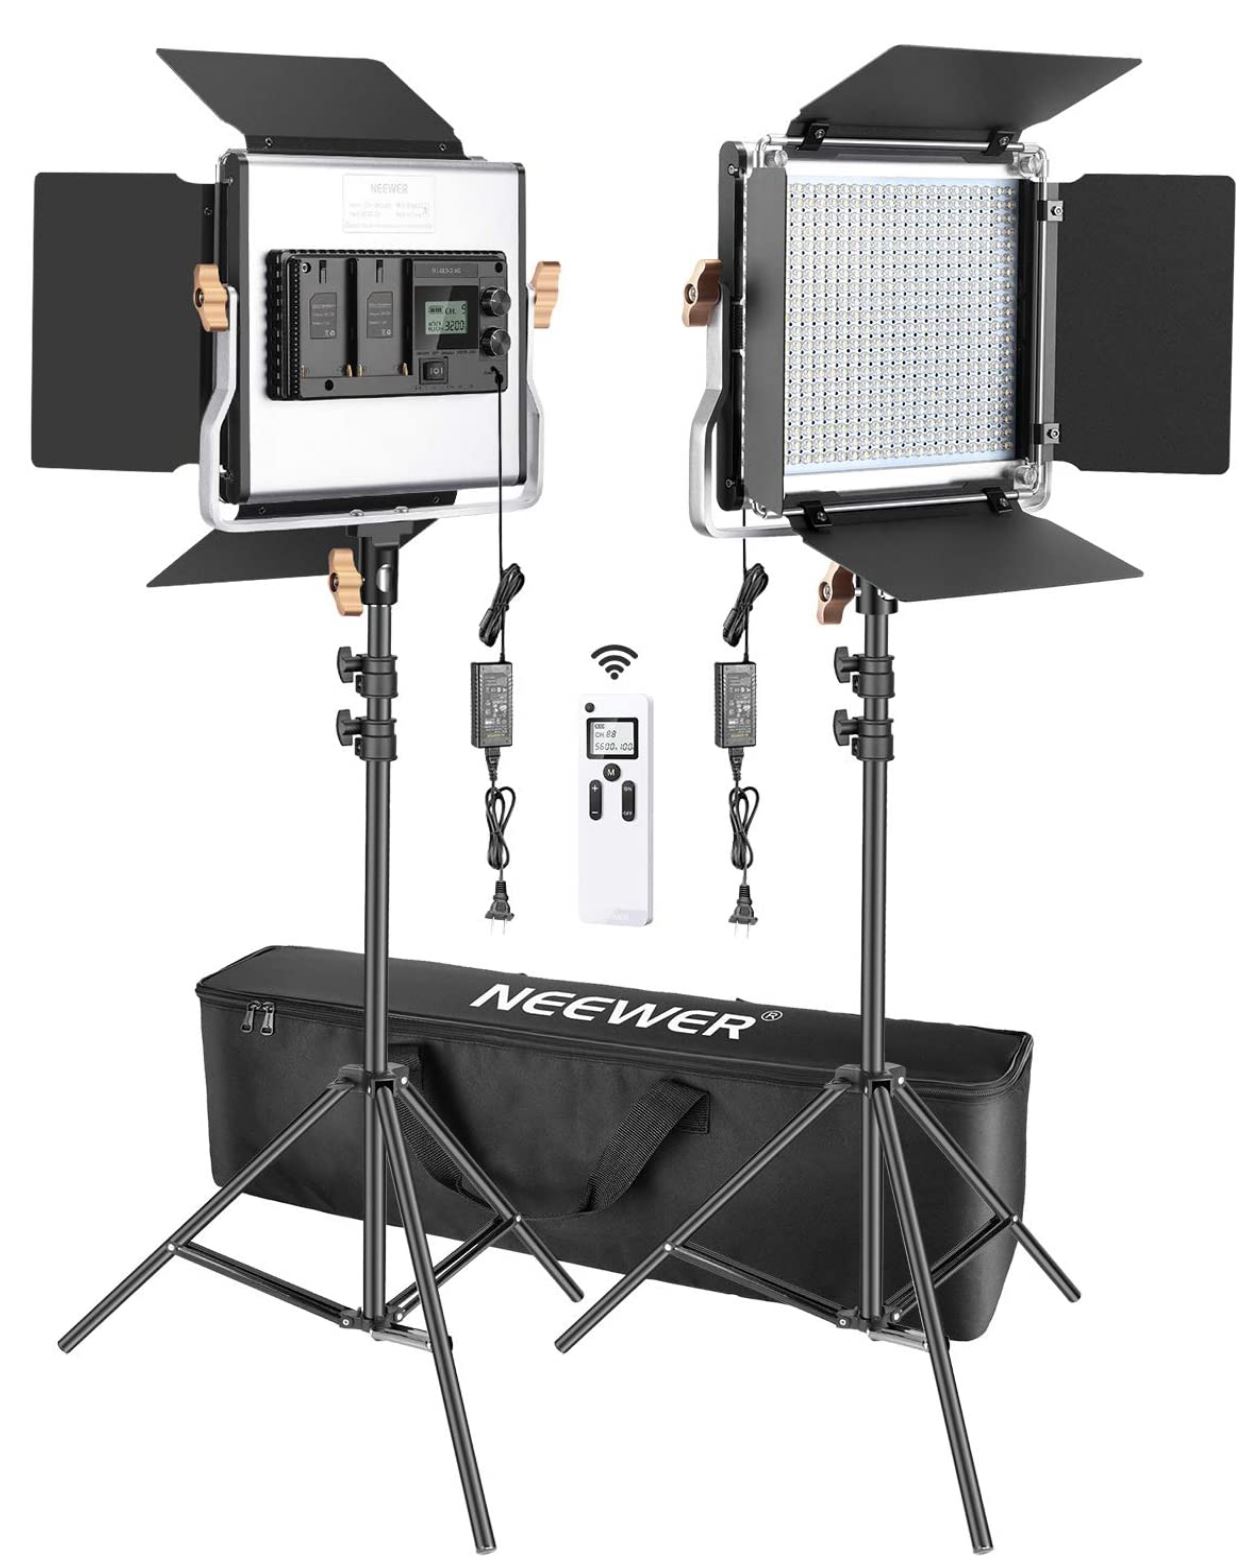
If you’re lighting yourself, the ability to adjust the lights remotely can save a bunch of time and irritation. Some units, like the Neewer lights in Figure 6, come with a standalone remote, others do this via apps. Also shown is the carrying case, a convenience for storage, and if you’ll be carrying the lights to remote locations.
Summary
For your convenience, here are some questions to ask before buying any LED light kit. Once you answer all these questions, you should be in a great position to buy the perfect light kit for your video shoots.
- What is the color temperature of existing lights (if applicable)
- What is the color temperature of the bulbs?
- What is the CRI value? Shoot for 90 or higher.
- How many bulbs? 40 – 70 should work well for a webcam light, 150 – 200 for an on-camera light, but you’ll need 450+ for a decent standalone light particularly if it has an adjustable color temperature.
- Does the fixture come with a diffuser? This is necessary to soften the light and to prevent multiple shadows from different bulbs.
- Do you have infinite control over intensity or just a few stops?
- Can you control the lights via remote control or app on your mobile phone?
- Do the lights have barn doors or similar implements for focusing the light?
- Can the lights be operated by battery and AC?
- Are the lights noisy?