Streaming Learning Center Where Streaming Professionals Learn to Excel

Related Articles


Reaching multiple viewing platforms with a single live video stream used to be impossible, but not anymore. Here’s how to do it with Switchboard Cloud.
Live content can be extremely engaging, and oftentimes, the more you spread it around, the better. This means streaming to accounts you have access to, and also to accounts controlled by partners, stakeholders, and others who want to share your content with their audiences.
On its face, the concept of streaming to multiple disparate accounts sounds fabulous, but also technically complex, if not impossible. In truth, it was both for most producers until the last couple of years. Today, using a service aptly called Switchboard Cloud, it’s actually quite simple and even inexpensive. In this tutorial, you’ll learn how to mix multiple live streaming inputs and send them to multiple outputs via Switchboard Cloud.
To demonstrate, I’ll use a scenario from Streaming Media East, where conference sessions were shot at several locations and interviews shot at another. To simulate this, I’ll have two encoders running and sending a stream into Switchboard Cloud, one from a session, the other from an interview. To distribute the feeds, you’ll learn how to switch between the two sources and send them to different live streaming services, including Facebook Live, YouTube Live, and others.
By way of background, operating Switchboard involves four basic concepts: streams, workflows, destinations, and templates (see Figure 1). Streams are incoming videos, which can come from any streaming source that can output an RTMP stream, including an on-camera encoder, live video switcher, or encoding appliance. Destinations are your various live streaming outputs, which can include Facebook Live, YouTube Live, Periscope, and any RTMP-defined destination.
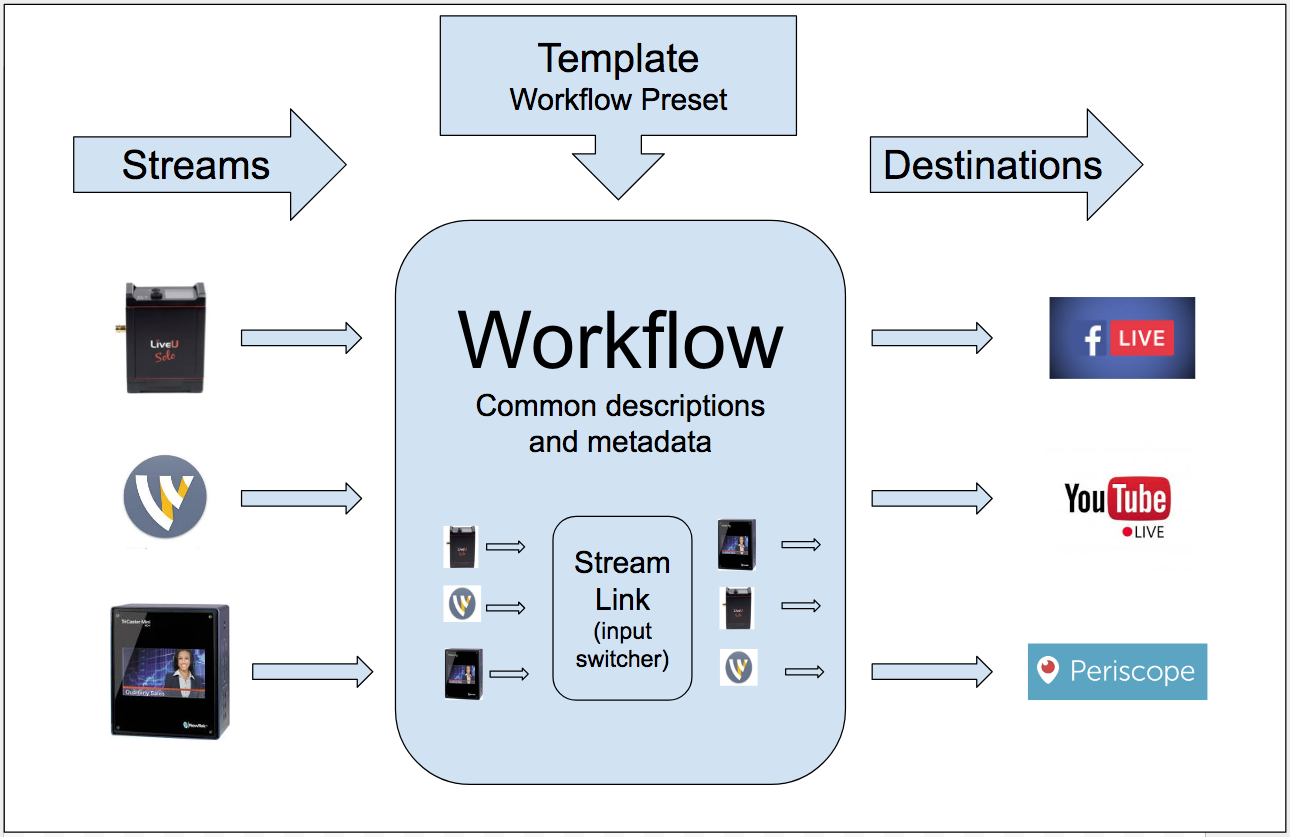
Figure 1. This shows how Switchboard works and what its operational concepts are
Workflows assign destinations to each incoming stream and inject titles and other metadata into the stream so this data is presented uniformly by the target services. Templates also allow you to control Stream Link, the switcher within Switchboard Cloud, which I’ll explain in a moment. Templates are prebuilt workflows, so you don’t have to build your workflows from scratch each time you go live.
Seven Steps to Switchboard Success
Here’s the step-by-step process to use:
1. Configure the incoming streams. Switchboard works with two kinds of streams: direct inputs from actual encoders, and Stream Link, which are links to incoming streams. As you can see in Figure 2, I’ve configured two direct inputs, interviews on the left and sessions on the right. On the right is a Stream Link input, which can deploy either of the two direct inputs and switch between them.
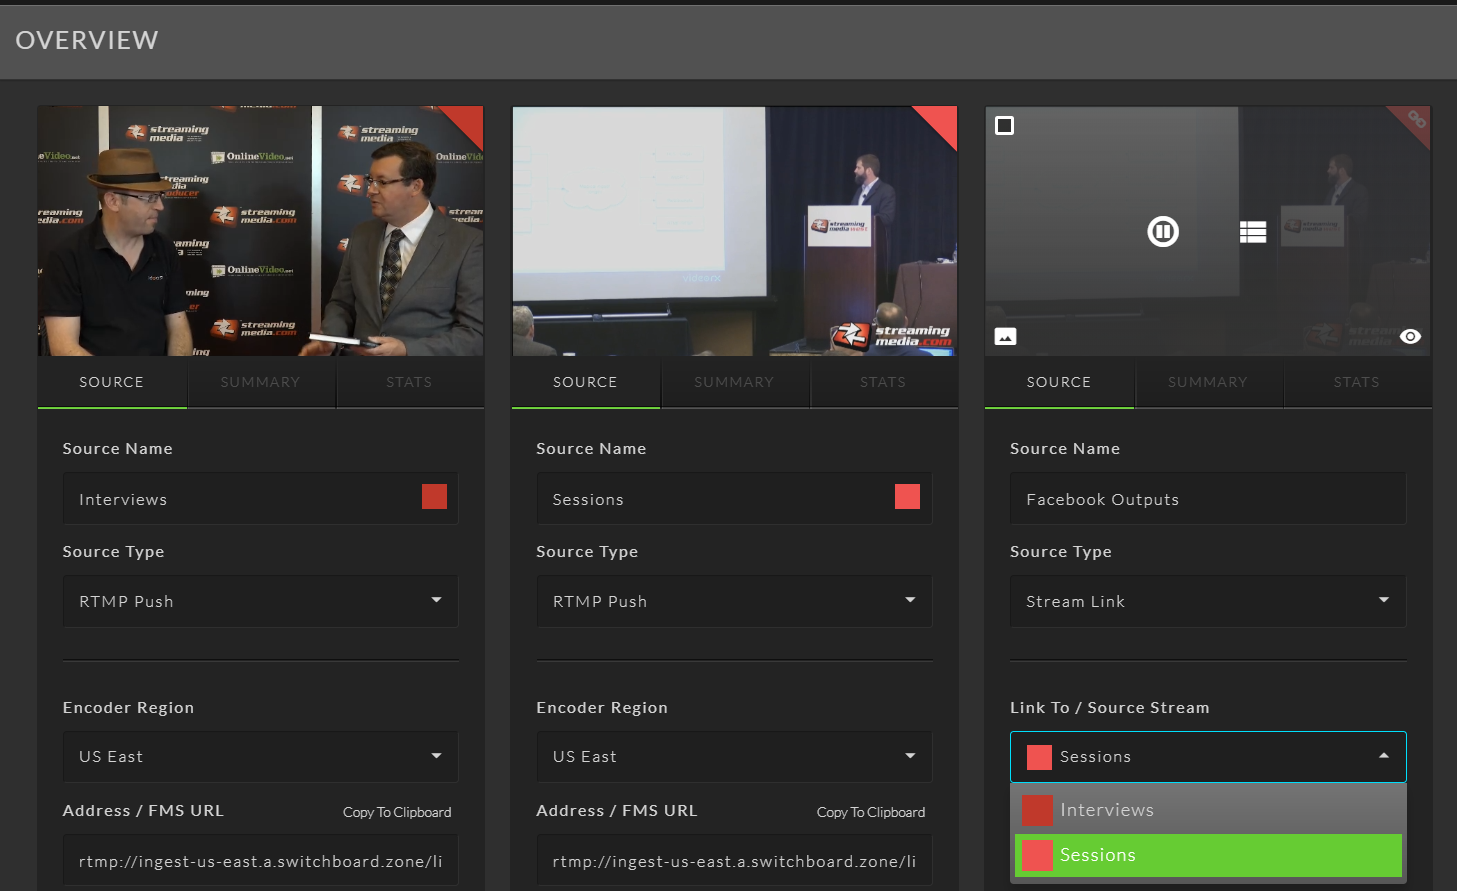
Figure 2. Configuring the input streams. Stream Link is on the right, and can easily switch between Interviews and Sessions.
Stream Links serve two purposes. First, once you assign destinations to a Stream Link stream (which you’ll do in step 2), you can switch inputs very simply, in our case from sessions to interviews. If you assign a destination to a fixed input, either interview or session in our example, then you can’t easily switch the input.
Second, Facebook prohibits streaming products and services that use the Facebook API to stream to Facebook Live using the API while simultaneously streaming to other sites using their APIs. So, if you want to stream the same content to Facebook Live and other services using their APIs, you have to set up two inputs, one via the original and the other via Stream Link, or set up multiple Stream Link sources.
As you can see in both the direct inputs in Figure 1 (Interviews and Sessions), Switchboard Live provides the familiar RTMP address for input, with the stream name just below, but cropped out of the figure for space considerations. As with any streaming destination, you just copy and paste these into your encoder to start streaming to Switchboard Live. Again, on the right is the Stream Link where you can switch between the two live inputs.
2. Configure your destinations. Destinations are the target services, and you can see the target services I’ll be streaming to in Figure 3. There are three types of destinations shown.
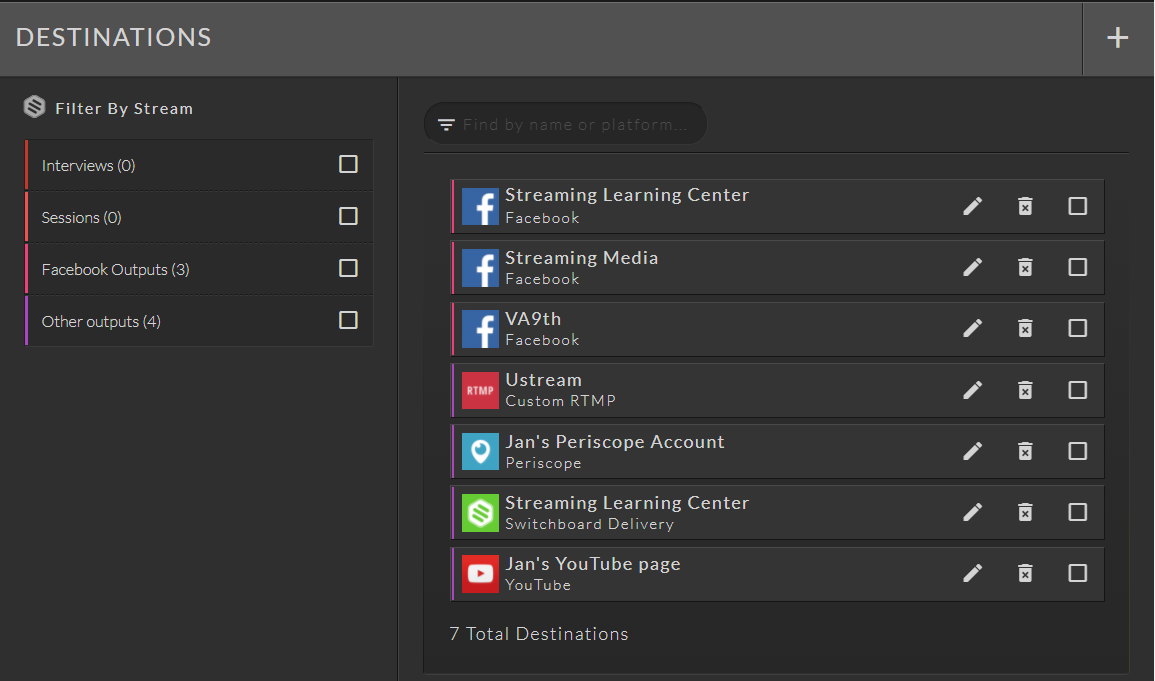
Figure 3. Here are the destinations for our streams.
The Facebook, Periscope, and YouTube accounts are all template-based. You click to select them, log into your account, and give Switchboard the necessary rights. Easy peasy.
The Ustream account is a custom RTMP account that I manually configured by retrieving the RTMP address and stream name from my Ustream account and configuring that into Switchboard. It’s identical to the procedure you would follow if you were streaming directly to Ustream via a separate encoder.
The final destination type is Switchboard Delivery. This type provides an embed code that you use to deploy the player into your own website for HTML5 delivery. Or, you can grab the URL of an HLS master manifest to plug into an existing player deployed on your website or elsewhere.
3. Request third-party destinations. All destinations shown in Figure 3 are accounts we had direct access to. To stream to third-party sites, you add a destination type called Stream Share, which opens the wizard shown in Figure 4. This walks you through the process of describing the event (shown), and then sends an email to the third party. This email contains a link they can click to provide the necessary authorisation to send video to their account, so you can stream to their service without ever seeing their credentials. Once it’s set up, the third-party site appears just like any other destination.
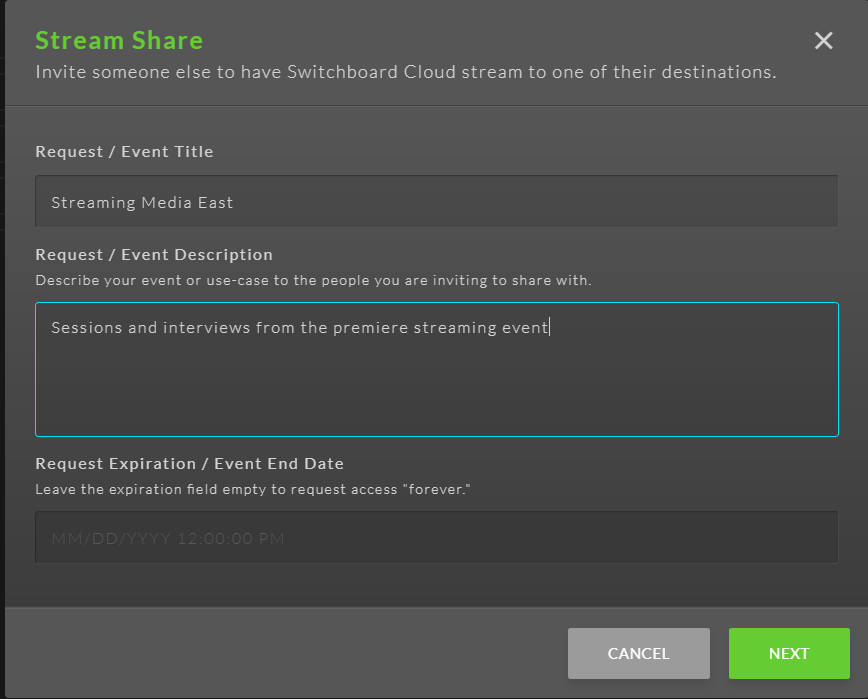
Figure 4. Requesting access to a third-party account
This is an incredibly powerful feature. For example, say you were planning a live interview of a candidate for a political office. Using Stream Share, you could distribute the stream to all Facebook pages of all organisations in the state, or even the country, so long as they gave you permission. This would be impossible for most organisations without a service like Switchboard Live.
4. Create workflow templates. I’ll use two workflows for this event: one for Facebook Live, the second for all other services. The easiest way to do this is to create a template for Facebook Live, then duplicate the template and rename as needed.
I’m creating the template in Figure 5, inserting the title, description, tags, and similar content. This text and metadata will be injected into the similar fields supported by most live streaming services. Once I create the first template, I click the Duplicate icon on the upper right (next to the + sign), then make any changes and save the second template.
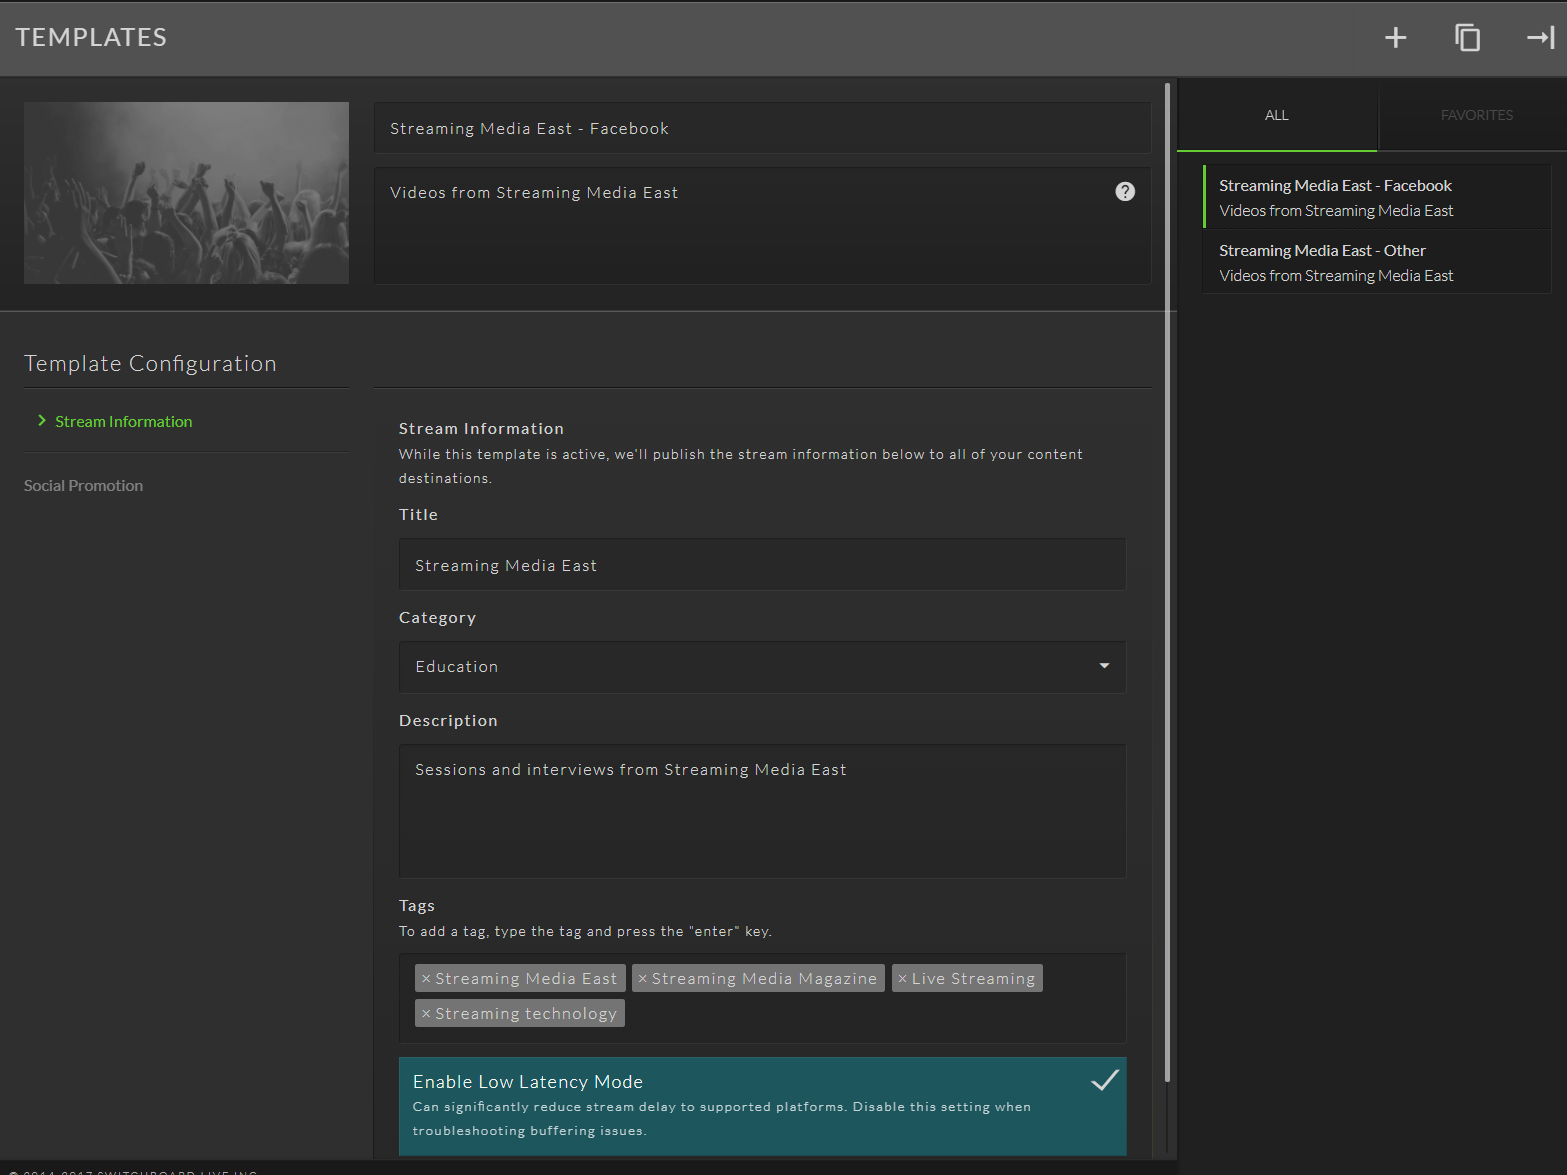
Figure 5. Creating the template for Streaming Media East
Note that you don’t need to create a template; you could enter all this information directly into the workflow. It’s just easier for repetitive use with the template.
5. Create workflows and configure destinations. Every stream has its own workflow, but in this case I’ll only configure two: one for all Facebook Live accounts, the second for all other accounts. I’ll do this and a lot more in the screen shown in Figure 6.
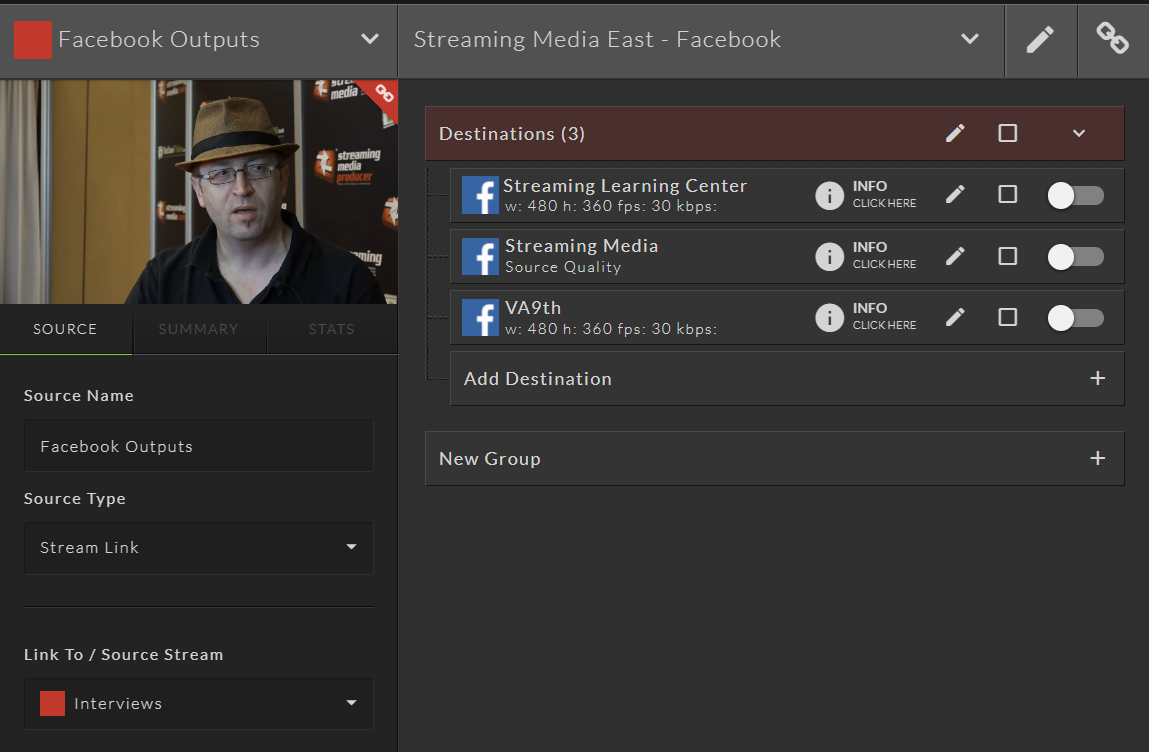
Figure 6. Choosing and configuring destinations
Once I click into this screen, I choose the stream source via the drop-down list shown on the upper left, which currently reads “Facebook Outputs.” This is the Stream Link source shown on the extreme right in Figure 2.
I add destinations by clicking the Add Destination button shown below the three Facebook outputs. As you can see, I’ve configured the three accounts so that the Streaming Media account gets the full source quality, while the other two only get 360p. You access these configuration options by clicking the checkbox on the right of each preset, which also gives you access to controls for uploading and applying a watermark to the video, which is useful when distributing your video to third-party sites.
As you can see, you can create groups of destination sites, which would simplify group operation. For example, you might want to configure sites by time zone so you can enable and disable them as a group. During the event, this is the screen you’ll use to switch the source from the sessions to the interviews, using the drop-down list on the lower left (currently showing “Interviews”).
6. Start streaming and monitoring. You start the live stream via the slider on the right of each destination, either individually or as a group. Once the stream is live, you can click the Info button on each destination to open an info screen with session details like the number of viewers, outbound bandwidth, and the like. You can also access Facebook Insights, which provides the details shown in Figure 7.
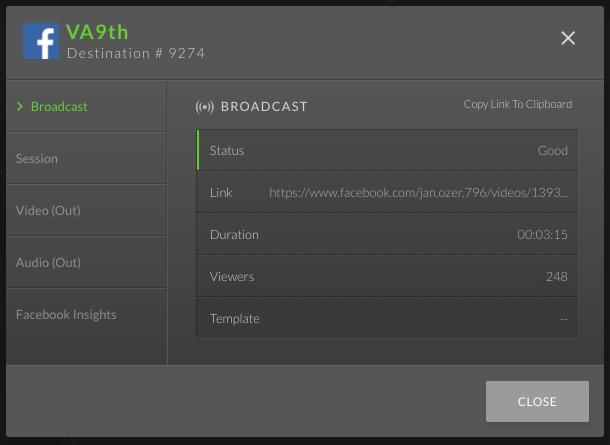
Figure 7. Here are the Facebook Insights for the VA9th page.
Or, you can click the icon for each service as shown on Figure 6, and open the viewing page for the service. Figure 8 shows the Facebook page for the project, and by using the template and workflow, all the text shown will be consistent from service to service.

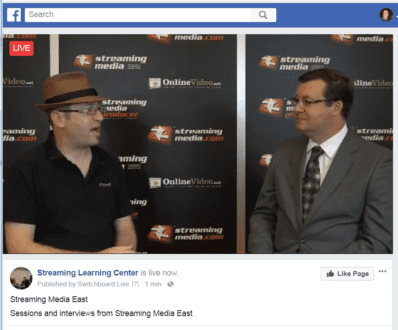
Figure 8. The Facebook Live player on the Streaming Learning Center Facebook page
Note that Figure 7 is the page your viewers will see, not the live streaming control page you can access when streaming directly via Facebook Live or other accounts. Currently, there is no centralised access to inputs from all sites that you’re broadcasting to, or even access to the broadcast page of some services.
For example, with Facebook Live, you can’t get to the live streaming control screen unless you originate the stream from Facebook Live or some other products like Wowza ClearCaster. You can’t get there from Switchboard. However, you can get to the YouTube Live control page, but not through Switchboard; you have to navigate there manually. You can interact with your Facebook viewers via your Facebook page, but you don’t get the detailed video performance statistics you get when broadcasting directly from Facebook Live.
7. Analyse your results. Switchboard doesn’t offer consolidated results with any of packages discussed above, forcing most viewers to review stats from each individual viewing site. Switch does offer a for-fee analysis with the consolidated numbers shown in Figure 9, along with individual results from all viewing sites. This costs $2,500.
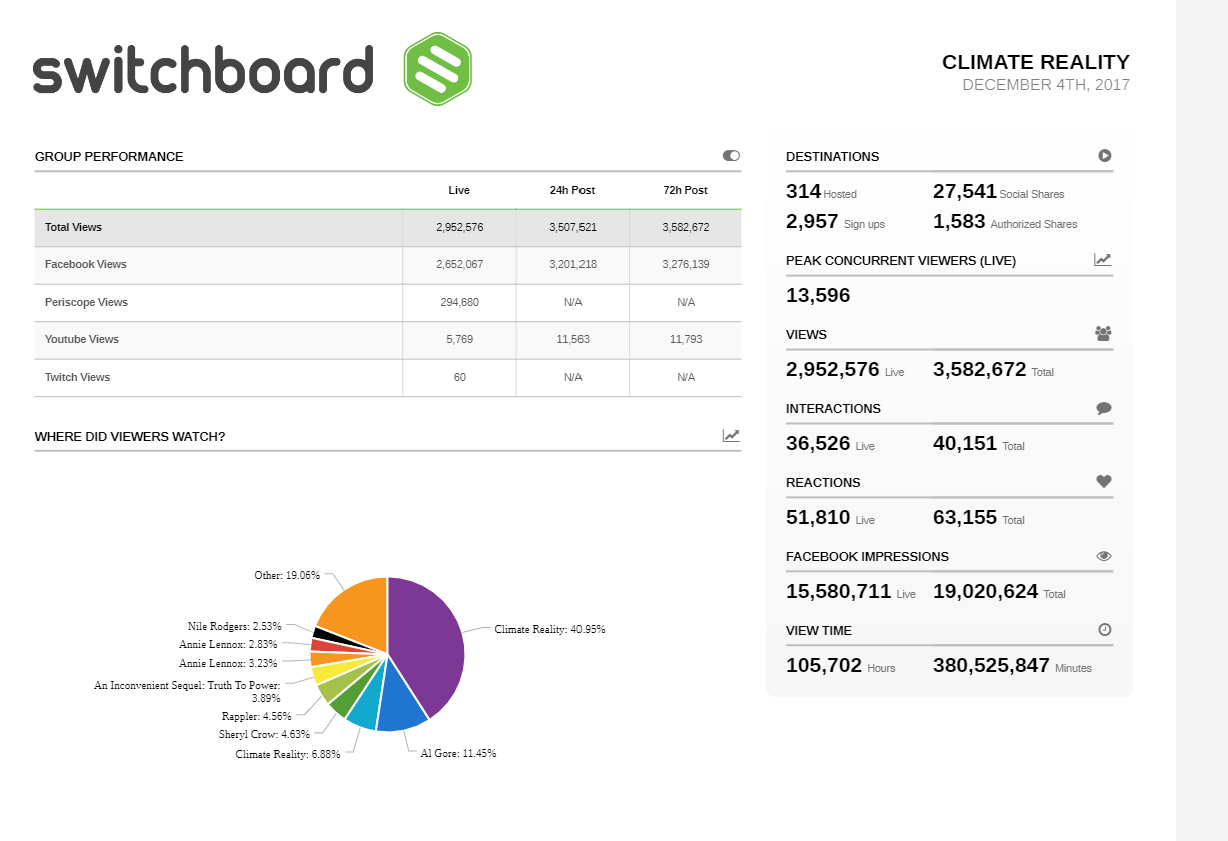
Figure 9. Consolidated reporting is available for $2,500.
According to the officials I spoke with, Switchboard plans to add additional customer-accessible analytics over the next few months.
Service Plans
Briefly, Switchboard Cloud has three plans, Professional ($75 per user/month), Business ($150), and Enterprise ($300). Plans differ regarding the number of destinations and workflows, along with customer service options and other features.
In some ways, particularly analytics and centralised control options, Switchboard Cloud is a work in progress. However, for organisations, corporations, and agencies that need to reach multiple internal and third-party distribution points for their live videos, it’s a marvellously enabling technology that works just fine today.
[This article appears in the Spring 2018 issue of Streaming Media European Edition.]