 Streaming Learning Center Where Streaming Professionals Learn to Excel

Related Articles


I’ve spent the last two months testing four AV1 codecs accessible via command-line arguments and I start testing VVC codecs next week. Trying to fairly and accurately test the capabilities of these codecs turned out to be a pretty grueling and messy task. The key challenge, of course, was creating the optimal video encoding command string for each codec. While there are many similarities in configuration options for the four AV1 codecs, there were also several key differences in terms of available configurations, default settings, and performance.
If you’ll be testing AV1 codecs, you can see the command strings used for performance testing in my article on Streaming Media. I will say that I performed a bunch of testing after submitting those results, and probably would change these for real-world production for distribution. I cover all the details in my course Encoding with the AV1 Codec, available here.
If you’re creating a command string for a new codec, whether it’s HEVC, AV1, VVC, or even VP9, here’s a list of items to consider in roughly the proper order.
- Have a target
- Have a good starting point
- Nail compatibility
- Data rate control/buffer size
- GOP size/closed GOP
- Tuning for metrics
- Adaptive quantization and similar tweaks
- Choose a preset
- Thread control
- Codec specific tweaking
- What not to do
If you’re working with an encoding tool like Telestream Vantage or Capella Systems Cambria FTC, or a cloud encoder like Bitmovin, Elemental, or Hybrik Dolby, I would adopt these steps to the configuration options available in that encoding tool.
Contents
Understand Your Target
Typically, this will be an existing command line for a codec that you’re currently distributing. For the article, it was this command string used for x264 and FFmpeg.
ffmpeg -y -i Football_10.mp4 -c:v libx264 -threads 16 -b:v 1890K -preset veryslow -g 60 -keyint_min 60 -sc_threshold 0 -tune ssim -pass 1 -f mp4 NUL &
ffmpeg -i Football_10.mp4 -c:v libx264 -threads 16 -b:v 1890K -maxrate 3780K -bufsize 3780k -preset veryslow -g 60 -keyint_min 60 -sc_threshold 0 -tune ssim -pass 2 Football_x264_ssim_4.mp4
So, the new command string needs to:
- Deploy two-pass encoding
- Limit bitrate to 200% constrained VBR
- Set the VBV buffer to two seconds worth of data
- Create two-second GOPs with no I-frames at scene changes
- Choose an equivalent preset
- Choose the equivalent tuning method (if any)
- Control threads used during encoding
- Control any codec-specific options (none here, but lots with AV1)
Have a Good Starting Point
Most codec vendors will publish a simple encoding string as a starting point. For example, here’s a simple string for the AOMedia codec from the GitHub Wiki.
aomenc.exe input.y4m –passes=2 –pass=1 –width=1920 –height=1080 –bit-depth=10 –fps=30000/1001 –target-bitrate=1490 –fpf=stats.log –output=NUL
aomenc.exe input.y4m –passes=2 –pass=2 –width=1920 –height=1080 –bit-depth=10 –fps=30000/1001 –target-bitrate=1490 –fpf=stats.log –output=output.webm
This was my starting point, which I adjusted as discussed below. In the webinar and classes, I work from this and similar starting points for the other codecs and walk you through the testing and logic that produced the final command string.
If you’re working with an encoding tool or service, check whether there are some presets you can use as your starting point.
Nail Compatibility
Encoding for device compatibility isn’t an issue like it was during the early days of H.264 encoding when you produced using the Baseline profile for older iPhones and the like. When you don’t set an x264 profile in your command string, FFmpeg uses the High profile, which is what Apple now recommends for all encodes.
There were no compatibility issues with any of the AV1 codecs.
Data Rate Control/Buffer Size
When I first tested the AV1 codecs, I used encoding strings suggested by the vendors which didn’t uniformly include max bitrate and buffer controls, which are different for each codec. For two of the codecs, I added these controls and re-encoded which is why the print article has slightly different results than the online article, which is updated. With another of the codecs, I learned that the maximum bit rate switch didn’t appear to work.
The difference is minuscule when encoding 10-second files of relatively homogenous content, but you want your production settings to reflect these limits.
GOP Size/Closed GOP
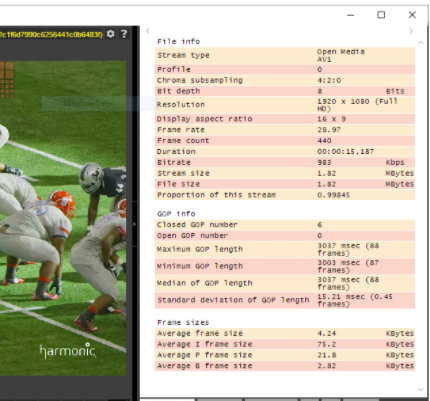
Setting the GOP size and minimum to avoid I-frames at scene changes is straightforward though the switches varied among the different codecs. For adaptive streaming, you want closed GOPs because open GOPs can cause playback issues. Some of the AV1 codecs had switches for closed GOPs, but those that didn’t produced closed GOPs by default. I was able to check this in Zond 265 which shows 6 closed GOPs and no open GOPs below.
Tuning
If you’re benchmarking your codecs with objective metrics as I did, you have to choose a tuning strategy which I explain at length in the Streaming Media article. The Cliffnotes version is that I tuned for SSIM with x264 and x265, but didn’t tune at all for AV1, primarily because adaptive quantization was disabled by default for all AV1 codecs (see next section). If you’re producing for production you shouldn’t tune.
Adaptive Quantization and Similar Settings
Adaptive quantization improves visual quality but can reduce metric scores. If you’re comparing with metrics, you should disable AQ and similar controls which is what happens when you tune for specific metrics.
When you’re producing for distribution, my gut tells me to go with the default settings. Codec developers know their codecs the best and if they think the encoded video looks better with AQ enabled, leave it enabled for your production encodes. If not, I wouldn’t mess with it.
Choosing a Preset
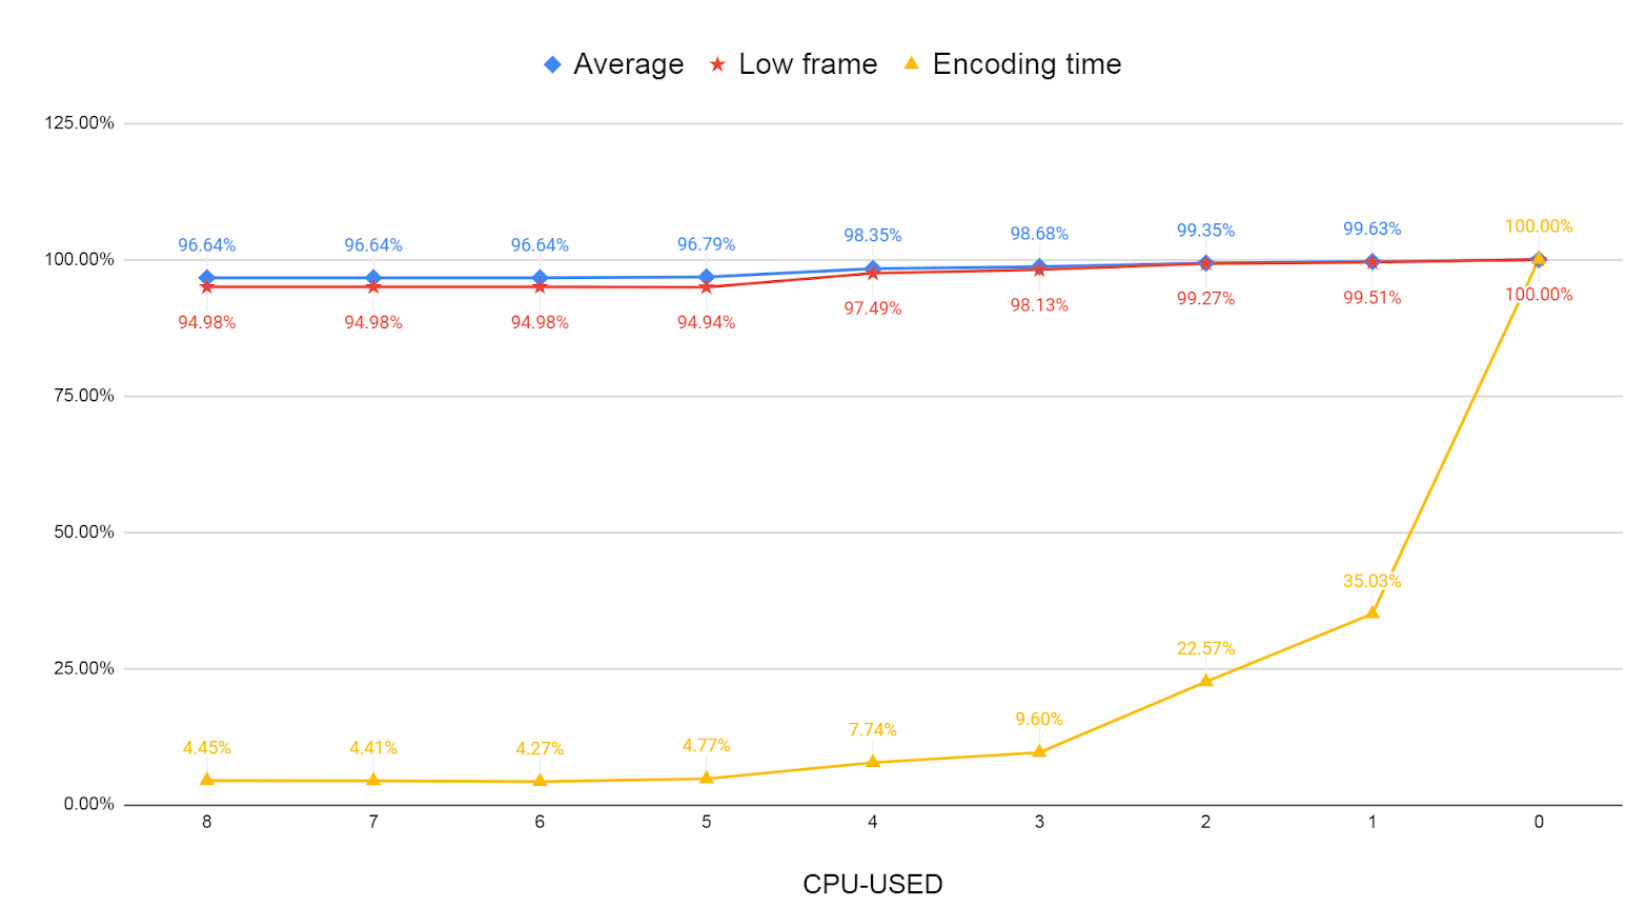
The preset controls the encoding time/quality tradeoff which is a huge deal with AV1 because it’s still much slower than x264 and x265. With most AV1 codecs, you control the preset using the cpu-used command. To identify the proper preset, you should encode a number of test files using all presets, time the encodes, and measure the average quality and low frame quality of your favorite metric; I used VMAF. Then plot the three values on a scale from 0 to 100% to produce the chart below.
What the figure shows is that the quality delta between the presets is very small, particularly on the right when cpu-used values like 0 and 1 produce very little extra quality but extend the encoding time by 10x and greater over values like 4 and 3. I created this chart for the Alliance for Open Media aomenc standalone encoder, and tested with cpu-used 3 because it seemed to offer the optimum blend of quality and encoding time. For the webinar and training, I tested each codec individually; in at least one case, the results showed that a much faster preset actually produced higher quality output than the default I used in my testing. Whenever you deploy a new codec or encoder, you should produce a chart like this with relevant test files to help choose the optimal preset fo
Thread Control
The thread switch controls how many logical processors the encoder uses during encoding. Most researchers use a single thread because it generally produces higher quality results and because when encoding with a single thread, encoders are usually deterministic and produce the same result each time. However, this can really slow single-file encoding down. When encoding with multiple threads you can get slightly different results on different machines or even different encodes on the same computer. With FFmpeg, x264 will grab as many threads as are available which reduces encoding time but can lead to lower quality and transient quality issues.
Of course, encoding with a single thread doesn’t really slow things down if you can efficiently utilize other available cores. On my 40-core HP Z840, however, it’s unlikely that you could host 40 simultaneous encoding sessions. That said, understanding the quality/performance tradeoff can help you choose the optimal encoding station for your AV1encodes. If 8 threads is optimal, it may not make sense to encode on a 96-core m5d.metal AWS Instance when a much cheaper 8 or 16-core system could deliver the same performance.
Interestingly, it turns out that three of the four AV1 codecs max out at 8 threads, while one consumes as many threads as you have available. What about the quality impact? Here’s where things got interesting.
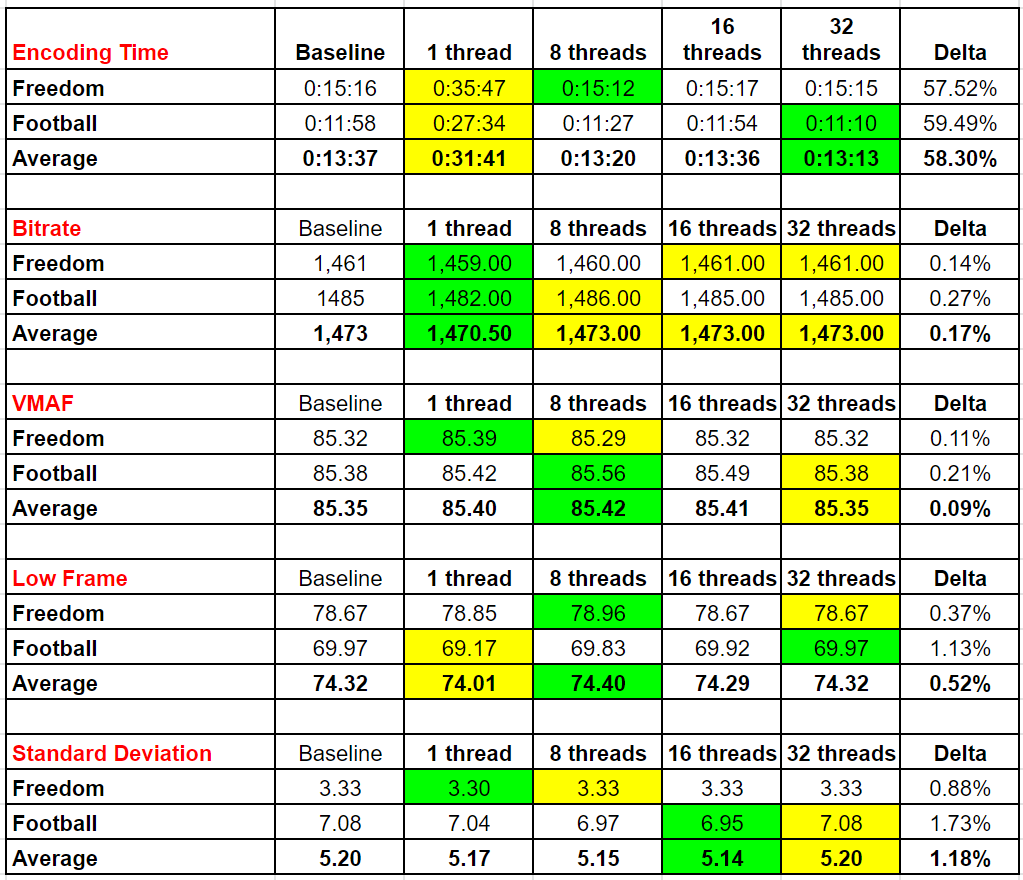
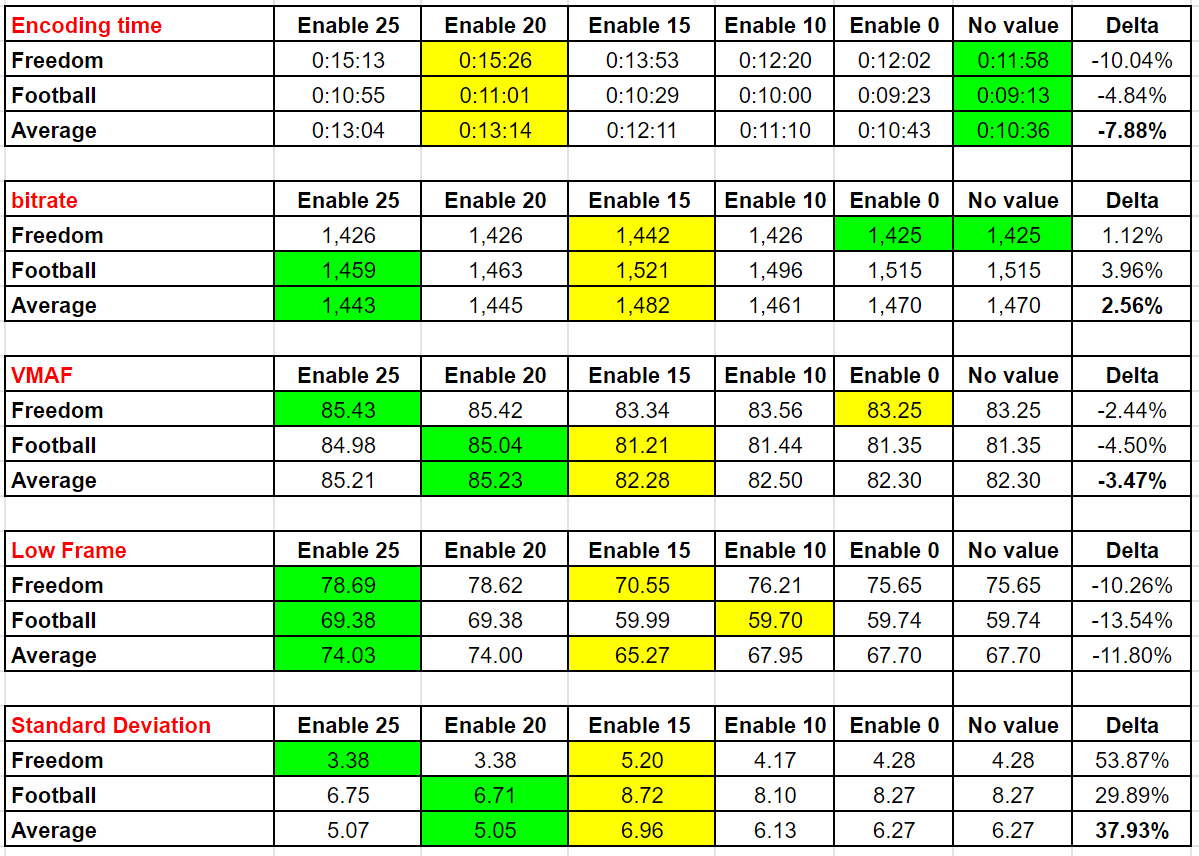
The basic premise is this; for threads and all AV1 performance/quality tweaks, I wanted to measure how much the decision impacted quality and encoding speed. So, I used two challenging test files at aggressive encoding settings to gauge the available configuration options. The table below shows that if you encode with a single thread, you slow encoding time by 58% (testing performed on my 40-core Z840) but as the green color codes show (green is best, yellow worst), mean and low-frame VMAF are actually higher at 8 threads and the standard deviation is lowest at 16-threads. You also see that deploying 16 or 32 threads doesn’t materially impact encoding time.
What does the quality look like graphically? The two charts below from the Moscow State University Video Quality Measurement Tool compare the two files encoded with 1 thread (in red) to the 8-thread file (green). The top file is the football test clip while the bottom is a music video. While there are some minor differences, there were no substantial differences as the low-frame and standard-deviation scores suggest.
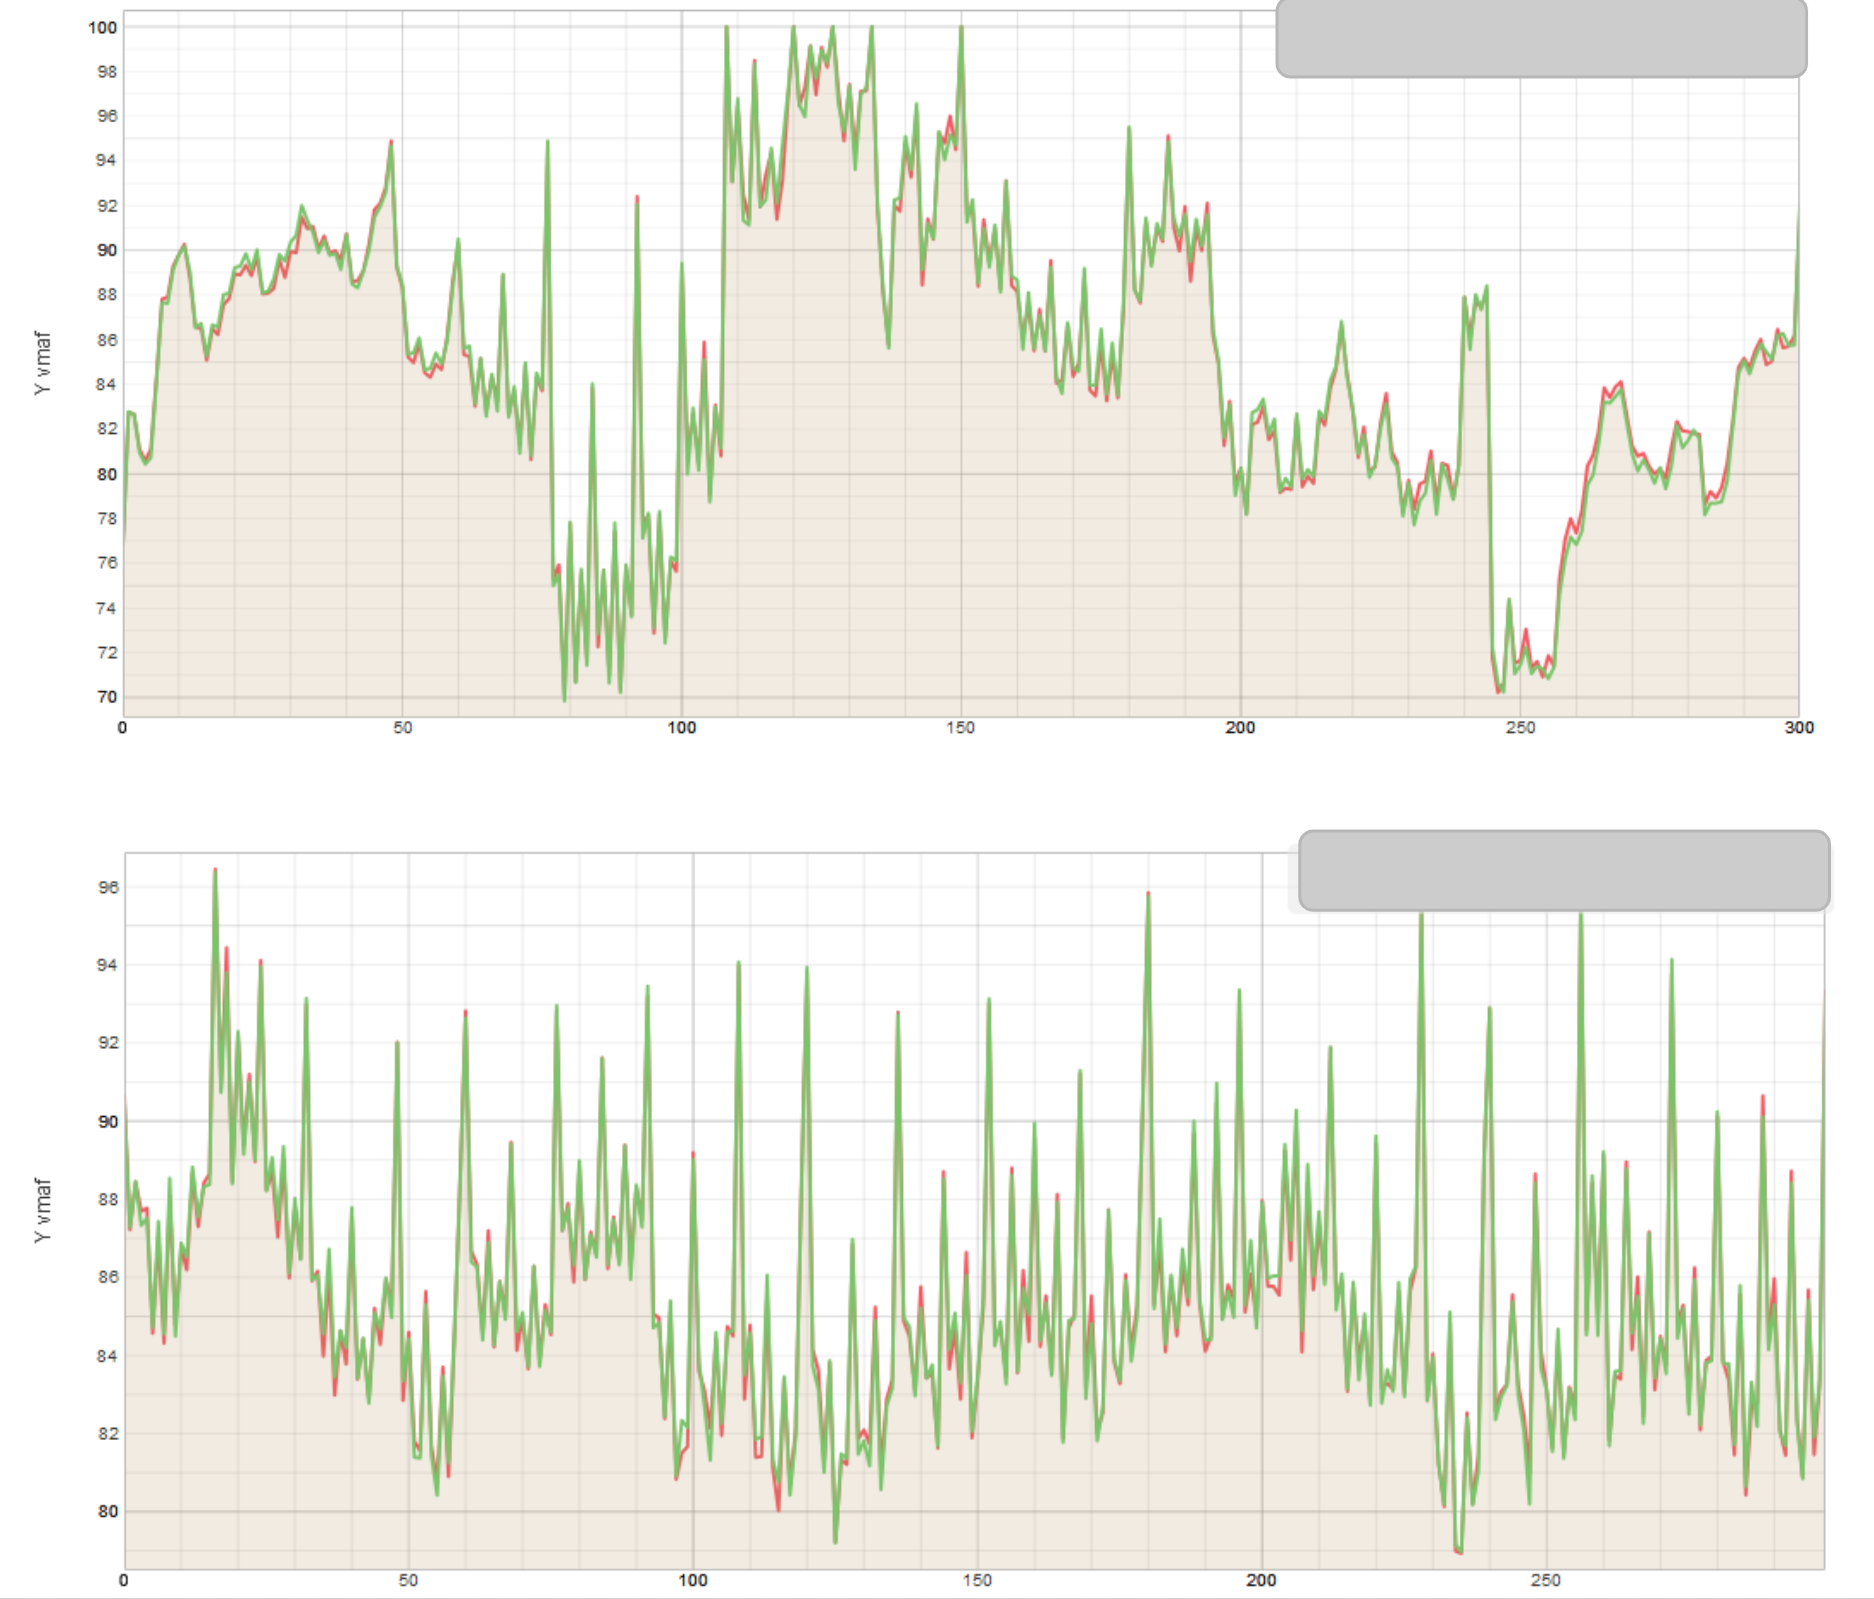
This data makes it easy to choose the appropriate thread count; unless I can get multiple instances running very efficiently I’ll go with 8 threads. Ditto for which type of instance to deploy for efficient encoding.
Codec Specific Tweaking
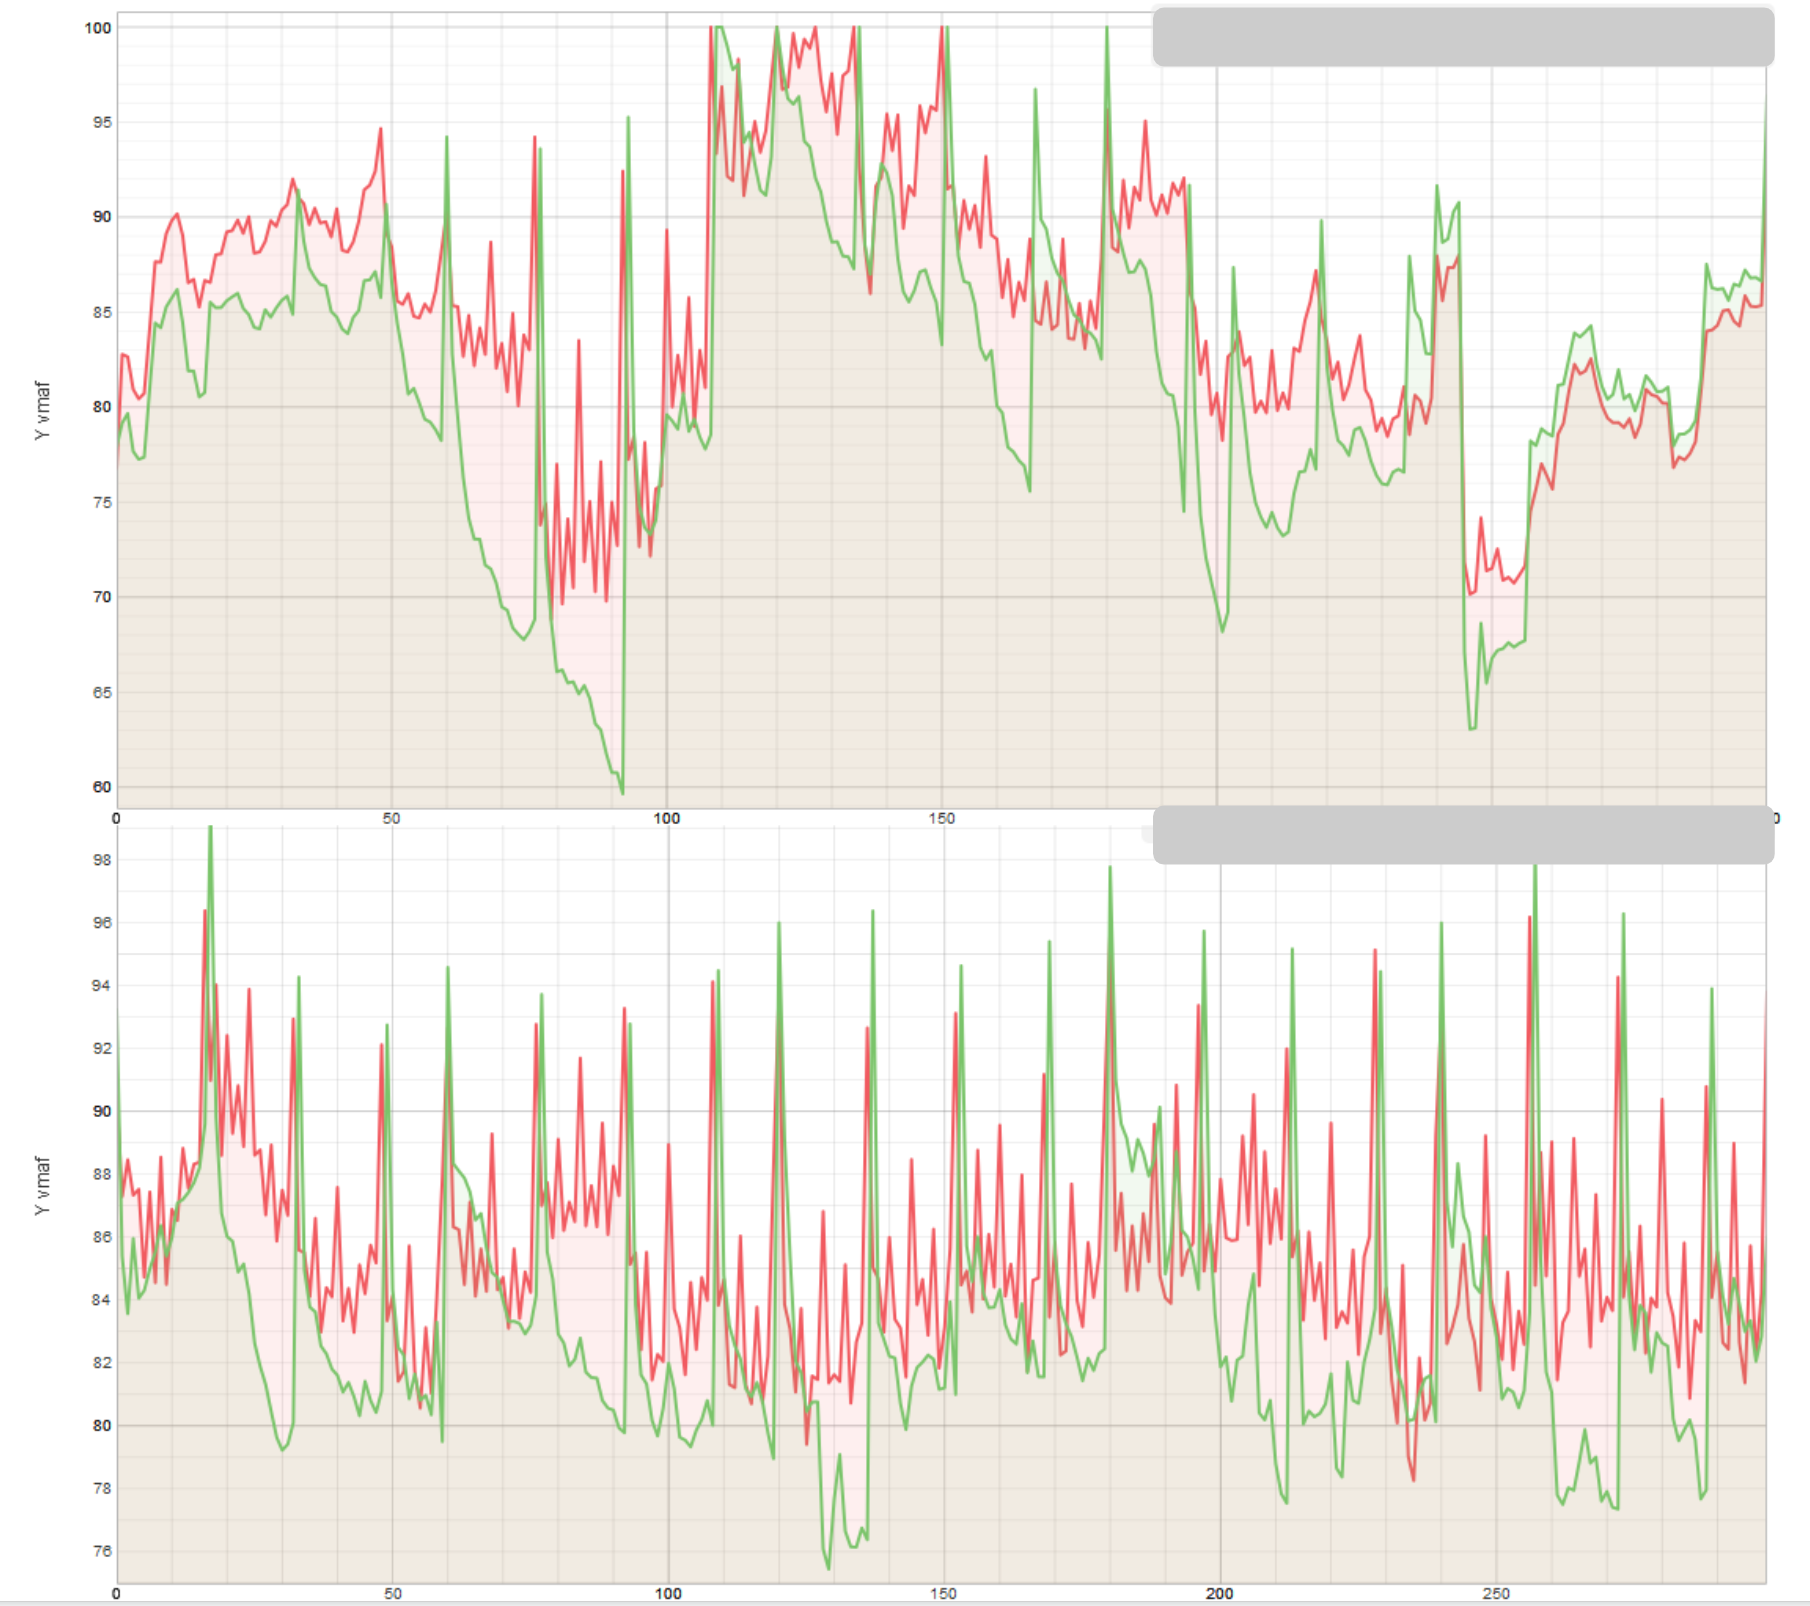
I’m not a big tweaker when it comes to encoding parameters because I think most tweaks deliver diminishing returns and take forever to test. However, with AV1, there are five or six encoding controls that impact quality and encoding time and you need to know what they are, what the default setting is for each codec, and how and when to enable them. One such control is the lag-in-frames switch. Below I tested at settings of 0, 10, 15, 20, 25, and without the switch altogether (no value). We see that this setting increases encoding time but delivers significantly higher quality once you exceed 15.
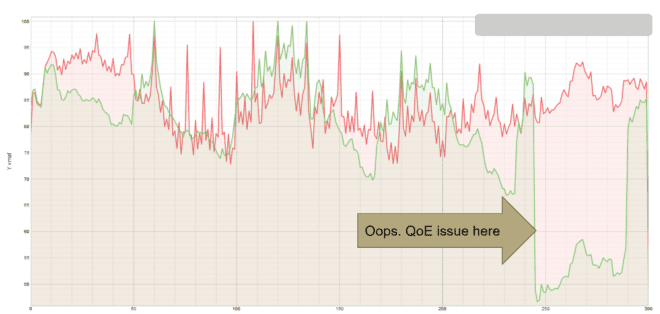
The VMAF results plots below, which compares files encoded with lag-in-frames set at 25 (red) and 0 (green) shows significant transient quality drops that would definitely be noticeable to the viewer and would impact QoE.
In the webinar and courses, you’ll get data like this for each of the key AV1 encoding options for each AV1 codec.
What Not To Do
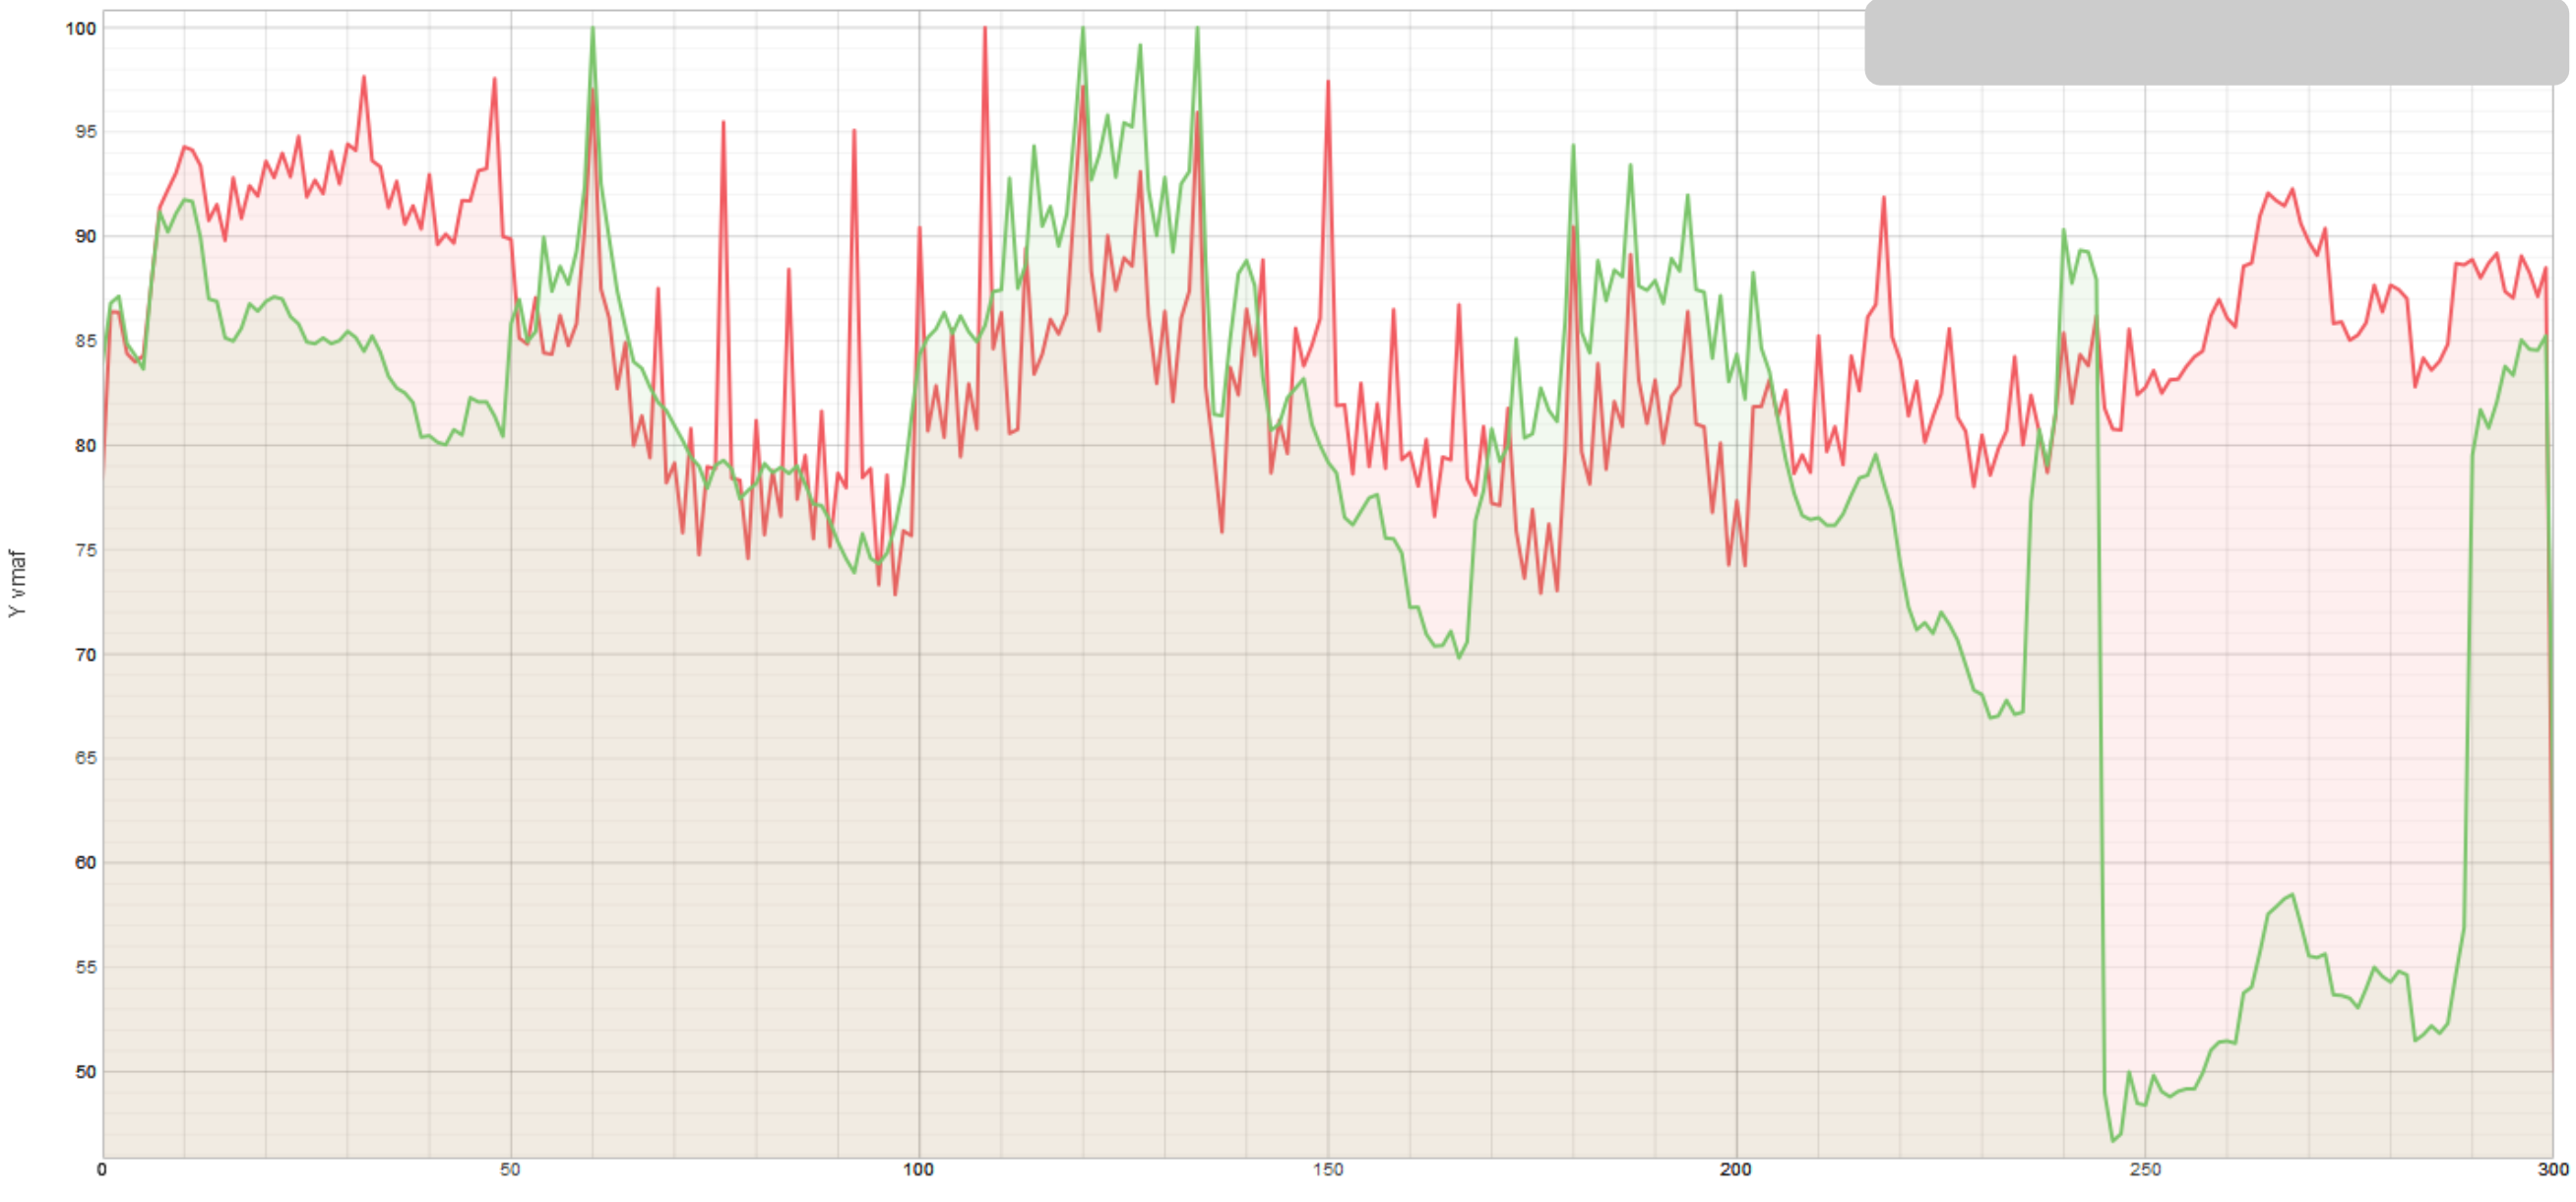
Finally, what not to do? Don’t copy encoding parameters published in white papers or other research as they are typically much more complex and delivered the same or lower quality, often dramatically so. For example, encoding using the encoding string published by one researcher produced the following results in the football test clip (my parameters in red, theirs in green). When researching these command strings, I compared quality and encoding time with strings produced by Netflix, Facebook, and this team of researchers just to be sure that there weren’t any “magic” switches that I missed. There weren’t and this string, in particular, produced poor results, perhaps in part because the lag-in-frames setting was 16 rather than 25. You’ll see the results of all these comparisons in the webinar.
Basically, my advice is to not add any encoding switches unless you’ve tested them using a few test clips as shown above and have proven their performance.
That’s my take on how to build your new encoding string; I hope you found it useful. If you’re working with AV1 codecs, you’ll find that the course Encoding with the AV1 codec to be a huge time saver. Click here for more information, or click the advertisement below.


Adaptive quantization was applied in TM5 Rate Control of MPEG2
mquant_j = QP_j x act_j , where act_j is the normalized spatial activity for the MB j.
Shevach – good to see your name in my comments. As usual, you’re way over my head – can you tell me what the point of your comment was?