 Streaming Learning Center Where Streaming Professionals Learn to Excel


Related Articles


This is a long post only of interest to those attempting to optimize their VP9 encodes. The three key takeaways are 1) use the command script shown on the bottom of the page, 2) a speed setting of 2 offers the optimal quality/performance tradeoff, and 3) the row-mt setting improves performance significantly with zero quality loss when multiple unused cores are available. As always, if I’ve gotten anything wrong, please let me know at janozer@gmail.com.
Many producers are exploring options to produce quality similar to H.264 at lower bitrates. One of the best options is to encode using the VP9 codec, which plays in most browsers, on Android devices, on Macs and iOS devices in Chrome, and on many OTT devices and SmartTVs. This should allow you to drop the data rate of your videos by 30 – 40% and deliver the same quality as H.264.
I’m updating the VP9 section of my course Streaming Media 101: Onboarding for Streaming Media Professionals and wanted to share three key findings. Let’s jump right in.
Contents
Choosing the Right Command String
There are several sources for command strings. Here’s the recommendation from the Google Core Technologies blog:
ffmpeg -i tearsofsteel_4k.mov -vf scale=1920x1080 -b:v 1800k \

-minrate 900k -maxrate 2610k -tile-columns 2 -g 240 -threads 8 \

-quality good -crf 31 -c:v libvpx-vp9 -c:a libopus \

-pass 1 -speed 4 tos-1920x1080-24-30fps.webm && \
ffmpeg -i tearsofsteel_4k.mov -vf scale=1920x1080 -b:v 1800k \

-minrate 900k -maxrate 2610k -tile-columns 3 -g 240 -threads 8 \

-quality good -crf 31 -c:v libvpx-vp9 -c:a libopus \

-pass 2 -speed 4 -y tos-1920x1080-24-30fps.webm
FFmpeg newbies should note that the slash (\) is the Linux/Mac line continuation character that tells FFmpeg to ignore the carriage return and run the string as a two-line script; the Windows analog is the caret (^) above the number 6 on your keyboard.
As an initial observation, you see that this command string inserts the file name at the end of the first line instead of the much more familiar NUL command. This works, but is non-standard and may be confusing to some (if not most) FFmpeg users.
It’s also interesting that the argument ignores recommendations from Google on the same page, which advise using a speed setting of 2 for the second pass (rather than 4 in the command string) and a tile-columns setting of 2 (rather than 3 in the second pass). I’ve bolded the three switches that impact output quality, which I’ll discuss further below.
Here are the VOD Recommended Settings from the VP9 Encoding Guide in the WebM Wiki:
ffmpeg -i <source> -c:v libvpx-vp9 -pass 1 -b:v 1000K -threads 8 -speed 4 \

-tile-columns 6 -frame-parallel 1 \

-an -f webm /dev/null
ffmpeg -i <source> -c:v libvpx-vp9 -pass 2 -b:v 1000K -threads 8 -speed 1 \

-tile-columns 6 -frame-parallel 1 -auto-alt-ref 1 -lag-in-frames 25 \

-c:a libopus -b:a 64k -f webm out.webm
Note that this string doesn’t have a -g switch to set I-frame interval, so it would use the default I-frame interval for WebM files. The Wiki supplies separate recommendations for files encoded for DASH output with I-frames every 150 frames. Other than not having I-frame controls, this command string is pretty standard. Note that the characters at the end of the first pass are for Linux/Mac. For Windows, substitute NUL && \ for /dev/null.
Another source is the command string I developed for two books plus the AV1 First Look published in Streaming Media Magazine, which I developed with significant input from several engineers from Google.
ffmpeg -y -i input.mp4 -c:v libvpx-vp9 -pass 1 -b:v 6000K \

-threads 8 -speed 4 -g 60 -keyint_min 60 -sc_threshold 0 \

-tile-columns 4 -auto-alt-ref 1 -lag-in-frames 25 \

-frame-parallel 1 -f  webm NUL /dev/null
ffmpeg -i input.mp4 -c:v libvpx-vp9 -pass 2 -b:v 6000K \

-minrate 6000K -maxrate 12000K -threads 8 -speed 0 -tile-columns 4 \

-auto-alt-ref 1
-g 60 -keyint_min 60 -sc_threshold 0-lag-in-frames 25 \
-frame-parallel 1 output_VP9.webm
Note that the string in the Streaming Media article didn’t have I-frame settings because the test file was five-seconds long, a practical necessity when testing the AV1 codec. I’ve added them above using the familiar two seconds interval for completeness.
Isolating the Key Differences
The biggest issue in the Google recommendation is that by including a CRF value into the command string, the recommendation seems to conflate capped CRF encoding (called Constrained Quality in VP9 speak) and two-pass variable bitrate encoding. The classic capped CRF encoding includes a CRF value to set overall quality and a data rate cap to set the maximum file data rate. That’s how Constrained Quality is shown in the WebM Wiki and the FFmpeg Wiki. By setting both a minimum and a maximum data rate, the Google command string seems to leave CRF no role to play.
To verify this, I encoded four files using the recommended Google command string with CRF set at 21, 31, and 41, which is a huge difference in quality level. However, the file sizes were almost identical as were the VMAF values shown in Table 1. It seems like the data rate values and the speed setting in the command string were setting the data rate and quality, not the CRF values.
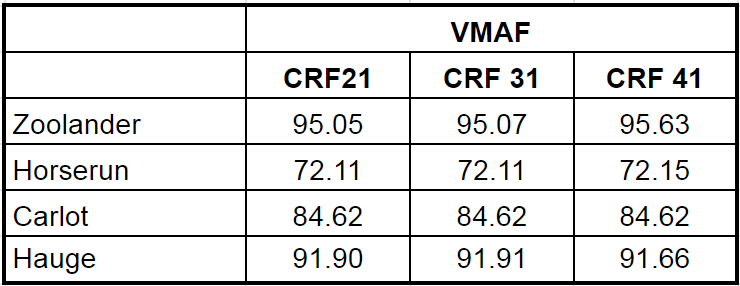
Table 1: These results show that the CRF setting in the Google command string had little impact on output quality.
The other major difference between the Google recommendation and the other two is a difference in appearance only. Specifically, the -quality good switch in the Google script is the default value. So, if you remove it the output is exactly the same.
Beyond this, the Google recommendation doesn’t include auto-alt-ref, lag-in-frames, and frame parallel, so FFmpeg will use the default settings for these switches, which according to the FFmpeg help is -1, -1, and auto, respectively (this FFmpeg help is what you see when you type ffmpeg -h encoder=libvpx-vp9 in the command prompt. You can download a text file containing this help here.
However, when I removed auto-alt-ref 1, lag-in-frames 25, and frame parallel 1 from my command string, the output file was exactly the same as that produced with these options in. This shouldn’t happen because the script values were different than the defaults and probably means that the FFmpeg help file is incorrect and that the defaults are those shown in the WebM and my script. I typically simplify command strings by excluding all switches implemented at their default values but if Google updates the codec to reflect the presets identified in the FFmpeg help file it will change the output. For this reason, I’m leaving these switches in the script recommended below using the values shown in both the WebM and my command line arguments.
Use a Speed Setting of 2
Of course, quality is king and what matters is which command string delivered the best quality. As configured, my command string won handily, though it took about four times longer to encode than the Google command string and about twice as long as the WebM Wiki. Why? Because, after data rate, the speed switch is the most important determinant of encoding speed and quality, performing the same role as x264 presets like medium, veryslow, and placebo.
VP9 encoding speed ranges from 0 to 4, with 0 being the slow, high-quality option, and 4 being the fast, lowest-quality option (according to the FFmpeg help file, the default is 1). Testing has shown that running the first pass at maximum speed doesn’t degrade quality, so that’s the recommended approach. It’s the second pass where the setting really matters.
Interestingly, though the Google website recommends a speed setting of 2 for the second pass in a table presented above the recommended command string, the command string uses a setting of 4. That’s why it was so much faster than the other two approaches and why the VMAF averaged about three points lower in the six files that I tested with this string.
What’s the appropriate speed? It depends upon your throughput requirements, quality goals, and who’s paying for the encoding. I show this in the chart below, which you can click to view at full resolution in a separate window. To create this chart, I encoded 35 ~ 20-second files of different genres like movies, games, sports, and animations to the same encoding parameters except for speed. I timed all of the encodings on my HP Z840 with time represented by the red line in the graph. Encoding speed is shown as a percentage of the total speed at speed 0, so speed 4 took 16.84% of speed 0 on average.
Average quality is the average VMAF quality of the files, which improved from 85.85 at speed 4 to 88.90 at speed 0. For reference, it takes 6 VMAF points to make a just noticeable difference that over 50% of the viewers would notice. Low frame quality in green is the VMAF score of the lowest quality frame in the video file, a measure of the potential for transient quality issues. Here we see a more meaningful difference of just under 5 VMAF points from speed 4 to speed 0.
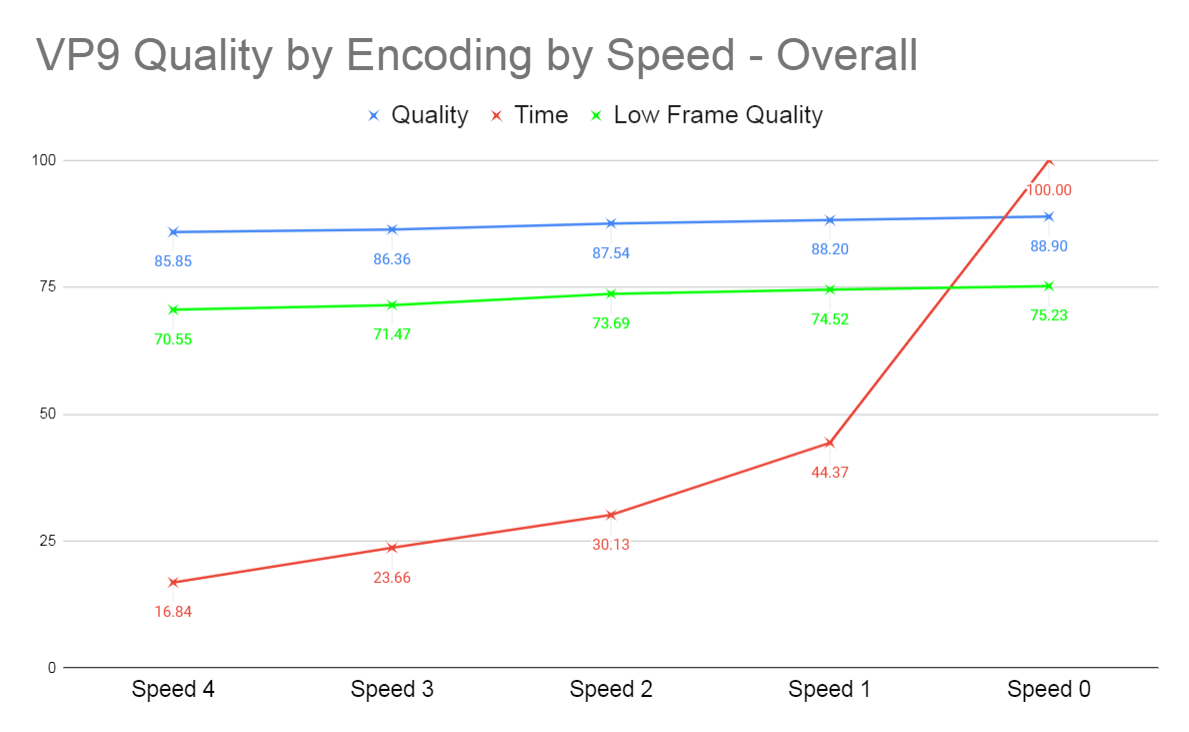
What’s the right speed? Well, your inner CPA is probably leaning towards 4, since “why the heck would I boost encoding cost by close to 6x for a difference fewer than 50% of the viewers would notice?” On the other hand, your inner Spielberg has to be saying, “hey, if only one person notices, the difference is worth it.” I’m with Google on this point; let’s split the baby and go with 2.
For the lesson I’m including in the Streaming Media 101 course, I break out this speed/quality analysis by content type (movies, sports, animations, gaming), though my inner boy scout forces me to say that there’s not a huge difference between the results (though if you’re distributing animations and care about throughput, speed 3 or even 4 is worth a look if your tests confirm mine).
To close this section, I’ll confess that if you use -speed 0 with all three scripts, the output quality and encoding time are about the same, assuming that you add the row-mt switch discussed below. So, there’s nothing inherently better about the script I recommend, particularly as compared to the WebM script. It’s just one that I’ve used and proven many times over the last few years.
Boosting Encoding Speed with Row-MT
One switch not in any of the strings is row-mt which enables row-based multithreading. When I posted a second article on AV1 encoding on Streaming Media a reader named Chris Kennedy advised that adding -row-mt 1 “will enable row-based multithreading for libVPX. It helps solve the thread limitations of VPX from what I have read, and in practice, it performs at a much faster encode speed with the same quality output.”
I tested this on multiple files and show the results in the table below. On these four files, adding -row-mt 1decreased encoding time by 35.77% and increased VMAF by 0.06%.
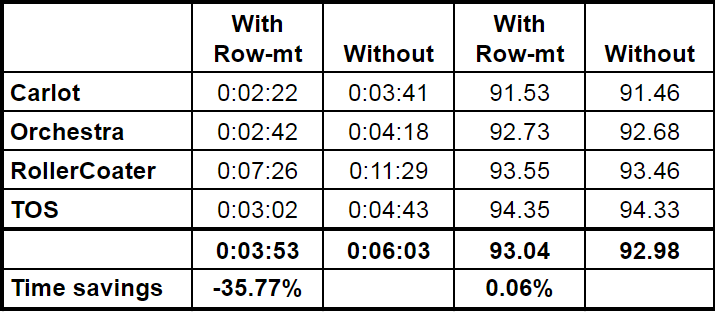
Table 2: Adding row-mt cut encoding time by ~36% and boosted VMAF quality slightly.
I should caution that I tested on my Z840 which has 40 total CPU cores; testing on a machine with fewer cores will deliver less benefit. For example, on my HP Zbook notebook with eight cores, the speed difference was only about 21% with quality again virtually identical.
In addition, if you’re already running multiple encoding instances on a multiple core computer, or using other techniques to maximize multiple-core efficiency, you will likely see less benefit from this switch, which seems to harvest unused CPU cycles, not create them out of thin air.
The Recommended Command String
So, here’s my recommended command string for two-pass variable bitrate encoding. Again, you could probably exclude auto-alt-ref, lag-in-frames, and frame parallel, and get the exact same output, but I’ll leave them in for the reasons stated above.
ffmpeg -y -i input.mp4 -c:v libvpx-vp9 -pass 1 -b:v 2000K -g 48 \

-keyint_min 48 -sc_threshold 0 -threads 8 -speed 4 -row-mt 1 \

-tile-columns 4 -f webm /dev/null
ffmpeg -i input.mp4 -c:v libvpx-vp9 -pass 2 -b:v 2000K -minrate 2000K \

-maxrate 4000K -g 48 -keyint_min 48 -sc_threshold 0 -row-mt 1 -threads 8 \

-speed 2 -tile-columns 4 output.webm
Change /dev/null to NUL && \ in the first pass to run on Windows.
What’s in the Lessons included in Streaming Media 101
That’s all the free stuff, folks. Also included in the updated lessons in Streaming Media 101: Technical Onboarding for Streaming Media Professionals are:
- Speed/quality charts for animations (3 test files), sports (5), movies (4), and games (8).
- An FFmpeg script for a complete VP9 encoding ladder implementing two-pass constrained VBR encoding (essentially using the command string shown).
- Recommendations and suggested command strings for encoding VP9 using Capped CRF (constrained quality) which is the technique used by the JWPlayer online video platform. If you’re looking for an inexpensive way to implement per-title encoding with VP9, this is it.
- How to encode for DASH output, though this relies upon instruction found here so there’s not a lot of extra value.
VP9 Resources
Here are some of the resources I checked in creating this post and the lessons.
-
- WebM Wiki – VP9 Encoding Guide – in my view, the most helpful.
- FFMPEG.org: FFmpeg and VP9 Encoding Guide – also very helpful.
- Google developers blog – Good discussion of fundamentals but command strings are a bit funky.
For more information on Streaming Media 101: Technical Onboarding for Streaming Media Professionals, click here.


