I produce lots screencams, and some customers like having a live greenscreen video intro in front of the screencam. “What’s the harm,” they ask? It’s only 30 seconds of video, how long will that take to shoot?” Well, if you’re like me and you don’t have a dedicated studio and staff for such productions, they can take awhile.
If fact, this week I had to shoot two video intros, and it took three hours to produce them. So, just to have ammunition for higher fees next time, I figured I would detail the gear I had to set up and configure to get the job done.

Here’s the big picture “establishing shot.” Sharp-eyed readers will discern two sets of lights, one on the greenscreen, one on me, plus the lens of the Canon XH A1 I’m shooting with and the ProPrompter teleprompter that uses my iPad 1 for the electronics.
It all starts with the green screen, of course, which is the cheapest and easiest part. Rather than buying a stand, I pinned the green screen to a scrap piece of 1×4 lumber and hung it on my wall with some picture hooks. There’s another scrap 1×4 board at the bottom maintaining the tension and minimizing the wrinkles. I’ll build a similar one in white for future shoots.

Optimally, you light the green screen separately from the subject, and I have a set of cheap compact fluorescent softboxes for that chore. Specifically, I bought the Fancierstudio 3000 Watt Lighting Kit With 3 Stands and 3 softbox Lighting Kit for about $160, primarily because it came with three lights, one with a boom to serve as hair light. The two lights were perfect for lighting the greenscreen, but the hair light was too unfocused and created highlights on my forehead, so I didn’t use it. A good backlight really needs a focusable element, whether a lens, barn door or egg crate, to avoid that problem. Still, for $160, I marvelled at how cheap and effective lighting has become.
I positioned both lights about head level on the background, trying to produce even lighting on the portion of the screen that showed behind me in the shot. In this small setup, these four-bulb lights worked perfectly.

You need separate lights for the subject, and for this I used some ePhoto softboxes that I’ve had for awhile, specifically, the ePhoto VL9026s 2000 Watt Lighting Studio Portrait Kit, which now costs $167 on Amazon. I’ve had these for just under two years, and they provide lots of cheap, undirected light, which is perfect for office shoots like this one. You don’t have the control for moody, nuanced lighting, but for flat or slightly shadowed lighting, they’re ideal. Both sets of lights are daylight balanced, so I didn’t have to put shades on my windows.
If you look at the top shot, you can see that I’ve positioned these lights slightly above my head pointing towards my face, both about 45 degrees from my nose, with one light using 3 bulbs, the other 5 to create a slightly shadowed look to model the face. You can see that in the final video below.

My go-to camera for office shoots like this one is the Canon XH A1which is now over 8 years old but produces exceptionally crisp images and offers fine manual controls with three rings around the lens which I absolutely love (iris, focus, zoom).

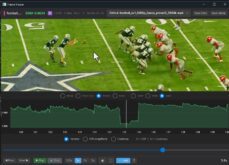
The most important feature in this instance, however, is the one relating to the cable poking out the back, which is the Firewire cable that lets me connect to my computer and use Adobe OnLocation for the waveform and as a DVR. Getting proper exposure is always hard, but when you’re shooting yourself, it’s near impossible without a software waveform. In the screen you can see the zebra stripes on the left (you get two sets of zebras) plus the waveform on the upper right right. I confess that I don’t use the Vectorscope on the bottom right beyond making sure that skin tones fall on or near the appropriate line at the 11:00 position.

I can wing my screencams pretty well without a script (and with lots of editing in post) but when I’m on camera for intros like these, I need a prompter. What you see below is my ProPrompter HDi Pro2 Teleprompter Kit for iPad, which cost around $800 when I reviewed it back in May, 2010. The short story is that it uses your iPad as the computer that drives the system, you can see it poking out of the device in the figure below. You upload your scripts to your iPad over the Internet and you can control scrolling speed with another iDevice, like an iPod touch or iPhone. Works great, and is much cheaper than any other teleprompter system that I’ve seen, assuming that you own the iPad of course.

For audio, I used the Azden 330ULT 2-Channel UHF Wireless Microphone System which I reviewed here. I love the battery-powered operation, the on-camera placement for the receiver and the quality of the UHF system.

Obviously, the Canon has XLR connectors that can accept the incoming feed from the Azden, so no converter box was required.
Overall, the gear took about an hour to setup, then it was time to configure and adjust. Getting good exposure took the longest, as it always does. Audio was pretty simple to connect and test, and it took about 30 minutes to get the prompter up and running. Then it took about eight takes until I got what I considered a keeper, then breakdown and cleanup. Like I said, about three hours soup to nuts.
Here’s the video. I’m not quitting my compressionist day job, and I’ll do better next time, but I think it looks credible from a lighting and audio standpoint, particularly the background, which keyed out wonderfully in Premiere Pro using the fabulous Ultra Key. OK, OK, gotta do something about the dark spots under my chin (reflector maybe?), and make sure that any green tint in my face is gone after compositing, but it’s not bad for a one-person shoot. OK, the hair does have a Max Headroom feel, but cripes, no one is perfect.
All navel-gazing aside, if you're a marketing or compression pro and have wondered why it took so long to shoot a simple 30 second video, well, now you know. And if you're on the production side and have clients who wonder the same, just send them this way.
 Streaming Learning Center Where Streaming Professionals Learn to Excel


