The term adaptive streaming refers to technologies that encode multiple instances of a live or on-demand stream and switch adaptively among those streams to deliver the optimal experience to each viewer, taking into account both delivery bandwidth and playback horsepower. Producing for adaptive streaming involves two discrete analyses: how to choose the optimal number of streams and their configurations and how to customize the encoding parameters of the various streams to operate within each adaptive streaming technology. This article will explore both analyses.
Let’s start with a brief technology overview of how adaptive streaming technologies work.
Contents
Technology Overview
There are two kinds of adaptive streaming technologies: server-based and server-less (or HTTP). The most prominent server-based technology is Adobe’s RTMP-based Dynamic Streaming, which maintains a persistent connection between the player and the server while the stream is playing. The player monitors heuristics such as playback buffer and CPU utilization and decides when a stream change is required, and the server delivers the alternate streams as required. When encoding for RTMP-based Dynamic Streaming, you create multiple instances of the source file in the same format as you would for delivering a single file to the same player, which is typically an MP4 or an F4V file.
In contrast, with 
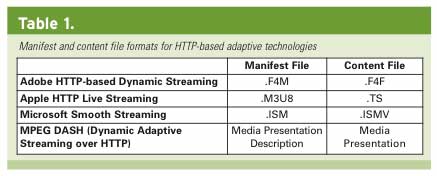
server-less, or HTTP, technologies, there is no server to deliver the alternativestreams, and the player is charged with both monitoring playback heuristics and retrieving the appropriate stream. To accomplish this, HTTP technologies, such as Apple’s HTTP Live Streaming (HLS), Microsoft’s Smooth Streaming, and Adobe’s HTTP-based Dynamic Streaming, require two types of files: a manifest file containing metadata describing the identity and location of the alternate streams and content files specially encoded so the player can retrieve discrete chunks of the file during playback. File extensions for the two file types for these technologies are shown in Table 1.
As you can see, MPEG DASH, a newly adopted standard for adaptive streaming, uses the same file dichotomy, with content contained in media presentation files, and XML-based metadata in the Media Presentation Description file.
Accordingly, when producing for RTMP-based adaptive streaming, you produce multiple files that are identical to files produced for single-file playback. With HTTP technologies, you produce the manifest file and the content file in the specialty formats required by that particular technology. I included a list of resources for each technology at the end of this article.
Generic Issues
Now that we know the landscape, let’s explore generic issues such as choosing the number of streams and their configuration. While none of these decisions are an exact science, there are some definite factors that you should consider when making these decisions.
How Many Streams?
At a high level, when choosing the number of streams, you should choose a stream count that enables you to effectively deliver your video to your most relevant viewers. The right number will depend upon the nature of content that you’re delivering and its purpose. To add structure to this admittedly squishy definition, consider the following factors:
- Identify the largest and the smallest resolutions to be distributed. If you plan to distribute a 1080p stream for power users, and a 416×234 stream for iPhone viewers, you need many streams in between to effectively serve the relevant spectrum of targets. On the other hand, if all streams are 640×480, a common occurrence for SD content, three streams may suffice.
- Determine whether the use is entertainment-oriented (generally 4–11 streams) or educational or corporate (generally 3–5 streams). If you’re selling subscription or pay-per-view content err on the high side of this equation.
- Consider the window sizes on your website. If your website only offers one viewing window, three or four streams should suffice. However, if you will display the alternative streams at multiple window sizes, consider having at least one stream for each window size.
Configuring Your Streams
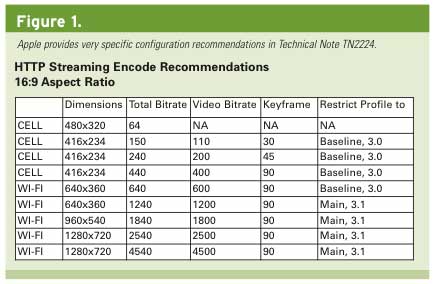
Once you identify the stream count, it’s time to configure your streams. While Adobe, Apple, and Microsoft have all issued some guidance regarding the configuration of streams for their respective technologies, Apple provides the most specific guidance for streams targeting iOS devices in Technical Note TN2224: Best Practices for Creating and Deploying HTTP Live Streaming Media for the iPhone and iPad. This document should be your first stop when configuring streams for HLS.
When configuring streams targeted for playback in other environments, considerations include the following: 
- You should have at least one resolution for each window size within which you will display the video.
- If you’re displaying all streams in a single window size, check whether you can produce all streams at that resolution, varying the data rate and frame rate for lower-quality streams, rather than resolution. So long as the resolution is 640×480 or lower, this seems to work best.
- Consider mod 16, but don’t be dogmatic. To explain, the H.264 codec divides each frame into 16×16 blocks during encoding, so resolutions that divide evenly into 16×16 blocks, or mod 16 resolutions, encode most efficiently. Some producers will only use mod 16 resolutions, but Apple obviously isn’t one of them, since neither 416×234 nor 640×360 is mod 16 resolution (see Figure 1). So use mod 16 when you can, but don’t sweat if you choose a noncompliant resolution, particularly at larger resolutions.
Choosing a Data Rate
When configuring the data rate for your adaptive streams, choose data rates that will make a discernable difference in quality between the streams; otherwise, switching streams makes no sense. This means smaller data rate differences at smaller resolutions and larger differences at higher resolutions.
As you can see in Figure 1, Apple uses this schema for its recommended streams. At the low end, there’s a 90Kbps difference between the first and second streams. At the high end, there’s a 2Mbps difference between the highest quality and penultimate streams.
Encoding Your Streams
Once you’ve configured your streams, it’s time to focus on encoding. From a codec perspective, you have multiple options for some, but not all, adaptive technologies. For example, Apple’s HLS is H.264 only, but Microsoft’s Smooth Streaming works with VC1 and H.264, while Adobe’s Dynamic Streaming works with either VP6 or H.264.
As compared to either VP6 or VC1, H.264 delivers better quality at similar data rates, and it can be accelerated during playback by the GPU, enabling smoother playback on lower-power devices. H.264 also plays on most mobile platforms, so you can encode one set of streams for multiple targets. Unless you have a very good reason to use VC1 or VP6, I recommend H.264 in all applications.
For the most part, the H.264-specific encoding parameters recommended for adaptive streaming are similar to those used for producing files for single-file playback. If you’re producing solely for computer playback, I recommend the high-profile with CABAC enabled. If you’re encoding one set of streams for delivery to both computers and mobile devices, you should encode for the lowest-common-denominator target device, which means following the profile-related recommendations in Figure 1.
Regardless of the selected codec, you need to customize your encoding so that the files will operate smoothly within the selected adaptive streaming technology. Here are the issues that you need to consider.
Bitrate Control: CBR vs. VBR
As a rule, adaptive streaming technologies work best when streams are switched as infrequently as possible. To determine when a stream switch is necessary, all adaptive streaming technologies monitor the playback buffer to determine how much video is stored locally for playback. When that buffer drops below a certain threshold, the player switches to a lower data rate stream.
This schema works best when files are encoded using constant bitrate (CBR) encoding, because all relevant file segments are roughly the same size, which promotes smooth and consistent delivery. With variable bitrate (VBR) encoding, hard-to-encode sequences are produced at much higher data rates, and while transferring these sequences, the buffer can drop below the relevant threshold and trigger a stream switch. In this case, the stream switch wouldn’t relate to actual throughput problems but to your encoding technique.
For this reason, most authorities recommend encoding using CBR, or VBR constrained to a maximum of 110% of the average data rate. The problem with CBR, however, is that it can produce degraded quality in hard-to-compress sequences. For this reason, many producers use constrained VBR when encoding for adaptive streaming.
The potential negative impact of encoding with VBR will depend on many factors, including how close your streams are packed together and the constraint level used during VBR encoding. The most conservative approach is CBR, and for a first-time implementation, that’s where I would start. However, if quality is a problem, I would experiment with VBR constrained to 150%–200% of the target and see if that produces too many stream switches during your testing.
Consistent Keyframe Interval
As we’ve discussed, all adaptive streaming technologies involve a player receiving sections of content from different streams. As with all streaming files, playback of each section must start on a keyframe because that’s the only frame type that includes a complete frame. For this reason, each section of content must start with a keyframe. To accomplish this, you need a consistent keyframe interval across all files in an adaptive set, which means disabling scene-change detection in your encoding tool.

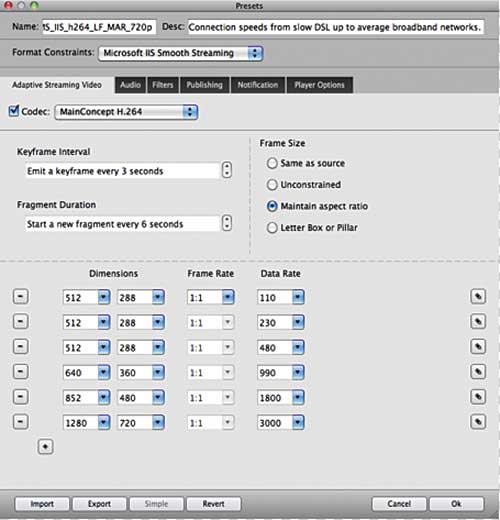
With technologies that divide the distributed files into separate fragments, such as Apple’s HLS and Microsoft’s Smooth Streaming, you also need a keyframe at the start of each fragment. To accomplish this, you need your keyframe interval to divide evenly into your fragment duration. One of the most polished interfaces that I’ve seen accomplish this is in Sorenson Squeeze 7, as shown in Figure 2. As you can see, you set the keyframe interval and fragment duration for all files at one time; you can customize other encoding parameters by clicking the Edit button associated with each stream on the right.
The other keyframe-related point is that all keyframes should be IDR frames, which means that no frames after the keyframe will reference frames located before the keyframe. This option isn’t available on all encoding tools, but as a general rule for any streaming encoding, all keyframes should be IDR frames.
Consistent Audio Parameters
The final encoding consideration relates to audio parameters. If you subtract the video bitrate from the total bitrate in Figure 1, you’ll see that Apple recommends 40Kbps audio for all streams. Most authorities recommend the same, warning that audible pops may occur when switching between streams with different audio parameters. The obvious negative is that audio quality doesn’t scale with video quality, which is a concern in concerts and similar events where audio quality is a significant component of the overall experience.
Again, with live CBR and VBR, this is another general rule that seems honored more in the breach than in the observance. For example, adaptive streaming presets in the Adobe Media Encoder scale with the video data rate, and many producers in the field follow the same practice.
If audio isn’t a significant component of the experience, say in a training or similar speech-oriented video, take the safe route and use one set of conservative parameters for audio throughout. For concerts, ballets, and other similar events, use two sets of audio parameters, one mono, one stereo, that share the same sample rate and bit depth. For example, your lower-quality stream might be 64Kbps/44 kHz/16-bit mono, while your higher-quality stream might be 128Kbps/44 kHz/16-bit stereo. Then test to determine if you hear audible popping when stream switching occurs.
Other Considerations
Another key factor to consider when producing your streams is whether you’ll be using a transmuxing technology such as that offered in Wowza Media Server, Adobe Flash Media Server, Microsoft IIS, or RealNetworks Helix Server. Briefly, transmuxing technologies input a set of streams in one format, dynamically rewrap the content files in a different container, and create the necessary manifest file for other formats. So you could input a set of streams produced for RTMP playback, and the server could transmux the files for delivery to iOS devices, Silverlight, or other targets. If you’re using a transmuxing technology, check with your server administrator for the best format to submit your streams.
For live events, you might also consider transcoding products such as the Wowza Transcoder AddOn, which can accept a single incoming stream and re-encode (or transcode) that stream into multiple lower-quality streams in different formats for different playback technologies. Again, if you’ll be using a product such as the Transcoder AddOn, check with your server administrator for the optimal input format.
 Streaming Learning Center Where Streaming Professionals Learn to Excel


