One of the most critical purchases a streaming producer can make is a light kit. In this article, I’ll explain the factors to consider when choosing a light kit and tell you when it makes sense to spend $3,000 rather than $150.
Let’s start with some assumptions. First, I’ll assume that you’re relatively new to lighting design and streaming production, and that you’re looking for a light kit primarily for talking head productions, whether for video blogging, corporate announcements, or client testimonials. You’re not looking to light a room, but to make sure that you get that face adequately lit.
Second, you’re looking for a kit that’s reasonably portable, rather than a system to install in a room. Finally, that your budget is at least $150 and that you want to buy a kit rather than build one yourself.
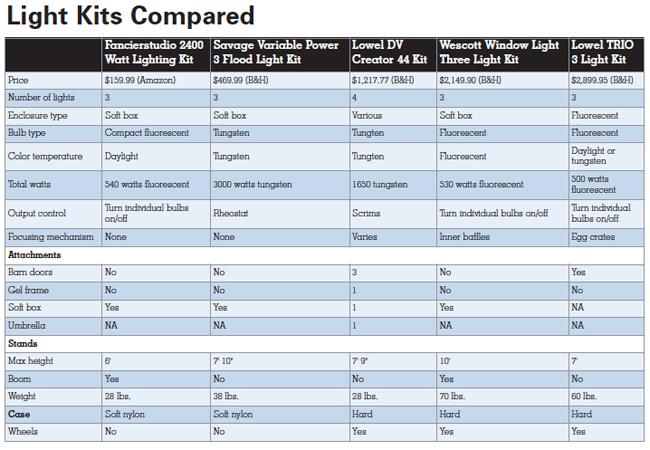
At the bottom of this article, you’ll find a features table comparing five different light kits, from $150 to almost $3,000.
Contents
Lighting for Streaming
Let’s start with some basics to define and elaborate on the items in the features table. When you’re starting out, consider lighting along a continuum. Most important is that lighting is sufficient to allow you to shoot with zero or minimal gain on your camcorder. Once this is accomplished, you can start thinking about the art of lighting, whether shadowy three-point lighting for that dramatic customer testimonial, or slight shadowing to help “model” your CEO’s face when she announces quarterly earnings.
When lighting for streaming, you typically should use soft lights that create soft edges around shadows and minimize details like wrinkles. You can create soft lighting two ways; by using a soft light source like fluorescent bulbs, and by diffusing hard lights like tungsten bulbs in a soft-box or by bouncing the light off umbrellas or other surfaces. All the light kits that I discuss are capable of producing soft light.
For maximum flexibility, you need at least three lights, one to serve as the key light, one as fill light, and one as back or hair light, and all kits in the features table have at least three lights. You can Google three-point lighting for resources detailing how these lights are placed. With a three light kit, you can create dark, contrasty shadows for that customer testimonial, or perfectly flat lighting for a news announcement. If you plan on producing green screen footage, or shooting against a white background, you’ll need at least two additional soft lights to light the background. Again, Google these techniques and you’ll find plenty of resources that detail lighting placement and direction.
The color temperature of your lights is important because mixing lighting temperatures on a shoot can be a disaster. You can color correct for any single temperature, either on your camera or in post, but if you’re buying a kit to match existing lights, make sure they produce the same color temperature. It’s safest to choose a kit that provides sufficient light without relying on existing light sources, so you can shut the shades and/or turn off existing lights and shoot without worrying about mixing color temperatures. All of the kits in the features table produce sufficient light for one or two subjects, but if you’re looking to light a larger area, you’ll need more lights.
Features to Consider
With this as background, let’s take a closer look at the features table, starting with enclosure type. As you can see, softboxes dominate with four of the five kits using a single or multiple softbox. By way of background, a softbox is an enclosure around the bulb that focus the light, and project its through a diffuse material in front to produce the soft light. Softboxes are constructed with flexible rods that connect to a ring around the light fixture in the back, and hooks or other connectors in the enclosure that spread the softbox fabric and keep it taut.
Though simple in design, setting up a softbox typically requires lots of force as you snap the rods into placement holders in the fabric, and can take five or ten minutes. Using softboxes probably adds fifteen minutes to setup and teardown time as compared to fluorescent light fixtures, and, like cheap tents, inexpensive softboxes in particular probably have a useful live of less then 25 or 30 setups before they start to tear or otherwise break down. For this reason, inexpensive softbox kits are best purchased if they can be set up once for semi-permanent use, rather than for continuous portable use.
In the center of the features table, the Lowel DV Creator 44 light kit is a traditional kit created before the revolution in fluorescent and particularly compact fluorescent bulbs. It mixes four different tungsten light types with the directional controls discussed below, with a softbox and umbrella reflector to create the soft lights recommended for streaming production.
I included this Lowel kit because the lights provide the basics for streaming production, but also the controls for more nuanced and artistic lighting. For example, you can create hard, intense lighting if that’s desired, a dramatic spotlight, or easily change light color with gels. None of this is easily possible with the other kits.
Tungsten vs. Fluorescent
Next up is bulb type, either tungsten or fluorescent. The primary benefit of tungsten is lots of light from a single bulb, but that light burns very hot, which consumes power, overheats your subjects, delays tear down until the bulb cools and require special handling. Cool fluorescent lights are easy by comparison, but don’t create as much light.
How do fluorescent lights compare to tungsten in lighting output? In their product specs on the B&H website, Lowel says that the three 55 watt fluorescent bulbs in the Trio kit generate “approximately 2000W of conventional tungsten light (119 foot-candles of light at 6′ distance)–for a total of app. 6000W of light output.” That would suggest that you multiply fluorescent watts by a factor of 12 to approximate tungsten lighting power, which sounds high to me. On their web site, Wescott states that the the 500 watt output of their light kit provides the “equivalent output of 2100 watts,” a four to one ratio that sounds closer to the mark. Fortunately, you can move fluorescent lights much closer to the subject without risking first degree burns, which helps even the score a bit.
Next up is output control. All fluorescent systems control intensity by turning individual bulbs on and off, so your key light might have five bulbs blazing, and your fill light only three. The Savage system includes a rheostat for infinite control, though this may impact color temperature as well at lower power values. With some of the lights on the Lowel system you can use scrims to reduce lighting intensity, or of course move the light further from the subject if you have room.
As the name suggests, focusing mechanisms let you focus the intensity of the light. For example, the inner baffles on the Wescott system and particularly the egg crates on the Lowel lights enable a tightly-focused soft light that can add a touch of drama to a shoot, say by lighting only the head and shoulders of the subject. Many traditional tungsten lights, like some lights in the Lowel Kit, contain focus knobs that allow similar control. In contrast, the two systems on the left push out copious amounts of flat lighting that’s impossible to focus.
Attachments also enhance your ability to control lighting. For example, barn doors let you precisely control the edges of your lighting. Since a solid frame is required for barn doors, this typically isn’t an option on softboxes. Gels are a valuable tool for changing the color of your lighting, whether to match ambient lighting or create a specific effect, like yellowish lighting for warmth, or bluish for cold. The solid enclosures used on the Lowel system make it easy to attach frames that can hold the gels; with softboxes you’ll have to jury rig your own technique for attaching gels, which often involves wooden clothpins.
Moving down the features table, stand height is an obvious concern for some producers, while a boom attachment allows you to extend the back light over the subject, a great convenience for keeping the stand out of the video. If your light kit doesn’t include a boom stand, you should budget for one when buying or figure out how to attach the light to the ceiling or wall behind the subject.
Regarding the final item, cases, a hard body will always protect better than a soft base, and wheels are always a good thing, particularly when the kit weighs 60 pounds or more.
Other Lighting Considerations for Online Video
What else to consider? If you actually get to touch the kit before buying, check the construction of critical load bearing pieces. Many of the connectors and fasteners on inexpensive kits are made of plastic, and are one over-enthusiastic twist away from being worthless. Also assess the durability of the softbox, considering the strength of the materials, the soundness of the seams and the robustness of the rod/fabric connector. If you’re looking for a truly portable systems, does it feel like it will last through twenty or thirty setups?
Also consider the stability of the light stands. Cheaper stands are lighter and less stable, and more subject to easily tipping over. The best stands are air-cushioned, so sections descend slowly if they get loose, protecting the lighting gear from a quick drop, and your fingers from a painful pinch. Cheaper stands use inner springs to cushion any drops, which aren’t as effective and won’t protect your fingers. Before buying any of this gear, check reviews on Amazon and B&H, particularly for the less expensive kits.
Finally, like everything else, when it comes to lighting, you get what you pay for. The least expensive kits will let you produce sufficient light to shoot with zero gain, and create shadowed and flat lighting, but will be time consuming to set up and tear down and likely won’t withstand the rigors of portable use. They’re great kits for novices and for basic use, but if you need portability and/or the ability to create truly dramatic lighting effects, you’ll have to pay a lot more.
 Streaming Learning Center Where Streaming Professionals Learn to Excel


