Streaming Learning Center Where Streaming Professionals Learn to Excel

Related Articles


I just finished a project that involved encoding lots of downloaded YUV test files, which is something I never tried before. The problem is that there’s no resolution or frame rate information in the file header, so you have to detail all this in the command string.
My first crack at the problem evolved into this command string, obviously for a 25 fps 1080p file. Use this up to and including the -i switch in the normal command string.
ffmpeg -f rawvideo -vcodec rawvideo -s 1920x1080 -r 25 -pix_fmt yuv420p -i input.yuv
This worked fine but seemed verbose so I tried this one which also worked. Simpler is always better, so I’ll use this one going forward unless it breaks and I have to try the one above:
ffmpeg -s 1920x1080 -r 25 -pix_fmt yuv420p -i input.yuv
Of course, if you convert the YUV file to a Y4M file, you don’t have to include the descriptive information in FFmpeg or any analysis program. That’s because the Y4M file has this information in the file header. To convert the YUV to Y4M I first tried this:
ffmpeg -s 1920x1080 -r 25 -pix_fmt yuv420p -i input.yuv -c:v copy input.y4m
Which failed.

So, I dropped the c:v copy and tried this:
ffmpeg -s 1920x1080 -r 25 -pix_fmt yuv420p -i input.yuv input.y4m
Which worked and produced a file exactly the same size as the YUV. Here are the two peas sitting in the pod.

I encoded a file using the Y4M file and the output was identical to the YUV with a much simpler command string.
Author’s note:
After posting this article, I received the following message from Lou Logan, who wrote:
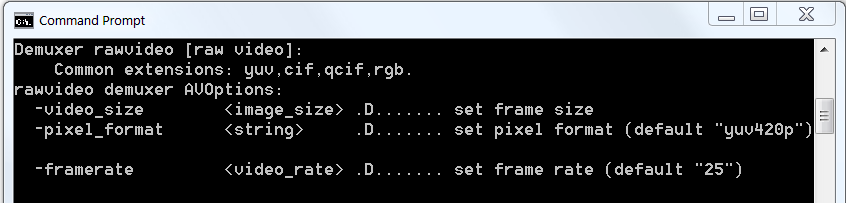
You are using -s, -r, and -pix_fmt input options for the rawvideo demuxer. You should be using the proper rawvideo private options instead. These are -video_size, -framerate, and -pixel_format. You can see demuxer info with “ffmpeg -h demuxer=rawvideo”.
Here’s what the help file says:
To verify these comments, I changed the command string to this:
ffmpeg -video_size 1920x1080 -framerate 25 -pixel_format yuv420p -i input.yuv output_correct.y4m
Which produced what appeared to be the identical file:
Identical results notwithstanding, the best practice is to use what’s specified in the help file, so from here on out, I’ll use the syntax that Mr. Logan suggested. Thanks Lou!
Having successfully converted the YUV file to Y4M, I can use the input.y4m file in FFmpeg and other tools like the Moscow State University Video Quality Measurement Tool and VMAF-Master and not have to specify resolution, format, and frame rate, simplifying the lot and reducing the risk of error.