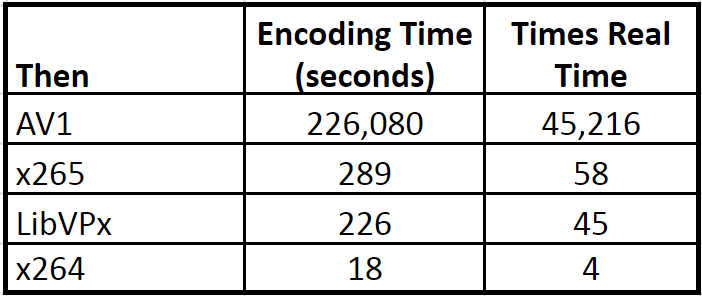
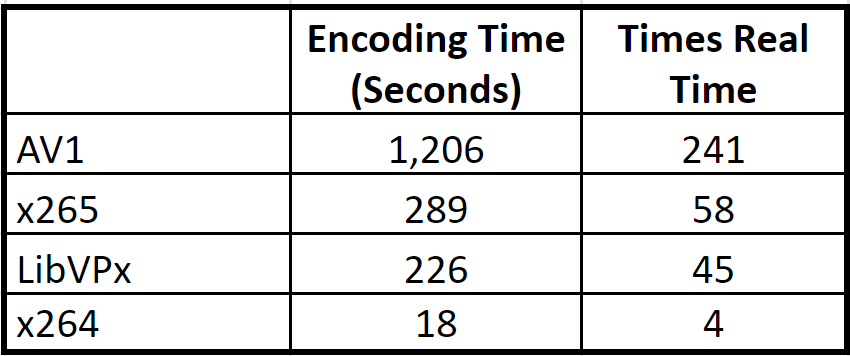
When I first tested AV1 encoding back in August 2018 encoding times were glacial and seriously detracted from the potential usability of the codec. Table 1 from that story tells the tale. Unless otherwise indicated, all encoding times are on my HP ZBook notebook powered by a single 2.8 GHz Intel Xeon E3-1505M v5 CPU. In addition, LibVPx is the implementation of VP9 in FFmpeg, and all references to AV1 refer to the AV1 codec available in FFmpeg.
Contents
 Table 1. Encoding times for the first release of AV1
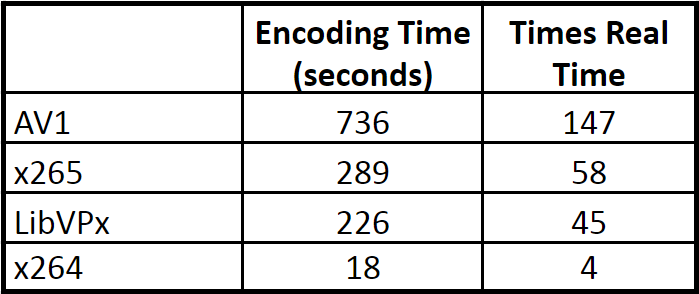
Starting in late 2018, I wrote that researchers had reported AV1 encoding times as low as 10x LibVPx encoding times. So, when I started a recent codec evaluation project, I was eager to see if I could match those times. I just finished that project, and Table 2 shows where things stand now. Since I know you’re wondering, the VMAF quality for the clip compressed last year was 96.18; the quality for the clip referenced in Table 2 is 95.55. Since it takes 6 VMF points to make a Just Noticeable Difference, even the sharpest-eyed viewer wouldn’t notice this .63 differential.
 Table 2. Current optimized encoding times for AV1
Based upon the old encoding times from the August 2018 review for the other codecs, AV1 was down to about 3x the encoding times of x265 and LibVPx. As you’ll read below, things aren’t exactly apples to apples, and I’m not exactly being fair to the other codecs, but all that notwithstanding it’s a pretty impressive speedup, wouldn’t you agree?
If you’re in a TL/DR kind of mood, you can jump down to Table 6 and see a comparison that is fair to the other codecs. If you want to take the time to learn how I got there, let’s break down the components.
Encoder Speed Improvements
The command string used back in our initial tests was this:
ffmpeg -y -i input.mp4 -c:v libaom-av1 -strict -2 -b:v 3000K -maxrate 6000K -cpu-used 8 -pass 1 -f matroska NUL & \

ffmpeg -i input.mp4 -c:v libaom-av1 -strict -2 -b:v 3000K -maxrate 6000K -cpu-used 0 -pass 2 output_AV1.mkv
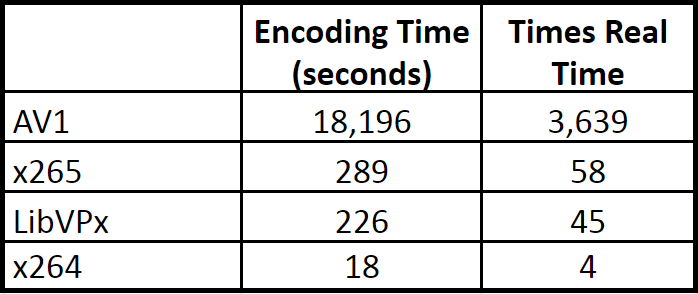
If you use this same exact string with the current version of FFmpeg (I tested version N-93083-g8522d219ce), the encoding time drops from 226,080 seconds (45K times real-time) to 18,196 seconds, or about 3,639 times real-time, a speedup of about 12x. Still about 63 times slower than x265 and 80 times slower than LibVPx, but a huge improvement that takes us to the results shown in Table 3. The VMAF score for the AV1 file created in Table 3 was 95.91 so there was a very small and insubstantial quality drop from last year’s 96.18.
 Table 3. Using the original command line with the current code (AOM’s improvements)
Table 3 shows apples-to-apples performance with our initial tests. All other encoding time decreases relate to changes to the encoding string.
Finding AV1’s Optimal Speed/Quality Tradeoff
Let’s get practical. Most codecs have presets that lets you trade off encoding time for quality. For example, with x264 and x265, the presets have names like slow, very slow, fast, very fast, and placebo. With AV1, the presets are controlled via the cpu-used switch, and you can see in the batch above that I used cpu-used 8 in pass 1 and cpu-used 0 in pass 2.
If you load the AV1 help notes in FFmpeg (ffmpeg -h encoder=libaom-av1), you’ll see the following:
-cpu-used <int> Quality/Speed ratio modifier (from 0 to 8) (default 1)
With LibVPx and AV1, first-pass quality doesn’t impact the second pass, so you typically run the first pass at the fastest/lowest quality setting. At Google’s direction for the August First Look, I ran the second pass at the highest possible quality, which was cpu-used 0. Encoding times were so slow that I didn’t take time to experiment with these settings as I’ve done before for x264, x265, and LibVPx.
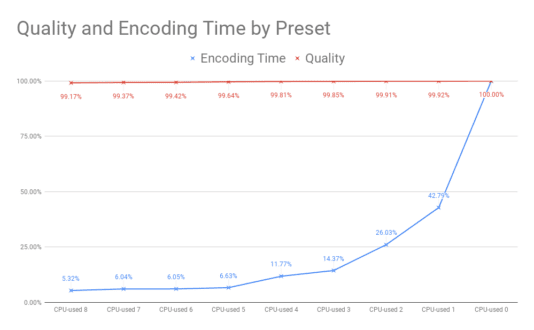
Figure 1 shows the graph I typically create for each codec/preset/encoder before I start serious testing or production encoding. The red line tracks available quality while the blue line tracks encoding time. At cpu-used5, for example, encoding time is 6.63% of the maximum (00:20:06 compared to 5:03:16) while quality is 99.64% of the maximum (95.56 VMAF compared to 95.91).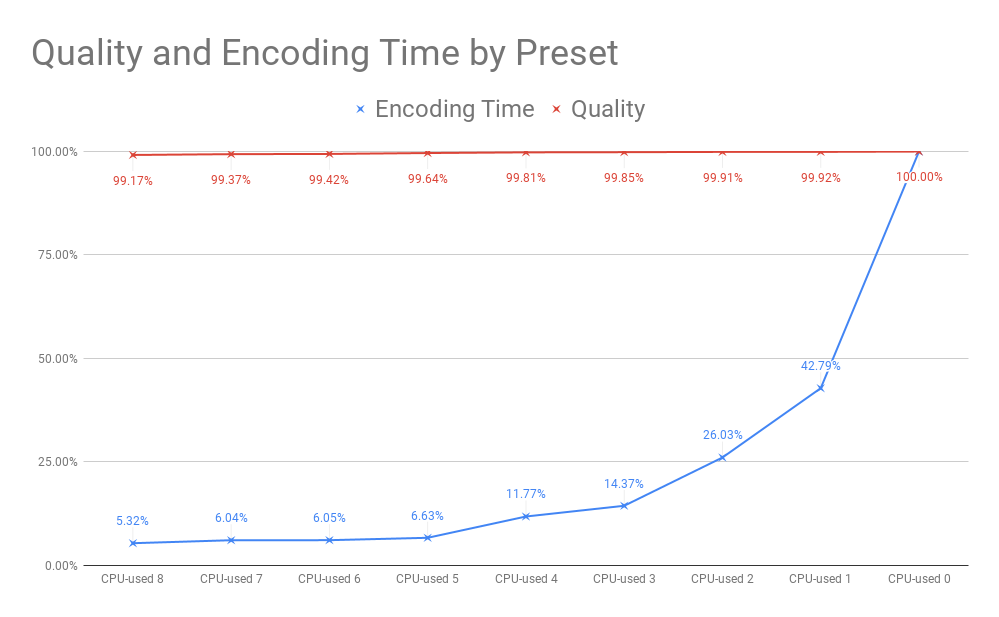
Figure 1. AV1’s quality/speed curve.
If you’re a researcher trying to measure the absolute best quality available from a particular codec, you ignore the graph and encode at cpu-used 0. If you’re a video producer, you probably encode at cpu-used 5, since lower settings deliver minimum time savings and higher settings deliver minimal quality improvements. Of course, based upon the numbers shown in Figure 1, no one would call you crazy if you opted for cpu-used 8. Assuming that you encoded with cpu-used 5, Table 4 shows how encoding times compare.
 Table 4. The current version of FFmpeg, cpu-used 5
Can a single encode of a five-second clip accurately predict the quality/speed curve for a broader range of clips encoded at multiple data rates? In the project I recently completed, I used the same approach on a different codec and the curve based upon a single encode of a five-second test clip predicted a quality differential of 1.3% between the preset used and maximum quality (and the preset cut encoding time from 18 minutes to 3 minutes). I later measured the actual differential between the preset used and maximum quality over a five-rung ladder and six test clips and the actual differential was 1.4%. So, while more data is always better, a single encode should be a reasonably accurate predictor.
That said, in my book, Video Encoding by the Numbers, I created similar curves for x264, x265, and LibVPx using eight clips averaging about two minutes in duration. Before I started serious encoding with a new codec or encoder, particularly AV1, I would run tests on similar or larger numbers of samples.
Running Multiple Threads
During the recent project, I asked Google if there were any other ways to accelerate encoding speed. One engineer advised:
If you can use multiple threads while running the encoder, it would help with the encoder speed. For HD and above resolutions, we suggest using tiles. Using tiles causes quality loss, and my old testing showed ~0.6% loss while using 2 tiles and ~1.3% loss while using 4 tiles.
I didn’t test 4k clips myself, so here I just give some suggestions.
For 1080p, use 2 tiles and 8 threads: “–tile-columns=1 –tile-rows=0 –threads=8
For 4k, use 4 tiles and 16 threads: “–tile-columns=1 –tile-rows=1 –threads=16” (or even try: 8 tiles/32 threads: “–tile-columns=2 –tile-rows=1 –threads=32″)”
Before implementing tiles and threads in that project, I tested both a 1080p and 4K file, this time on my HP Z840 40-core workstation which had many threads to spare. I used the suggested settings for 1080p, and the second set of settings (–tile-columns=2 –tile-rows=1 –threads=32) for 4K. Table 5 shows the results. At 1080p, encoding time dropped by 41.66%, while for 4K it dropped by 70.56%, in both cases with negligible quality differences.
 Table 5. Deploying multiple threads in other test encodes
Applied to our test clip on the ZBook testbed, deploying the –tile-columns=1 –tile-rows=0 –threads=8 switches dropped encoding time at cpu-used 5 from 20:06 to 12:16, the number shown in Table 2. This was accompanied by a whopping quality drop of .01 VMAF points (95.56 to 95.55).
Actually, to be perfectly clear, the switches added to our FFmpeg command string were as follows:
-tile-columns 1 -tile-rows 0 -threads 8
The switches shown by the Google engineer were likely for the AOM encoder that works independently of FFmpeg. Note that these switches are not currently in the FFmpeg help file for the AV1 codec but give them a shot and see if you get the same result (note: these switches were not documented in a previous version of FFmpeg that I checked while researching this article, but tiles, tile-columns, tile-rows, and row-mt are documented in the current version of the AV1 help file in FFmpeg).
Not to get all wonky on you, but while these settings should increase the encoding speed of any particular encoding run, they may not increase encoding throughput on any given system. That’s because they don’t appear to increase encoding efficiency, per se, they seem to allow each individual encode to consume more CPU resources, which is a zero-sum number on any given system.
Though the numbers don’t map perfectly, in essence, rather than processing two simultaneous encodings on the same system that each produce five minutes of encoded footage in an hour, we’re processing a single encode that runs twice as fast and produces ten minutes of encoded footage per hour. Overall system throughput is ten minutes per hour in both cases but the multi-threaded encode is working twice as fast. If you’re creating an encoder that processes multiple encodes in parallel, you may not want to use these settings. If you’re running a single instance of FFmpeg on a system, you almost certainly do.
Where Are We?
So, I started off saying that I wasn’t comparing apples to apples, which readers will now understand, but also that I wasn’t being fair to the other codecs. How’s that? Well, x264, x265, and LibVPx have their own quality/speed curves and if we’re applying the “practical” setting for AV1 we should do the same for these three codecs.
Specifically, if we use speed 2 for LibVPx (rather than the top-quality speed 0) and the slow preset for x264 and x265 (rather than very slow), we get the timings shown in Table 6. This puts AV1 at somewhere close to 20 times more expensive to produce than both x265 and LibVPx, which makes it appropriate only when encoding for high six and seven figure audience numbers. This is fine since to date it’s typically companies (and Alliance for Open Media members) like Netflix, Facebook, and YouTube that have produced video with the new codec. Impressive speed gains to date; I’m sure there’s more to come.
I’m showing the VMAF scores in Table 6 for informational purposes only; a single five-second 1080p encode of a relatively easy-to-encode clip at 3 Mbps is insufficient to draw any quality-related conclusions. Rather, you need to review rate-distortion curves and BD-Rate comparisons from multiple clips. I’ll update the results from the AV1 review in the next few weeks to create relevant comparative data.
 Table 6. Speed comparisons using the most “practical” settings.
In the meantime, if you’re encoding AV1, try the different cpu-used settings and tiles and threads, and see if your results are similar. If you read any AV1 comparative reviews that reference glacial encoding times, check and see which cpu-used setting the researcher used. If it’s not specified, the default is 1, which is likely a setting that no real producer would ever use. If it’s cpu-used 0, while arguably appropriate for academic research, the encoding times bear absolutely no relation to how real producers will actually use the codec.
To help those who want to try these new switches, here’s the final version of the FFmpeg command string.
ffmpeg -y -i input.mp4 -c:v libaom-av1 -strict -2 -b:v 3000K -g 48 -keyint_min 48 -sc_threshold 0 -tile-columns 1 -tile-rows 0 -threads 8 -cpu-used 8 -pass 1 -f matroska NUL & \

ffmpeg -i input.mp4 -c:v libaom-av1 -strict -2 -b:v 3000K -maxrate 6000K -bufsize 3000k -g 48 -keyint_min 48 -sc_threshold 0 -tile-columns 1 -tile-rows 0 -threads 8 -cpu-used 5 -pass 2 output.mkv
 Streaming Learning Center Where Streaming Professionals Learn to Excel

