This is the second in a five-part series on how to cut your encoding and streaming costs. The first article was Saving on Encoding: Adjust Encoding Configuration to Increase Capacity.
Article summary: Capped CRF encoding is a single-pass encoding method that can save encoding costs compared to two-pass VBR. Capped CRF is also a simple per-title encoding method that can reduce your bandwidth costs and improve viewer QoE. Capped CRF is a credible technique currently used by JWPlayer in the company’s online video platform for both H.264 and VP9.
Per-title encoding customizes each encode for the complexity of the video footage. Hard-to-encode video clips are encoded at higher data rates than your normal ladder, while easier-to-encode clips are encoded at lower data rates. Since most encoding ladders are so conservative, in most cases, deploying per-title encoding results in a data rate reduction for most clips.
You can access per-title encoding in many forms from many different vendors. You can license optimization technology from Beamr, Crunch Media, Euclid IQ, and ZPEG deploy on-premise encoders from Capella Systems, Harmonic, Elemental, and others with per-title capabilities, or access per-title encoding in the cloud from Bitmovin, Brightcove, JWPlayer, and Mux. Or, depending upon your encoding platform, you can roll your own via a technique called Capped CRF.
Contents
Bandwidth Savings, Increase QoS, or Both?
For some companies, deploying Capped CRF will reduce bandwidth costs. For others, it will improve the quality of service for their viewers. For some, both. It all depends upon which streams in your encoding ladder that you’re delivering to your existing customers.
To explain, consider Table 1, which shows an encoding ladder and three different stream distribution patterns, A, B, and C. Each pattern shows the percentage of each stream actually delivered from the adaptive group, as you should be able to derive from your log files.
 Table 1 Three stream delivery patterns.
In pattern A, all of the streams delivered are 3000Kbps or below, perhaps representative of distributing in a third-world country. In this case, switching to capped CRF would have no impact on bandwidth cost because you’d just be switching one 3000 kbps stream (or lower) for another. The quality would likely be improved, of course, but you’d be distributing the same bandwidth stream, so bandwidth savings would be modest.
In distribution pattern B, 100 percent of the delivered streams are the 7800Kbps stream, perhaps representative of distributing via direct fiber to the home in Scandinavia. Here, deploying capped CRF would likely reduce the bandwidth of most of your highest bandwidth streams, which would translate directly to bandwidth savings. For exceptionally hard-to-encode clips, it would also improve the QoE of your viewers.
Pattern C shows a high concentration in the top rungs and a decent spread in the other rungs, perhaps a mix of mobile and broadband. Again, deploying Capped CRF would drop the data rate of most streams in your ladder, reducing your delivery bandwidth. And, it would also improve the quality of some streams watched by your customers, improving QoE.
The obvious point is that your bandwidth savings depend upon your distribution pattern, which is data you’ll have to mine from your log files. It also depends upon how aggressive you are with your existing ladder. If your top bitrate for 1080p video is 6000 Kbps or higher, and you’re distributing lots of those streams, you’ll probably save quite a bit. if it’s 4200 Kbps, you’re already pretty aggressive and the savings will be more modest.
Note that all these observations are true for any per-title technology, not just capped CRF. They are also true for the benefits of implementing a new codec like HEVC or AV1.
What is Capped CRF
Constant rate factor (CRF) is an encoding mode that adjusts the file data rate up or down to achieve a selected quality level rather than a specific data rate. CRF values range from 0 to 51, with lower numbers delivering higher quality scores. Multiple codecs support CRF, including x264, x265, and VP9.
On its own, CRF is unusable for adaptive bitrate streaming, where data rates in the ladder rungs need to be limited. However, by adding a “cap” to CRF, you limit the data rate to that cap. An FFmpeg argument implementing capped CRF would look like this:
ffmpeg -i input_file -crf 23 -maxrate 6750k -bufsize 6750k output_file
This tells FFmpeg to encode at a quality level of 23, but to cap the data rate at 6750 kbps with a VBV buffer of 4500 kbps. For easy-to-encode clips, the CRF value would limit the data rate, as the required quality could be achieved at data rates lower than the cap. For hard-to-encode clips, the cap would kick in to control the data rate.
Capped CRF lacks some of the features of more sophisticated per-title technologies, like the ability to change the number of rungs in the ladder or change the resolution of some of the rungs. Still, it has always performed well in comparisons with other technologies (see One Title at a Time: Comparing Per-Title Video Encoding Options and is essentially free if your encoding tool supports it.
For Streaming Media East, I compared Capped CRF with per-title technologies from Capella Systems and Brightcove. You can see a video of my presentation and download the handout here. Table 2 shows the key results.
 Table 2. A per-title scorecard from Streaming Media East 2018.
In the table, you see that capped CRF ranked second in saved storage, last in streaming bandwidth saved, but first in net impact on VMAF. Essentially, this means that while capped CRF didn’t reduce the data rate as much as the two other technologies, this had the beneficial result of improving the viewer quality of experience over the other two. If your goal is more streaming savings you can use a higher CRF value that lowers the data rate and decreases quality slightly. For example, I used CRF 22 for my tests, where JWPlayer uses CRF 23, which delivers more bandwidth savings.
One key benefit of capped CRF is that it’s a single-pass technology. If you’re currently using a two-pass technique, capped CRF will also significantly increase your capacity or cut costs. In contrast, most other per-title technologies actually require an additional analysis pass prior to the actual encode, which may boost your encoding cost or decrease your capacity.
The single-pass nature of capped CRF is reflected in the 98 “saves,” representing one pass for each of the seven rungs in the fourteen test files. Capella and Brightcove got their saves by eliminating rungs from the encoding ladder for easy-to-encode clips, though this doesn’t factor in the analysis pass both systems use for their per-title encodes (it will next time).
This material is now included in a lesson in the course Streaming Media 101: Technical Onboarding for Streaming Media Professionals. If you need to learn key video streaming concepts, terms, technologies, workflows, and best practices, check out the course here.
Bitrate Control Concerns
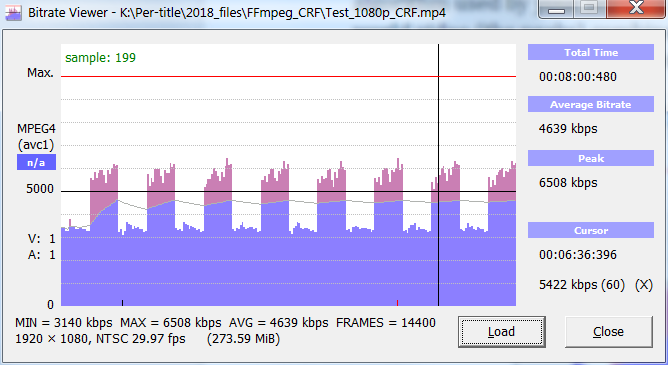
One concern about capped CRF is that because there are no bitrate controls other than the cap, there could be huge data rate swings within the file that potentially disrupt the switching algorithm used by your selected ABR technology. The file shown in Figure 1 contains a mix of ballet (the peaks) combined with a talking head video (the valleys) causing the data rate within the file to vary from under about 3 Mbps to 6 Mbps.
 Figure 1. Significant data rate swings in this file encoded using Capped CFR.
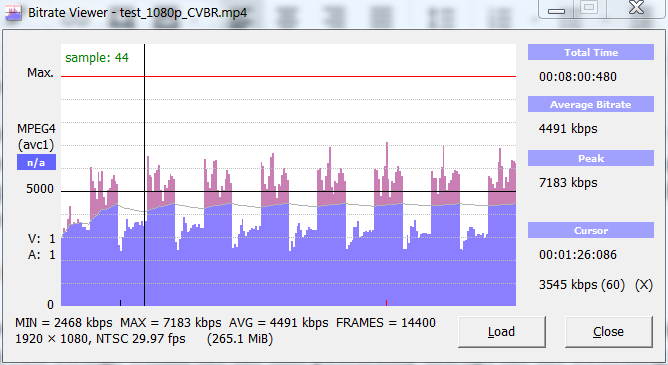
In truth, most other VBR technologies deliver a similar file. For example, Figure 2 shows the data rate of the same file encoded with FFmpeg using 200% constrained VBR. In this file, the valleys are about the same but the peaks slightly higher. So, if you’re using 200% constrained VBR now, capped CRF shouldn’t cause any concerns.
 Figure 2. Even worse data rate swings in this file encoded using 200% constrained VBR.
On the other hand, if you’re using CBR because you believe it maximizes file deliverability, then capped CRF is definitely not for you. From my perspective, the fact that JWPlayer continues to use capped CRF after several years of deployment allays most of those concerns.
Careful With Screencams
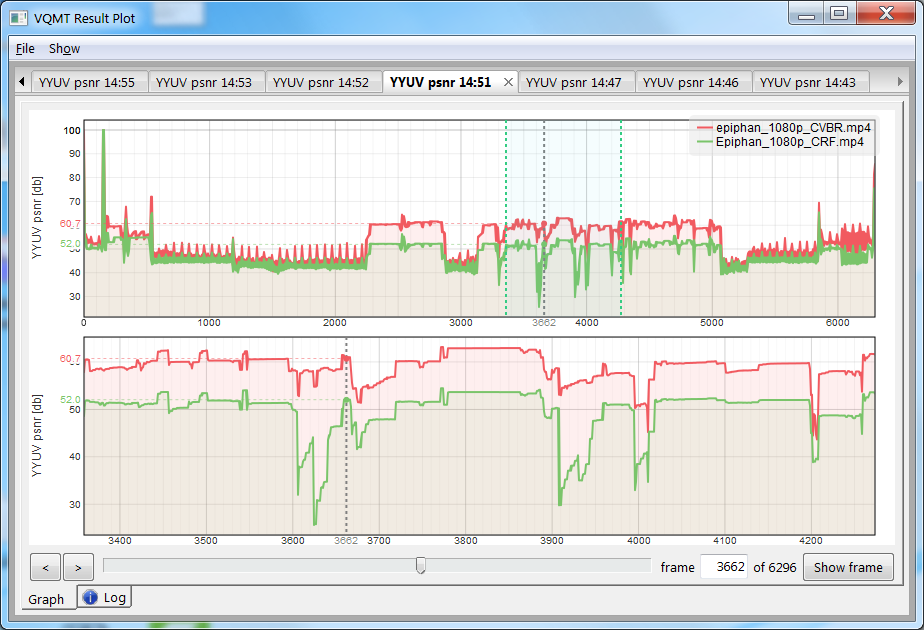
I test per-title technologies with about 20 test clips including three or so screencams or similar synthetic clips. While writing this article, I tested to see if CRF seriously degraded the quality of any clip, which is simplified by the Moscow State University VQMT’s Result plot, shown in Figure 3.
 Figure 3. The result plot shows significant qualitative differences between capped CRF and 200% constrained VBR.
Briefly, I used PSNR on these analyses (rather than VMAF) since it computes so much faster and is a great canary in the coal mine for quality issues. Here, I’m analyzing 200% constrained VBR (orange) and capped CRF (green), with the top graph showing the PSNR values for the two files over the entire file, and the bottom showing the highlighted region from the top (about 55% – 65%). The significant deltas between the values often points to very noticeable qualitative differences.
If you click Show Frame on the bottom right of the clip, you can toggle through the source frame and frames from the two analyzed clips. Figure 4 shows a portion of the screen from the capped CRF clip, which is clearly degraded.
 Figure 4. Indicating a few frames like this.
Note that this was, by far, the biggest qualitative difference I saw in the three synthetic clips, and I saw no meaningful differences in the real-world clips or animations. The comparisons for most real-world clips looked like Figure 5, a high motion clip where CRF delivered a slightly higher data rate than 200% constrained VBR and slightly higher quality, but no major deltas from the 200% constrained VBR plot.
 Figure 5. The CRF clip was consistently slightly higher than the 200% constrained VBR.
So, while I would not recommend capped CRF for screencam and similar synthetic footage without additional testing, I’m comfortable recommending it for real-world videos and animations.
Deploying Capped CRF
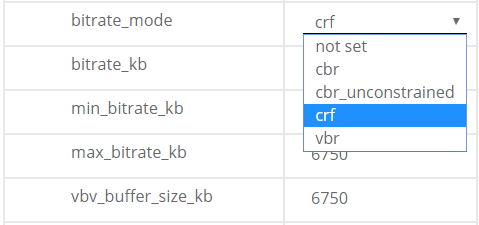
Deploying capped CRF encoding is simple so long as your encoder allows you granular control over your encoding parameters. For example, Figure 2 is a screenshot from the browser-based user interface of the Hybrik cloud encoder. As you can see, you choose the CRF bitrate mode, then enter the max_bitrate and vbv_buffer size values (the entry for CRF value is further below and isn’t shown). If you were using the API, you would configure the same parameters via JSON. Most cloud encoders are built around FFmpeg, so you may be able to access CRF encoding if another per-title method isn’t available.
 Figure 2. Selecting capped CRF in the Hybrik cloud encoder.
If your desktop encoder doesn’t allow you to select crf as a bitrate, you may be able to enter x264 commands directly within the user interface, which was a feature of Telestream Vantage last time I checked. If you can access CRF controls, you’ll substitute these for your previous bitrate control method, whether CBR or VBR.
Capped CRF in FFmpeg
The batch file below shows the test ladder from the Streaming Media comparison, absent the GOP, preset, audio, and other commands you’d normally see in an FFmpeg batch. I’ve changed the CRF value to 23 to match JWPlayer. I set the max rate and buffer size at 1.5x times the original target data rate, which was 4500 kbps for the 1080p stream. JWPlayer also sets the same value for data rate and buffer size, though I’ve seen other documentation where the buffer was twice as high as the target.
 ffmpeg -i Input.mp4 -c:v libx264 -crf 23 -maxrate 6750k -bufsize 6750k Output_1080p.mp4
 ffmpeg -i Input.mp4 -c:v libx264 -crf 23 -s 1280x720 -maxrate 4050k -bufsize 4050k Output_720p.mp4
 ffmpeg -i Input.mp4 -c:v libx264 -crf 23 -s 960x540 -maxrate 2850k -bufsize 2850k Output_540p.mp4
 ffmpeg -i Input.mp4 -c:v libx264 -crf 23 -s 852x480 -maxrate 2025k -bufsize 2025k Output_480p.mp4
 ffmpeg -i Input.mp4 -c:v libx264 -crf 23 -s 640x360 -maxrate 1350k -bufsize 1350k Output_360p.mp4
 ffmpeg -i Input.mp4 -c:v libx264 -crf 23 -s 480x272 -maxrate 750k -bufsize 750k Output_272p.mp4
 ffmpeg -i Input.mp4 -c:v libx264 -crf 23 -s 320x180 -maxrate 375k -bufsize 375k Output_180p.mp4
Batch 1. Encoding a full ladder with capped CRF.
Note that you can adjust all these parameters to achieve your specific delivery and quality of experience goals. Lower CRF values like 21-22 will deliver higher bitrates and higher quality, while higher values like 24-25 will do the opposite.
What About Duplicate Resolutions
Conveniently, Batch 1 contains seven rungs with different resolutions. This simplifies things, because so long as you use the same CRF value in all rungs, larger resolutions should always have higher data rates, preserving the necessary data rate progression for effective stream switching.
However, what happens if you have three rungs at 720p, say at CRF 21, 23, and 25? How can you be sure that the 720p @ CRF 25 rung has a higher data rate than the next lower rung, say at 540p@ CRF 21. You’ll almost certainly encounter this issue with 4K video footage where ladders can have 9 – 11 rungs.
I’ve run into this situation once when working with VR 4K footage. In that case, I ran test encodes on multiple clips at different resolutions and CRF values. With this data, I created a ladder that utilized several resolutions (like 4K, 1080p, and 720p) multiple times with different CRF values. I then tested the ladder with multiple clips that ranged in encoding complexity from simple to insane to make sure the ladder maintained the necessary data rate spread between all rungs.
With extremely simple clips, the lower rungs tended to get very close together, simply because you don’t need 11 rungs if the top rate is 5 Mbps. Still, the ABR groups were workable. The harder-to-encode files that I tested seemed to work perfectly.
Where to Go from Here
You should have everything you need to start experimenting with capped CRF. If you’re unfamiliar with video quality metrics, or other concepts presented above, I suggest you pick up Video Encoding by the Numbers. If you’d like to start experimenting with FFmpeg, consider picking up Learn to Produce Videos with FFmpeg: In 30 Minutes or Less (2018 Edition).
If you’d like to have a third-party look over your encoding parameters and perhaps run tests for you, contact me (Jan Ozer) at janozer@gmail.com.
Resources
Video Encoding by the Numbers: Eliminate the Guesswork from Your Streaming Video (PDF version)(Amazon).
Learn to Produce Video with FFmpeg in 30 Minutes or Less.
Per-Title Encoding Resources, Streaming Learning Center.
One Title at a Time: Comparing Per-Title Video Encoding Options, Streaming Media Magazine.
Buyers’ Guide to Per-Title Encoding, 2018 Streaming Media Sourcebook.
Per-title Presentation at Streaming Media East 2018, video and handout are available here.
 Streaming Learning Center Where Streaming Professionals Learn to Excel


