 Streaming Learning Center Where Streaming Professionals Learn to Excel

Related Articles


This is the first of five articles on how to cut your encoding and streaming costs.
[dt_quote type=”pullquote” layout=”left” font_size=”big” animation=”none” size=”1″]This article discusses how you can cut x264 encoding costs by 73% without noticeable quality degradation and triple your x265 capacity while actually improving real world video quality. [/dt_quote]
A key focus of my book Video Encoding by the Numbers was to isolate the qualitative impact of critical encoding decisions, particularly when they significantly impact encoding time. For example, if a configuration improves quality by 1%, it likely wouldn’t be visible and wouldn’t improve the viewer’s quality of experience. If this configuration option boosts encoding time by a factor of ten, it’s probably not worth it.
Clearly, configuration options like this impact cost in some instances and don’t in others. For example, if you’re encoding on-premise and you’re approaching full capacity, you may need to purchase another encoder. If you can accelerate your existing encoder without significantly degrading quality, you could save significant CAPEX.
If you’re encoding in the cloud with a service like Hybrik, where you pay a fixed monthly fee and pay for your own compute hours, cutting encoding time means cutting encoding costs. Ditto for pricing plans like encoding.com’s reserved cloud, where you rent the encoder for a monthly fee and process as much video as possible during that month.
Conversely, if you’re on a per-minute or per-gigabyte plan in the cloud, cutting encoding time won’t impact costs, and it makes sense to optimize quality to the max, irrespective of encoding.
Which configuration options should you check? There are two parameters with huge encoding time swings but only minor changes in encoding time or quality. These are presets and reference frames.
Contents
x264 Presets – Increase Capacity by 73%
For presets, I’ll address x264 and x265, since these are the codecs that I work with in FFmpeg. Both codecs offer ten presets with the same names, from Ultrafast to Placebo, which provide video producers with a simple mechanism for trading off quality against encoding time. If your encoder uses the x264 and x265 codecs, which most do, you should be able to select from among these presets. Note that the default is Medium, so if you don’t specify otherwise in your encoder, that’s the preset you’ll use.
In my Numbers book, I tested all encoding parameters with eight different files, including real-world videos, animations, movie clips, and screencams to account for variations in file types. For the chart shown in Figure 1, I encoded each clip ten times using identical configurations save the x264 preset. Then I measured the quality of each clip using Netflix’s VMAF metric calculated with the Moscow State University Video Quality Measurement Tool (VQMT). For perspective, values above 93 typically don’t show any artifacts, and a difference of six points constitutes a just noticeable difference (JND) that viewers will likely observe.
 Figure 1. VMAF values by clip and x264 preset (click image to view at full rez).

All videos cross 93 when encoding with the Faster preset, after which VMAF increases on average from 94.52 to 95.62, or about 1.1 VMAF points, well under the 6-point JND threshold. This means that for most videos, the Faster preset delivers sufficient quality to eliminate artifacts and that the additional quality delivered by the higher-quality presets likely wouldn’t be noticed by most viewers.
[dt_quote type=”blockquote” font_size=”big” animation=”none” background=”plain”]So, if you’re currently using the Medium preset and switch to Faster, you increase capacity by 73% while dropping the average VMAF score from 95.11 to 94.52, a change that would be imperceptible to the vast majority of your viewers.[/dt_quote]Table 1 shows the average encoding time in seconds for all test clips using all ten presets on my HP Z840 workstation. Line 2 shows the impact on encoding capacity if you switch from the default Medium preset to another. So, if you’re currently using the Medium preset and switch to Faster, you increase capacity by 73% while dropping the average VMAF score from 95.11 to 94.52, a change that would be imperceptible to the vast majority of your viewers.
Table 1. Average encoding time for the x264 presets and impact on capacity of change from Medium preset (click image to view at full rez).

If you’re not using the x264 codec, you still can benefit from this type of analysis. For example, Elemental encoders use their own codec, with a numerical switch (1-4 I believe) that trades off quality against encoding time. The MainConcept H.264 and H.265 codecs use values ranging from 1-28 to do the same. Using the analysis above as a template you could easily create your own test suite and find the optimal tradeoff between encoding time and quality. Click here to download the handout from a presentation on HEVC quality where I ran such an analysis for the MainConcept HEVC encoder and Google’s VP9 codec.
x265 Presets – Triple Your Capacity and Improve Quality
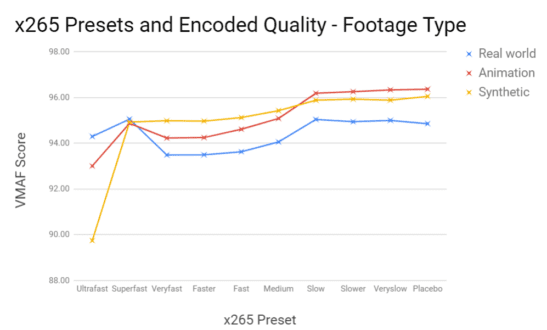
The HEVC preset situation presents a completely different set of choices. Figure 2 shows the results for the eight test files encoded with the ten presets. Where the x264 presets produce a reasonably steady increase in quality from left to right, the x265 presets achieve a mini-peak at Superfast (average VMAF of 95) that isn’t surpassed until the Slow preset (95.43).
Note that I checked my FFmpeg encoding script twice to make sure that I encoded correctly. In addition, in the Numbers book, which presents similar test results using PSNR rather than VMAF, the same dynamic was generally true; that is a peak at Superfast, then a drop in quality and slow increase that didn’t surpass Superfast quality until the Medium preset. So, I’m pretty sure the numbers are correct, even though they appear counter-intuitive.
Figure 2. VMAF values by clip and x265 preset (click image to view at full rez).

Figure 3 parses the data by clip type, separating animations, real-world videos, and synthetic videos, with Tears of Steel in the real-world category. Interestingly, the synthetic videos show the expected pattern of gradual increases in all presets. With real-world videos, Superfast produces the highest quality through the Slow preset, and with animations, it’s the highest quality through Medium. In all cases, the quality jump between Medium and Slow is alluring, though at about 1 VMAF point on average, it would go unnoticed by the vast majority of viewers.
[dt_quote type=”blockquote” font_size=”big” animation=”none” background=”plain”]For example, if you change from the Medium x265 preset to the Superfast preset, you pick up 218% of capacity, more than tripling your throughput. For real-world video clips, you’ll actually be improving the quality of your encoded videos.[/dt_quote]Whichever chart you look at, it’s hard to justify encoding with the Slower, Veryslow or Placebo presets since the quality stays the same for animation and synthetic videos, and actually drops slightly for real-world clips. The big question is, should you use the Superfast, Medium, or Slow preset? To make that call let’s look at encoding time.
Figure 3. VMAF values by clip type and x265 preset (click image to view at full rez).
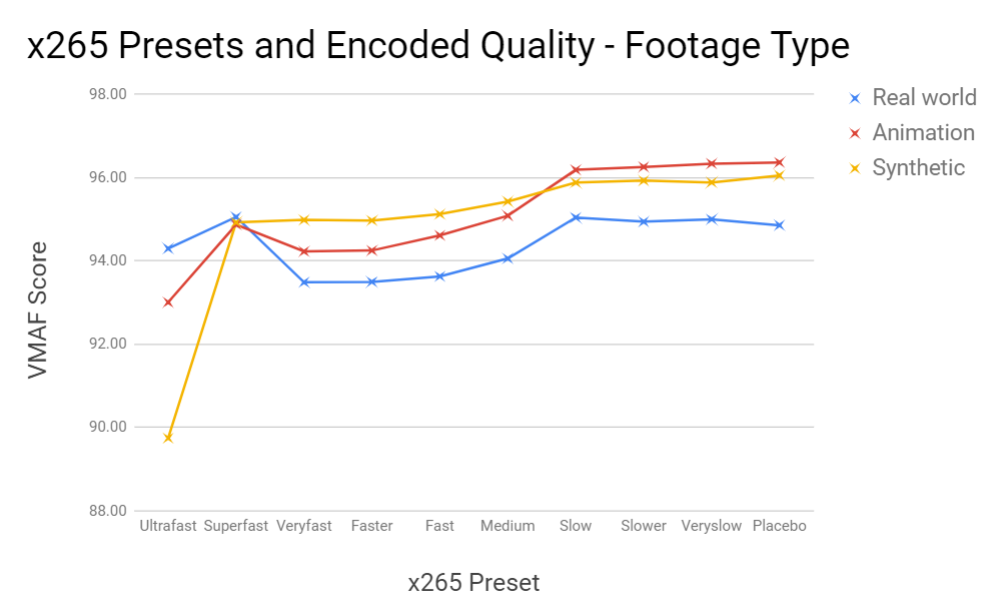
Table 2 presents the time element showing the average number of seconds for all eight clips for all ten presets encoded on my HP Z840 workstation. The second line shows the impact on capacity if you change from the default Medium preset. For example, if you change from the Medium to the Superfast preset, you pick up 218% of capacity, more than tripling your throughput. For real-world video clips, you’ll actually be improving the quality of your encoded videos.

Table 2. Average encoding time for the x264 presets and impact on capacity of change from Medium preset (click Table to view at full rez).
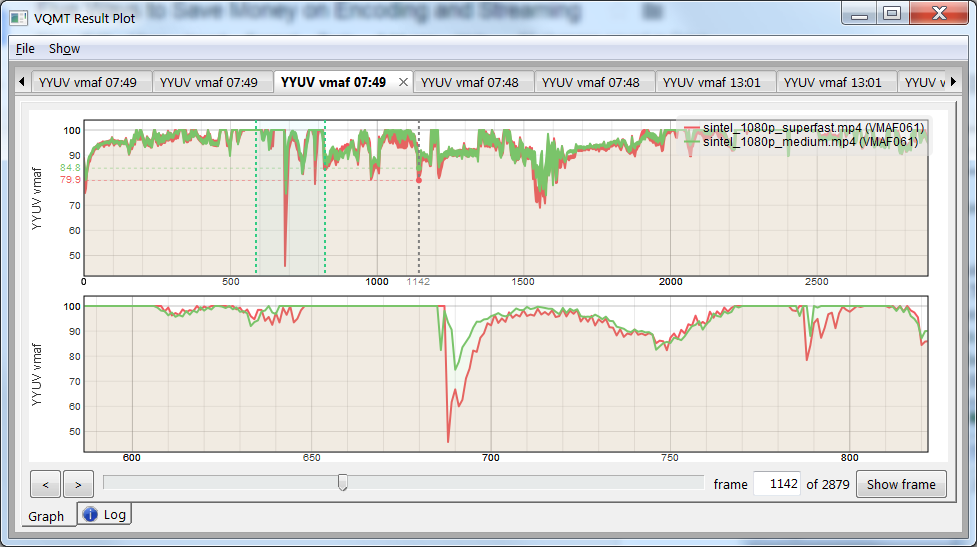
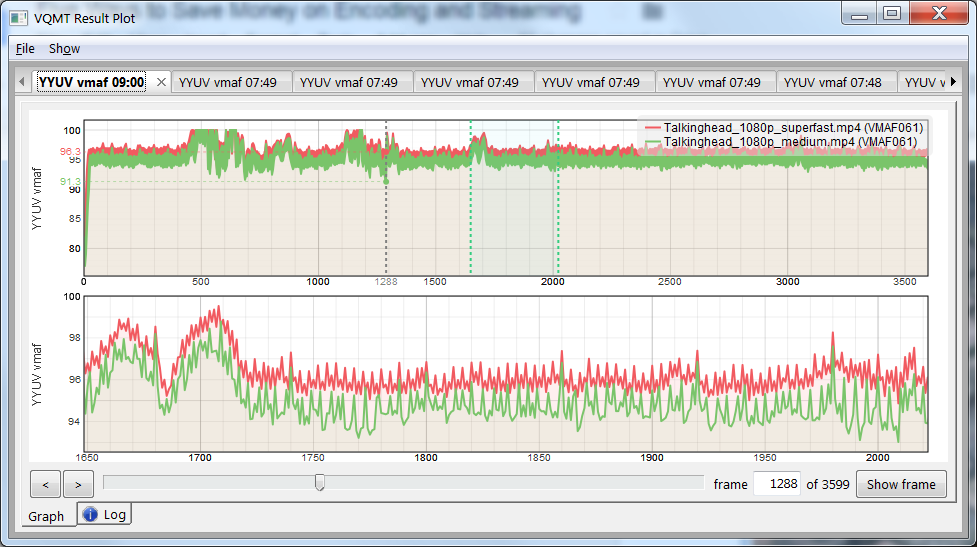
That said, whenever you use a very low-quality preset you should check for transient quality glitches using a tool like the Result Plot from the Moscow State University VQMT tool (Figure 3). This plots the VMAF score of the Sintel clip encoded using the Medium (in green) and Superfast presets (in orange). The top plot shows the entire clip while the plot on the bottom shows the highlighted region in the top. In this case, that’s the orange downward spike about 25% into the clip, which represents the much larger downward spike near the center of the bottom graph. To view the frames at the selected location, you would click the Show frame button on the bottom right, which displays the frames from the source and both encoded videos.
Figure 4. Looking for transient quality issues with the Moscow State University VQMT Result Plot. Click the image to see it at full size.
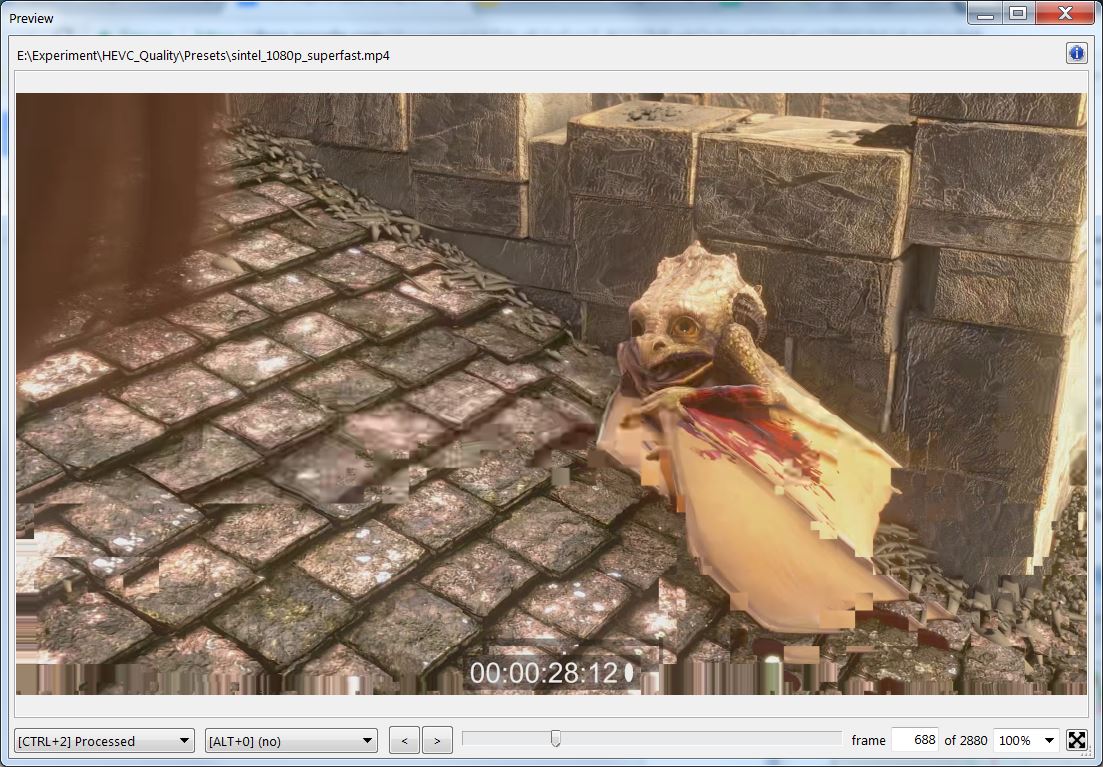
In this case, the Superfast preset produced the distortion shown on the bottom of the frame in Figure 5 which obviously is a concern even though it’s transient and only occurred once in the clip. The distortion was even worse in the Screencam clip and occurred several times, a caution sign against encoding screencams with the Superfast x.265 preset. If my library included many animated sequences, I would test to see if this type of distortion occurred frequently.
Figure 5. Distortion on the bottom of these few frames marred the Superfast-encoded clip (click image to view at full rez).
On the other hand, there were no similar issues with any of the four real-world video clips. Though Superfast produced some significant download spikes, they were very short in duration and the quality deficits were not visually discernible. In the Talking Head clip, shown in Figure 6, Superfast delivered higher quality throughout the clip with no downward spikes at all.
Figure 6. Superfast (in orange) delivered higher quality than Medium throughout the Talking Head clip (click image to view at full rez).
Given the potential savings at stake, it makes sense to test your footage to see if the Superfast preset produces transient glitches in your clips. If not, you should consider deploying the Superfast preset for your x265 encodes.
Cut Reference Frames to Boost Capacity with Minimal Quality Loss
The reference frame setting controls the number of frames the encoder analyzes to find redundancies with the frame being encoded, and this value can range up to 16 frames. Interframe compression fueled by these redundancies is much more efficient than the interframe compression used where no redundancies are found, so the more redundancies the better. That’s why some compressionists jack reference frames to the max, though this obviously boosts encoding time.
Intuitively, however, you’ll find most redundancies in frames proximate to the one being encoded which makes the reference frame setting another configuration option that can significantly boost encoding time without a concomitant benefit in quality. However, if you haven’t customized your reference frame settings, there’s probably little efficiency to be gained.
To explain, if you don’t customize your reference frame setting in your FFmpeg command line argument or your encoding interface, most encoders use the setting for the selected preset, which is Medium if you haven’t chosen otherwise. The reference frame setting for the Medium preset is 3, and it’s 2 for Faster, which doesn’t leave a lot of room for improvement since the lowest setting is 1.
On the other hand, the Veryslow preset uses a reference frame setting of 16. As you’ll see, if you’re using this preset and the previous section didn’t convince you to switch to Faster, you can reduce the reference frame setting to a lower value and pick up lots of speed with a minimal hit in quality.
[dt_quote type=”blockquote” layout=”left” font_size=”big” animation=”none” size=”1″]Increasing the reference frame setting from 1 to 5 boosts encoding time by about 35% with a 0.04 bump in PSNR. Not a good investment.[/dt_quote]Table 2 shows the quality side, with PSNR values for 720p files encoded using the reference frame values shown at the top. Red backgrounds indicate the lowest quality score and green the highest. Max delta, which averages 0.31%, is the maximum difference between the highest and lowest scores. Not much quality difference to be found.
Table 3. PSNR quality for different reference frame settings (click table to view at full rez).
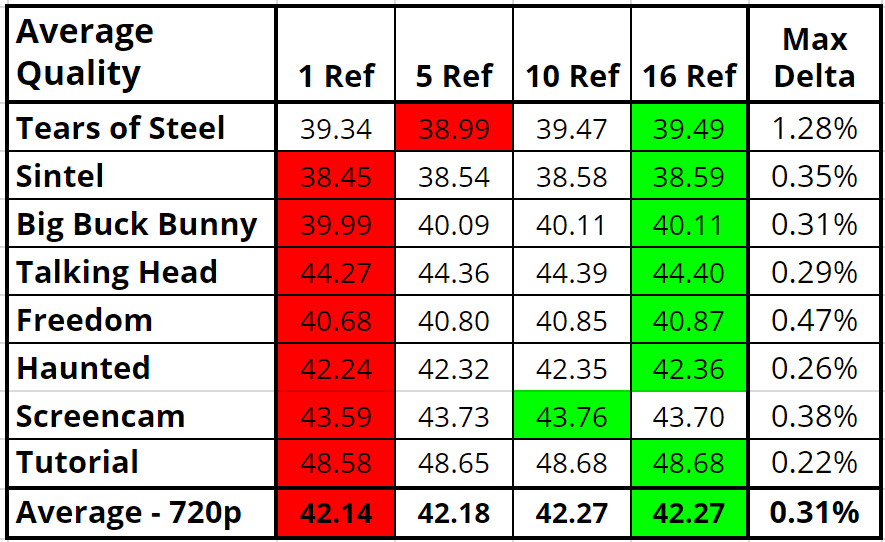
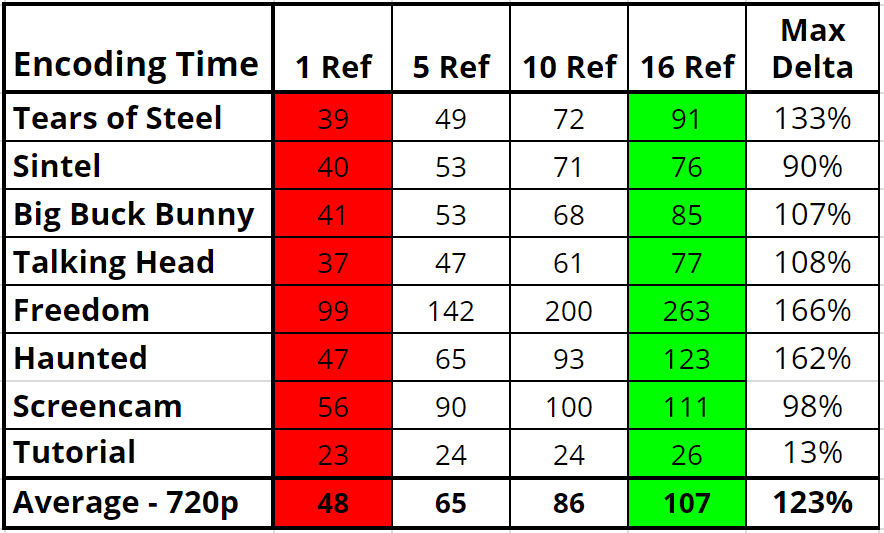
Table 4 shows the encoding time difference associated with the same reference frame settings. Increasing the reference frame setting from 1 to 5 boosts encoding time by about 35% with a 0.04 bump in PSNR. Not a good investment. In fact, you could argue that irrespective of the preset you’re using, you should manually reduce the reference setting to 1 to accelerate encoding.
Table 4. Encoding times for different reference frame settings (click table to view at full rez).
In summary, while we all want the best quality video possible, you also want to shave costs where they don’t impact QoE. In the case of x264 presets and reference frames, you can do so very easily. Paradoxically, with real-world footage, you may be able to improve encoding quality and decrease encoding cost by changing your x265 preset.
[dt_quote type=”blockquote” font_size=”big” animation=”none” background=”plain”]If you’d like to have a third-party look over your encoding parameters and perhaps run tests for you, contact me (Jan Ozer) at janozer@gmail.com.[/dt_quote]Action Steps:
- If you’re encoding with the x264 codec, check your encoding configuration and identify the preset used. If’s Medium or higher, consider changing to Faster. Before doing so, run test encodes on your typical footage to make sure that your results are similar to mine.
- If you’re not encoding with the x264 preset, run tests similar to that shown above on the whatever quality/encoding time slider your encoder uses. For example, the Adobe Media Encoder has five settings from Lowest (fastest) to Highest (fastest). Table 5, which is from the Numbers book and hasn’t been updated since 2016, shows that the Lowest preset is probably only an option for draft encodes and that either the Lower or Good increases quality with minimal impact on encoding time. From there however, encoding times hit the proverbial hockey stick and quality improvements get smaller. Since you’ll likely only be using the Adobe Media Encoder to create mezzanine files for uploading or archiving, you’re better off increasing the data rate for more quality rather than using a higher quality encoding preset.
Table 5. Adobe Media Encoder HEVC presets; encoding time and PSNR quality (click table to view at full rez).

- If you’re encoding with x265, check your encoding configuration. If you’re using the Medium preset or higher, run tests to confirm my findings above, including testing for both overall and transient quality with your different footage types.
- Irrespective of your codec or encoder, check the number of reference frames in your encoding configuration. If more than two, run tests to gauge the impact of switching down to one on both encoding time and quality.
Where to Go from Here
If you’re unfamiliar with video quality metrics, or other concepts presented above, I suggest you pick up Video Encoding by the Numbers, which details how to create test clips and measure quality. It also presents data similar to that shown above for a variety of configuration options, from bitrate control to I-frame interval.
If you’d like to have a third-party look over your encoding parameters and perhaps run tests for you, contact me (Jan Ozer) at janozer@gmail.com.
Resources
Video Encoding by the Numbers: Eliminate the Guesswork from Your Streaming Video (PDF version),(Amazon).
How to Choose and Use Objective Video Quality Benchmarks, Streaming Media Magazine, December 2017.
Moscow State Updates VQMT With New Metrics, Streaming Media Magazine, March 2018 (includes video demo of the program).
Applying Quality Metrics to Configure 2D and 3D Video, NAB presentation, with video and downloadable handout.


