 Streaming Learning Center Where Streaming Professionals Learn to Excel

Related Articles


This lesson is derived from my book, Learn to Produce Videos with FFmpeg In 30 Minutes or Less ($34.95), and my course, FFmpeg for Adaptive Bitrate Production ($29.95) (which includes a PDF copy of the book). Don’t just learn FFmpeg; become an expert in video compression.
Overview: Setting your I-frame interval in seconds rather than frames allows you to use one encoding string for files with varying frame rates, saving time and minimizing the risk of error. Author’s note: See a new section regarding a LinkedIn comment that this technique “interferes with the rate control mechanism of codecs.”
I just finished a significant project analyzing AV1 codecs using files with varying frame rates. In all encoding strings I set the I-frame duration using the normal -g command, like so:
-g 48 -keyint_min 48 -sc_threshold 0
This sets the I-frame interval at 48 and ensures that no I-frames will be inserted in scene changes. The problem with this approach is that you have to customize your encoding string for files with different frame rates, changing from 48 to 50 for 25 fps files, 60 for 29.97/30 fps files, and 120 for 60 fps files. When you’re working with 20 or 30 files that’s a lot of work and a significant risk for error.
There is a better way. If you use this command string:
-force_key_frames expr:gte(t,n_forced*2)
FFmpeg will insert a keyframe every two seconds. You can change the 2 to any value you would like, and access more documentation for this command here.
Note that for Ubuntu, I had to modify the command string with the following single quotation marks.
-force_key_frames 'expr:gte(t,n_forced*2)'
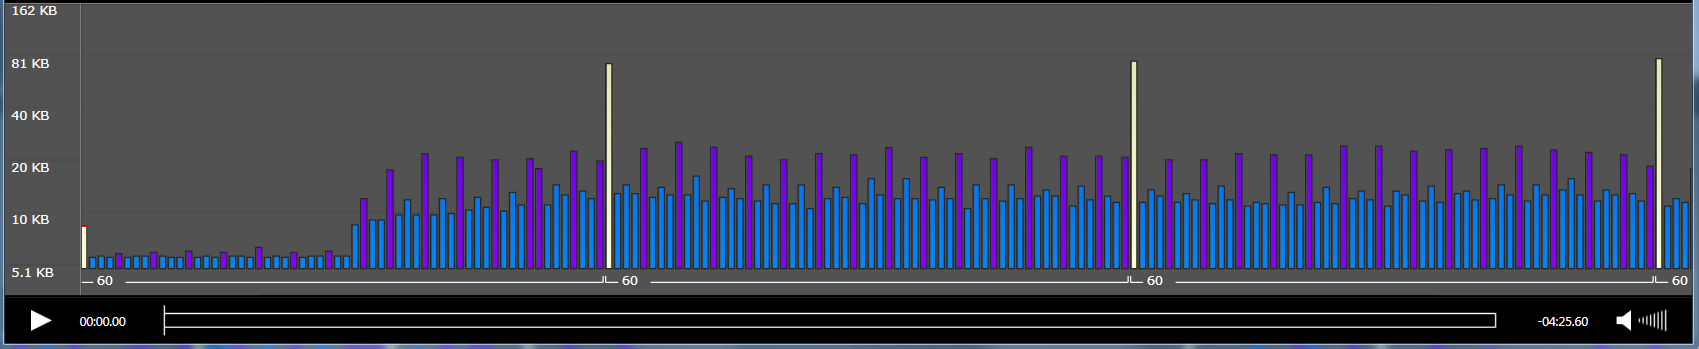
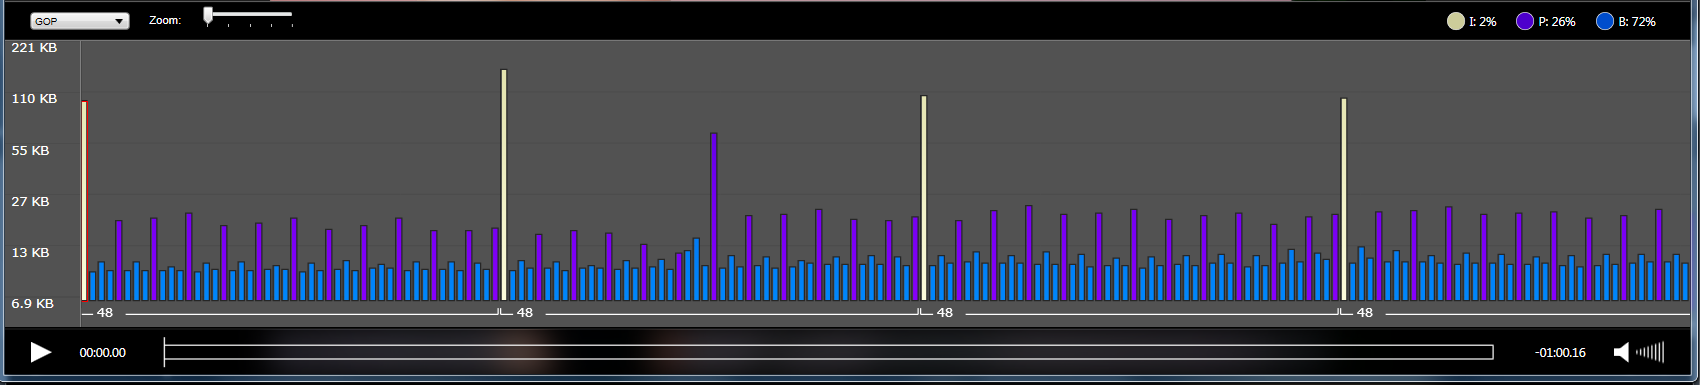
I recently proved the string on multiple files in a new project, including these three. This was a 30 fps file with the frame types shown in the Telestream Switch Pro version. For those not familiar with Switch, the large white frames are I-frames, the blue frames are B-frames, and the purple frames are P-frames.
 [/vc_column_text][/vc_column][/vc_row]
This was a 24 fps file, so you see the I-frames every 48 frames.
And, this was a 60fps file, so you see the I-frames every 120 frames.

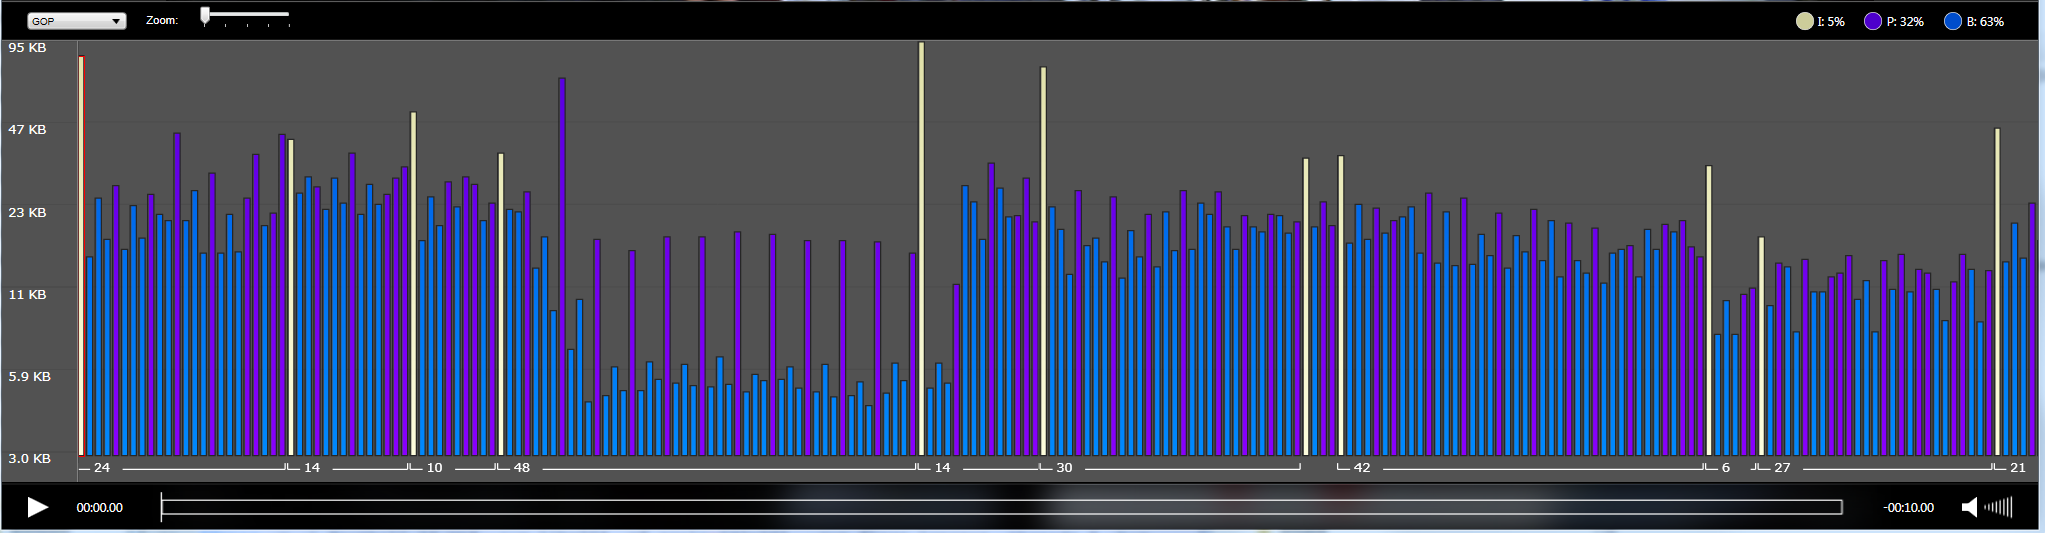
Some producers like to add I-frames at scene changes to improve quality. The string to accomplish this is:
-force_key_frames 'expr:gte(t,n_forced*2)' -keyint_min 25 -sc_threshold 40
This forces the keyframe at every two-seconds, maintains a minimum keyframe interval (in theory) of 25 frames, and sets the threshold for detecting a scene change at 40. I say in theory because I tried this string with a short file with lots of scene changes and got the following result. You see that the two-second interval was enforced, but that the minimum keyframe interval of 25 was not.
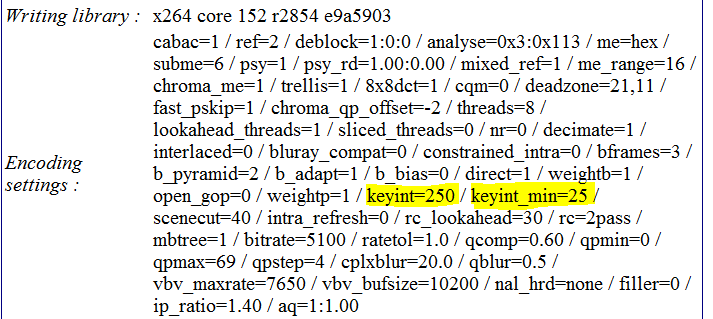
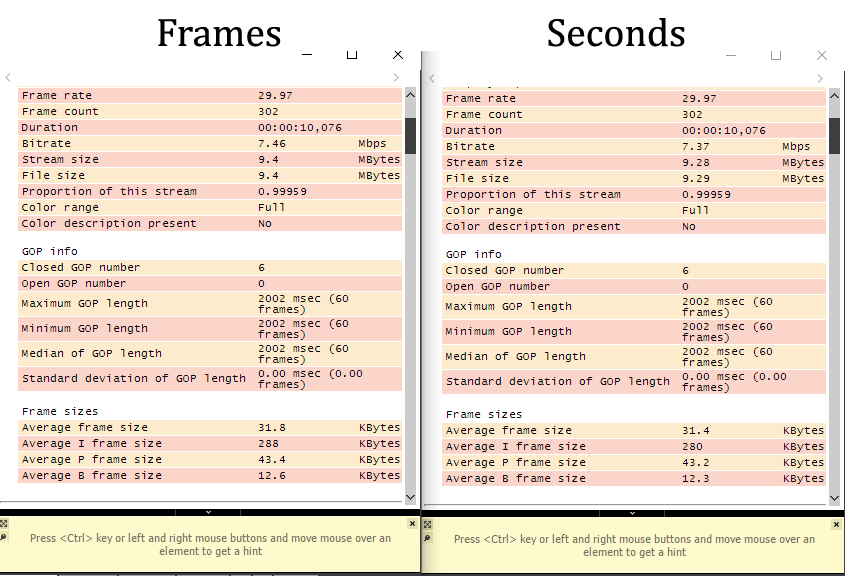
Note that if you check the file in MediaInfo, which I recommend doing anytime you experiment with FFmpeg, you’ll get a couple of pieces of misinformation. For the record, the MediaInfo analysis shown below is for the file immediately above, with I-frames every 48 frames plus at scene changes. Still, you see that the keyframe interval in MediaInfo reports that keyint=250 even though you see the white I-frames above. And you see that keyint_min=25 is also not enforced.
I’m not a huge fan of I-frames at scene changes when using a regular I-frame interval as they add very little additional quality to the mix; I’ve tested on two-minute files, and on a file with many scene changes the PSNR improvement was about 0.08.
I-frames at scene changes or not, just remember that you can’t trust MediaInfo when using this command string; you’ll need a tool like Switch Pro that can show the I-frames in the file.
Addendum:
On LinkedIn, Matteo Contrini commented, “However, according to Werner Robitza on Superuser, using “force_key_frames” interferes with rate control mechanisms of codecs. Not sure if that statement still holds today though.” I checked out the article but didn’t see Werner’s comment.
To figure out if Matteo’s concern was correct, I encoded a file two ways, one using the -g option, the other the option shown above. Here’s the traditional technique.
ffmpeg -y -i Football_10.mp4 -c:v libx264 -threads 8 -b:v 7800K -preset fast -g 60 -keyint_min 60 -sc_threshold 0 -pass 1 -f mp4 NUL & \
ffmpeg -y -i Football_10.mp4 -c:v libx264 -threads 8 -b:v 7800K -maxrate 11700K -bufsize 15600K -preset fast -g 60 -keyint_min 60 -sc_threshold 0 -pass 2 Football_10\Football_10_x264_1080p_high_frames.mp4
Here’s the technique shown above.
ffmpeg -y -i Football_10.mp4 -c:v libx264 -threads 8 -b:v 7800K -preset fast -force_key_frames expr:gte(t,n_forced*2) -sc_threshold 0 -pass 1 -f mp4 NUL & \
ffmpeg -y -i Football_10.mp4 -c:v libx264 -threads 8 -b:v 7800K -maxrate 11700K -bufsize 15600K -preset fast -force_key_frames expr:gte(t,n_forced*2) -sc_threshold 0 -pass 2 Football_10\Football_10_x264_1080p_high.mp4
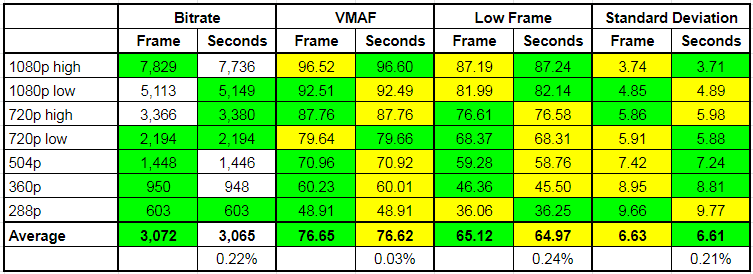
The test file was only ten seconds long but I encoded a complete encoding ladder using both techniques and measured data rate, VMAF, low-frame VMAF, and VMAF standard deviation. The results were very, very close. Here are the stats, with well under a quarter of a percentage point difference between the two alternatives.
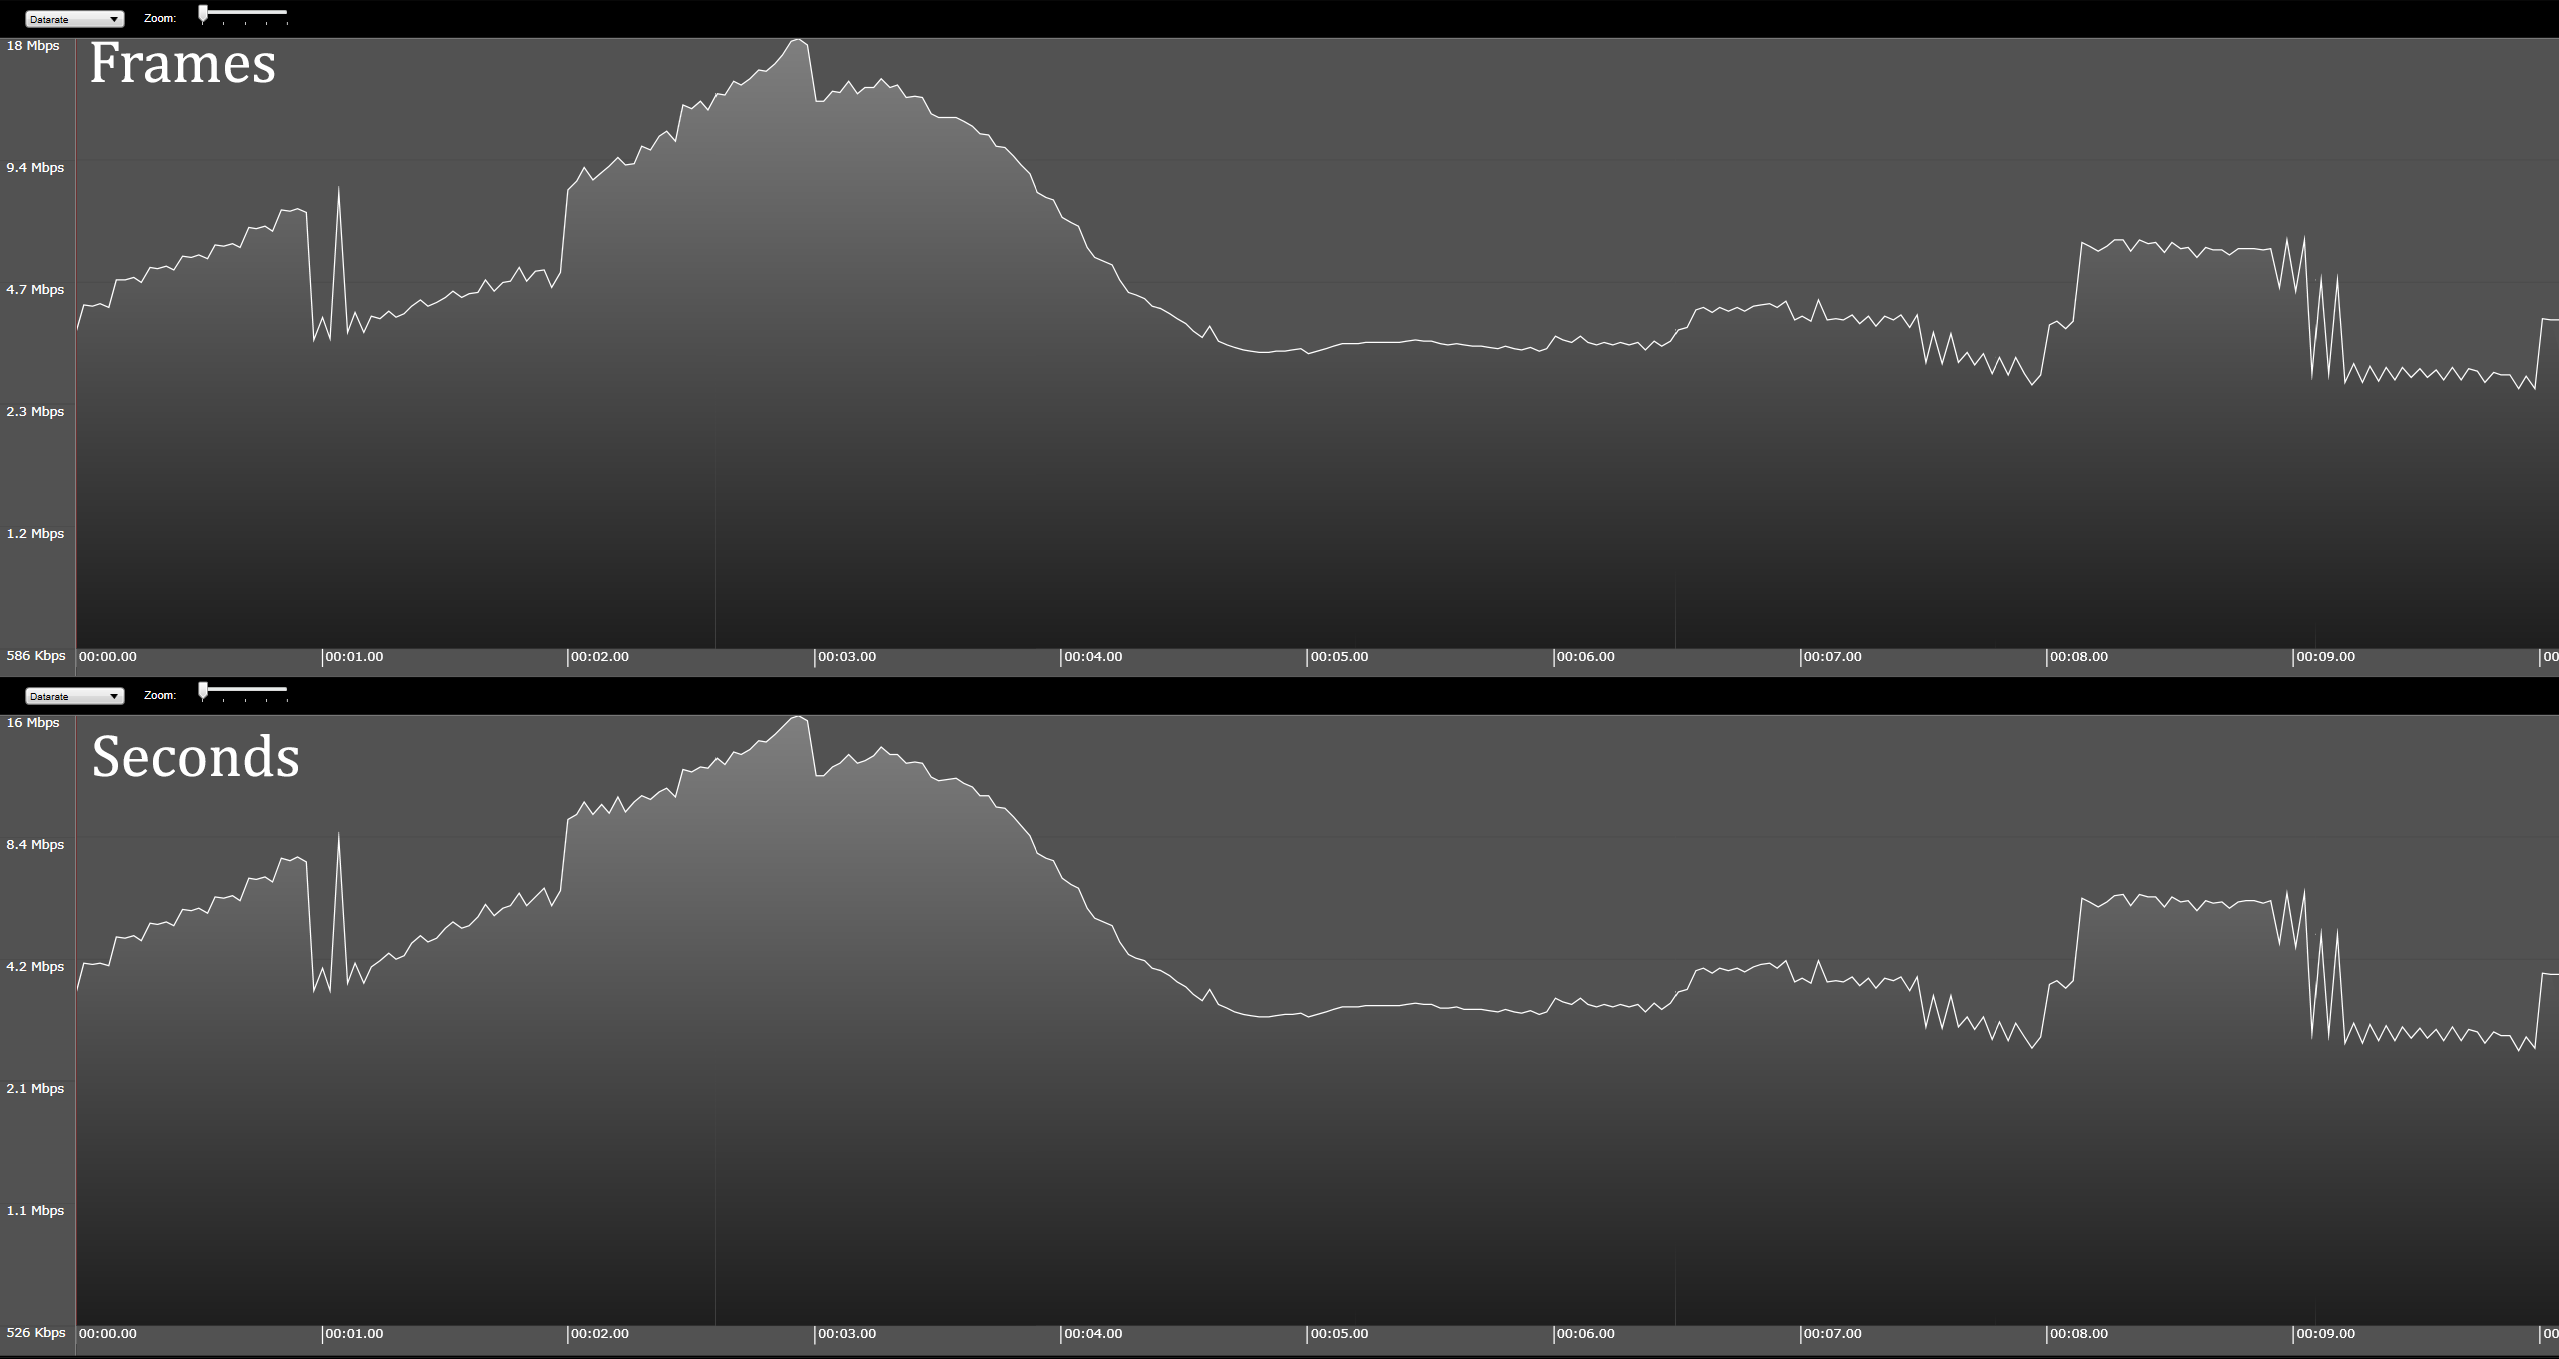
Here’s what the data rates look like in Telestream Switch for the 1080p high file. They look pretty similar to me.
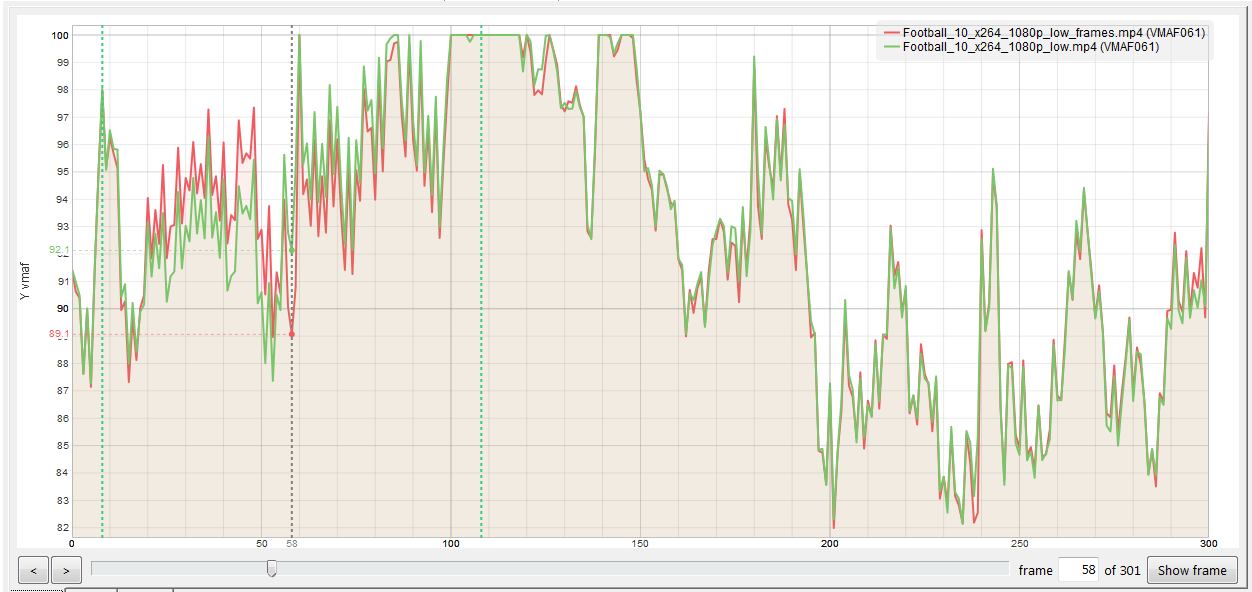
Here’s what the VMAF quality looks like in the Moscow State University Video Quality Measurement Tool. While there are some minor differences, overall the files are extremely close throughout, as the scores above would predict.
For the record, all the I-frames in both files were IDR frames as there were no open GOPs in either file. This is from Zond 265.
So, while I can’t find Werner’s comments, I’m not seeing any major disparities when encoding a short file with x264.


What do you think about the following comment:
If you keep scene change detection on, and use something like this, you will get a correctly coded file for streaming with keyframes evenly spaced every 48 frames. As a bonus the scene change detection will work its magic and give you nice I-frames on scene changes without messing up the GOP length:
-x264opts min-keyint=48 -force_key_frames “expr:eq(n,0)+eq(n, prev_forced_n+48)”
Thanks!
Good one. Of course, this means that you have to customize the script for different frame rates which is what the technique shown in the article avoids.
In my tests, keyframes at scene changes deliver negligible quality gains. As I detail in my book, Learn to Produce Video with FFmpeg in 30 Minutes or Less (where I discuss the technique you showed), in a two-minute file, adding keyframes at scene changes improved quality by 0.08% as measured by PSNR (see page 61).
Thanks.
Jan