 Streaming Learning Center Where Streaming Professionals Learn to Excel

Related Articles


This blog identifies six incredibly useful FFmpeg commands for transmuxing, extracting audio/video, converting to YUV/Y4M, and scaling to different resolutions. All commands are included in my book, Learn to Produce Videos with FFmpeg In 30 Minutes or Less ($34.95), and course, FFmpeg for Adaptive Bitrate Production ($29.95) (which includes a PDF copy of the book). Don’t just learn FFmpeg; become an expert in video compression.
FFMPEG is a free command-line utility that serves as the engine for most of the largest cloud encoding farms in the world, public and private. But it also performs many simple and essential tasks that crop up in a studio or encoding facility, particularly if you do performance or benchmark testing. In this article, I’ll show you how to perform six of these tasks.
Contents
Basic FFmpeg Commands
To get started, you can download FFmpeg for free from FFmpeg.org/download.html, with packages available for Windows, Mac, and multiple Linux flavors including Ubuntu, Debian, Fedora, and Red Hat Enterprise Linux. Though batch command structure and operation is different for each platform, the FFmpeg command syntax is very similar for all.
Here’s the basic FFmpeg command line structure:
ffmpeg -i input.mp4 output.mp4
Here’s an explanation for the commands:
Ffmpeg
This calls the program; add drive and folder information for ffmpeg.exe if it’s not in your path.
-i
This identifies the input file.
input.mp4
This is the input file. FFmpeg can input most container formats natively, including MP4, .ts, MOV, AVI, Y4M, MKV, and many others.
output.mp4
This is the output file. No switch necessary; just the file name.
Note that unless you identify an audio or video codec via switches, FFmpeg will use the default codecs for each container format as well as reasonable encoding parameters. For the MP4 extension, if you input a 1080p file, FFmpeg will encode using the H.264 video codec at about 9 to 10 Mbps, the AAC audio codec at around 130 Kbps, a keyframe interval of 250 frames, the High profile, and the medium x264 preset. All of these are customizable, of course, but if all you’re trying to do is to create a video file you can play from a hard drive, the command above will suffice.
Note that you can download all commands and the input test file used in this tutorial. (Note that the download will begin automatically when you click this link.) The video is excerpted from a test video provided by Harmonic, Inc. (harmonic inc.com).
Changing Container Formats Without Re-Encoding
Say you’re working with an application that only accepts MOV files and your source file is in an MP4 container (or vice versa). You could input the file into Adobe Premiere Pro and output as needed, but Premiere Pro can’t do that without re-encoding. This is easily done in FFmpeg with this command string:
ffmpeg -i input.mp4 -c:v copy -c:a copy output.mov
The new commands here are as follows:
-c:v copy
Video codec, copy. This tells FFmpeg to copy the compressed video stream into the new file without re-encoding.
-c:a copy
Audio codec, copy. This tells FFmpeg to copy the compressed audio stream into the new file without re-encoding.
A similar scenario might involve files in the MPEG-2 container format with a .ts extension. Here you may have to add one switch to handle the MPEG-2/4 ADTS header from the transport stream file.
ffmpeg -i input.ts -bsf:a aac_adtstoasc -c:v copy -c:a copy outputfromts.mp4
The added switch is as follows:
-bsf:a aac_adtstoasc
manages the ADTS conversion.
This particular conversion saved about 2 days of encoding when I had to convert about 100 .ts files into MP4 files for testing. The aac_ adtstoasc switch may not be necessary with more recent versions of FFmpeg, which may insert the switch automatically. You’ll know you need it if the conversion crashes or the audio doesn’t play normally in the converted file. Or, you can just leave it in.
Extracting a Section of a File Without Re-Encoding
Say you have a file and want to eliminate the first 30 seconds, or simply grab a 2-minute excerpt from the middle. Again, you could bring the file into Adobe Premiere Pro and edit what you want, but that would involve another rendering and encoding cycle. You can do this quickly and simply in FFmpeg using the command shown below.
The Harmonic test file is about 12 seconds long. This command seeks to 5 seconds into the file and excerpts the next 3 seconds without re-encoding.
ffmpeg -ss 00:00:05 -i input.mp4 -t 00:00:03 -c:v copy -c:a copy excerpt.mp4
-ss 00:00:05
Seeks to 5 seconds into the file.
-t 00:00:05
Extracts this duration of the file. If you leave this switch off, FFmpeg will include from the seek point to the end of the file in the extracted file.
Note that FFmpeg seems to work around keyframes in the file so the results are typically not frame-accurate. This doesn’t matter in most instances, but if you absolutely need a specific duration or specific frames included or excluded from your excerpted file, this technique probably won’t work. In these cases, you’re better off using your video editor.
If you want to extract only the video in the file and not the audio, add the -an switch. To extract audio only, add the -vn switch. Note that the MP4 container can hold audio-only files, so you don’t need to change container formats when producing audio-only files from MP4 sources.
Converting to a Raw Format
Some file analysis tools only input raw YUV or Y4M files, so you’ll have to convert your encoded files to YUV for input. In addition, when working with newer codecs like AV1, most tools can’t input the encoded file natively; again, you’ll have to convert to YUV or Y4M.
What’s the difference between YUV and Y4M? Both are uncompressed formats, but the YUV file header doesn’t contain resolution, frame rate, or other file-related information. To input a YUV file into a program, you’ll typically need to specify one or more of these parameters. In contrast, Y4M files contain this data, simplifying input.
For example, to input a YUV file like ConstructionField.yuv into the Moscow State University Video Quality Measurement Tool, you have to specify resolution and color information as shown at the top of Figure 1. With a Y4M file, this data is in the file header, so you can skip this step, both in the user interface and in the batch command string. Basically, if the tool you’re working with can accept Y4M files, use that format; if not, use YUV.
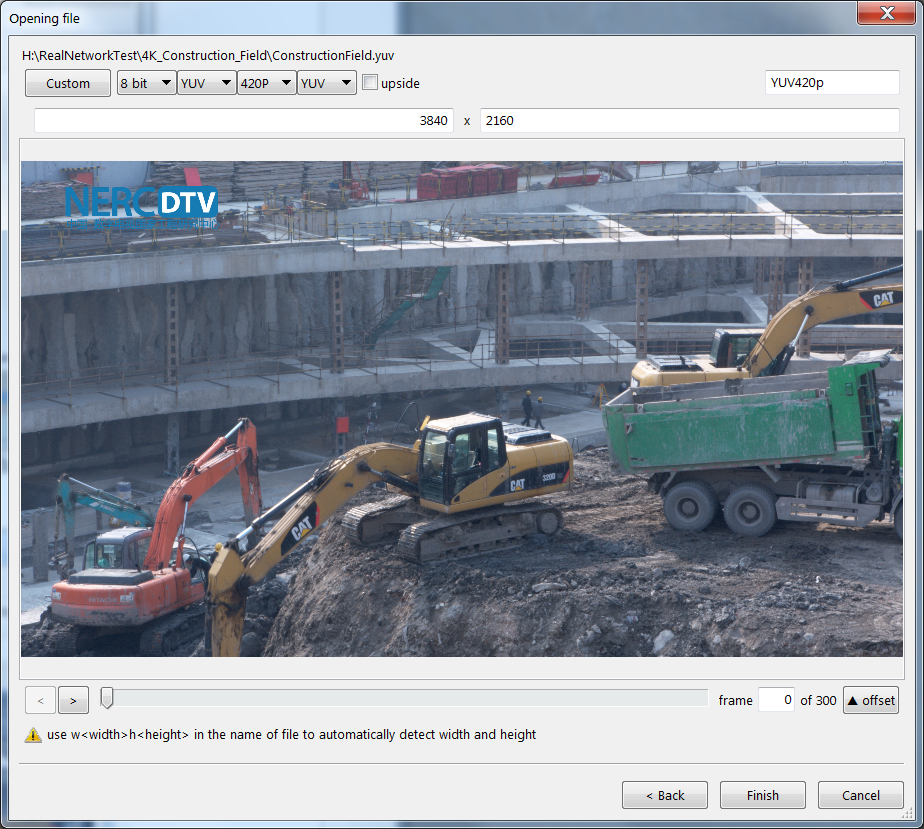
Figure 1. Inputting a YUV file into the Moscow State University Video Quality Measurement Tool forces you to specify the resolution and other file- related data. Y4M files contain this in the header and input normally
Converting to either format is simple using this command:
ffmpeg -i input.mp4 -pix_fmt yuv420p -vsync 1 output.y4m
To produce a YUV file, simply use that extension. Here’s an explanation for the new commands:
pix_fmt yuv420p
This sets the file format, and YUV420p is the most commonly used format for 8-bit files. If you’re working with 10-bit formats, check out this conversation on Stack Exchange.
-vsync 1
According to ffmpeg documentation, -vsync 0 is a passthrough, where each frame is passed with its timestamp from the demuxer to the muxer. -vsync 1 duplicates frames and timecode to achieve exactly the requested constant frame rate. As shared by a knowledgable colleague, “vsync 0 preserves timestamps in the audio and video, and therefore also preserves the audio/video sync. Vsync 1 would work as vsync 0 provided that the original stream has a constant frame rate.”
I’m not sure this command is necessary in every instance, but long ago it cured a sync issue for me, and I’ve left it in ever since. If you’re having sync issues with -vsync 1, try -vsync 0 or leaving out the command completely.
Scaling Compressed Files When Converting to YUV/Y4M
This is a very common use case when computing objective quality metrics on files compressed at lower resolutions than the original. For example, imagine you wanted to compute the VMAF rating on a 720p file encoded from a 1080p file. With most tools, you’ll have to scale the encoded file back to 1080p so you’ll have a pixel-by-pixel match with the source file.
To do this, use the same basic command as shown above, adding two new switches.
ffmpeg -i input.mp4 -s 1920x1080 -sws_flags lanczos -pix_fmt yuv420p -vsync 1 output.y4m
Here’s an explanation for the new commands:
-s 1920x1080
This tells FFmpeg to scale back to 1080p.
-sws_flags lanczos
This tells FFmpeg to use the Lanczos method of scaling
I use this approach because it is the primary scaling technique used by NVIDIA when scaling video from lower to higher resolutions and because when performing quality measurements, I’m trying to predict video quality as viewed by someone watching on their computer or on a smart TV. Though there are higher-quality scaling methods, they’re probably too slow for use on most display devices, so I stick to Lanczos.
That’s it. If you’ve never worked in the command line, you’ll definitely find yourself at a disadvantage, but an hour or two invested in learning basic command line will get you up-to-speed. If you frequently experiment with encoding and quality metrics, you’ll find the command line and FFmpeg absolutely essential, and that the combination vastly simplifies and accelerates your testing and analysis workflows.
Want to Learn More about FFmpeg?

If you’re looking for structured instruction on FFmpeg, check out my course on Udemy here, which teaches you how to:
- Use FFmpeg to encode to H.264, HEVC, and VP9 outputs
- Create an encoding ladder for HLS and DASH distribution
- Install FFmpeg on Windows, Mac, and Linux
- Create and run FFmpeg command strings on Windows and Mac platforms
- Understand video encoding basics like codecs, container formats, and encoding parameters like resolution, frame rate, and data rate.
The course now includes a PDF copy of the book below. Click here for more information.
 If you’re looking for a fast and easy way to learn FFmpeg, check out the 2018 Edition of my book, Learn to Produce Video with FFmpeg in 30 Minutes or Less. This edition updates the book to FFmpeg 4.0, and includes.
- Packaging to DASH and HLS formats with open-source tool Bento4
- How to create a hybrid HEVC/H.264 encoding ladder for HLS deployment
- How to encode and package VP9 files into DASH format with FFmpeg 4.0
- How to transcode inputs into multiple files simultaneously using the H.264, HEVC, and VP9 codecs for live ABR streaming
- Encoding to the Alliance for Open Media AV1 format with FFmpeg 4.0
The update costs $34.95 in print and $29.95 for a downloadable PDF. Click here for more information on the book.


One comment
Pingback: Voronoi-based Objective Quality Metrics for Omnidirectional Video – Streaming Learning Center