 Streaming Learning Center Where Streaming Professionals Learn to Excel

Related Articles


Quality control software has been around for a while now; for an overview of the category and quick look at four entrants, check out “Quality Control Roundup: Catch the Mistakes Before They Go Live.” Producing files for adaptive streaming throws some new wrinkles into the mix, however, both from a format and a management perspective. One of the first products that attempts to simplify QC for adaptive streams is Venera Technologies’ Pulsar, which now can analyze adaptive streams produced for HTTP Live Streaming (HLS) and Smooth Streaming, but not HTTP Dynamic Streaming (HDS). In this review I take a look at Pulsar as a whole, with a focus on these new adaptive streaming-related capabilities.
Contents
Overview
At a high level, all quality control programs operate similarly. You start by defining templates that contain conformance checks (Is the file encoded with H.264?), analysis tests (Is the average bit rate between 500Kbps and 700Kbps?), and quality-related tests (Does maximum quantization exceed 45?). Then you apply these templates against encoded files, and the QC program reports any errors.
Beyond these types of individual checks, adaptive streaming adds additional concerns that you’d probably prefer to manage within the group of adaptive files. For example, you want the key frame interval to be the same for all files, and some producers prefer to use the same audio parameters for each file. In addition, adaptive streaming technologies use unique formats such as Smooth Streaming’s .ismv files, or HLS’ multiple MPEG-2 transport stream chunks (.ts files). The QC program must be able to interrogate these formats and analyze multiple .ts files as a group, since analyzing a single chunk would likely produce irrelevant results.
Pulsar
To manage these individual file and adaptive group quality control analyses, Venera offers two versions of Pulsar: Professional, which can analyze up to four streams simultaneously and costs $25,000, and Standard, which can analyze only a single stream at a time and costs $12,000. The program runs on all flavors of Windows; I tested on 64-bit Windows 7 running on a 12-core HP Z800 with 24GB of RAM.
As with most QC programs, you can run Pulsar via watch folders, by writing to its application programming interface, or manually via its browser-based user interface. However, at least in the short term, the only way to access multiple-file, adaptive streaming-related analysis is manually in the user interface. Venera hopes to make this automatable in the near term, but it wasn’t available for my review.
As you can see in Figure 1, Pulsar’s interface presents major functions in a bar on the left with most operations performed or presented in the big center region. When working with templates, you can create a template from scratch or use an existing template as a starting point, saving under a new name to prevent overwriting the original template.
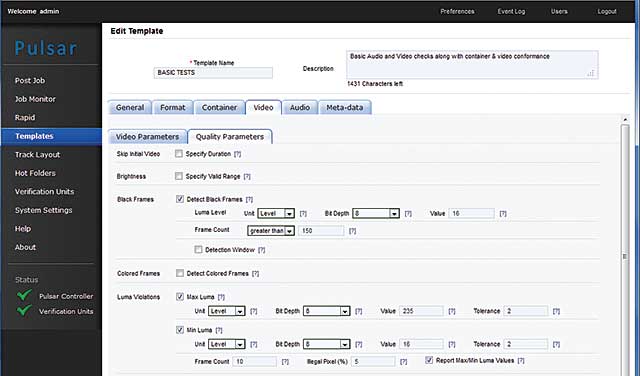
Figure 1. Creating a template in Pulsar
To create or edit existing templates, you click Templates on the left to open the Edit Templates interface, which presents template parameters in six tabs, with the Video and Audio tabs having two tabs each: one for conformance-type parameters, one for quality-related parameters.
The General tab contains parameters such as where to store the report and the maximum number of errors before disqualifying a file. One particularly useful feature is the ability to specify a track layout that lets you assign specific video parameters (color bar, black, freeze frame) or audio parameters (none, mute test tone) to specific regions in a file. That way, if you’re analyzing advertisements that start with 2 seconds of color bars and tone, Pulsar won’t kick the files out because of these conditions.
The Format tab checks for compliance with CableLabs and DVB specifications, while Container tab includes conformance checks for MP4, MPEG-TS, MXF/LXF/GXF, and other container formats. In the Video Parameters section of the Video tab, you can check for codec, chroma format, scan mode, frame rate, and average bit rate, as well as GOP-level checks such as GOP type and length.
To test or analyze a parameter, you check the associated check box and (most of the time) enter the associated level or value. In the Video Quality section, for example, you can test for the number of black frames, maximum and minimum luma and chroma levels, and the presence of blockiness artifacts on a scale from one to 10, as well as other metrics. There are no tests for signal-to-noise ratio or SSIM, since these require the original source file.
Audio conformance checking includes codec, sampling rate, channels and bit rate with qualitative analysis for audio drops, loudness and silence, audio peaks, and phase mismatch. Metadata checks include detecting V-Chip levels and closed captions and the presence of Active Format Description and Teletext.
Currently, there are no checks within the templates that specifically target adaptive streaming-related issues. Basically, the innovation in the current release relates to the workflow involved in testing and reporting on adaptive streams and the ability to support adaptive file formats. However, since bit rate control is so critical in adaptive streaming, Venera is adding a feature to verify the technique used and to analyze for maximum data rate bursts, which the company says will be available by August 2012.
Testing the Adaptive Group
When testing an adaptive group, you can create a single template that tests for high-level issues such as a consistent key frame interval or identical audio parameters. Or, you can create a single preset for each file in the adaptive group, which can test for consistency within the group, but also individual parameters such as resolution, H.264 profile, and quality levels.
Most producers will probably prefer the latter approach for several reasons. First, the Pulsar interface uses the number of frames to specify key frame interval, not seconds. For example, you can check for a key frame every 90 frames, but not every 3 seconds. So if your adaptive group contains files with different frame rates, which many do, you can’t use a single template to check key frame consistency.
Second, quality-related checks would likely be different depending upon the quality level of the file in the adaptive group. For example, you might set a very low threshold for issues in the highest quality file, such as a blockiness rating of 1, because you would expect few blocks in this high-bandwidth file. In the low data rate files encoded for mobile delivery, however, this threshold would probably be triggered by every frame in the file, so you’d want to tailor your quality checks for each file in the group. Finally, if you’re encoding higher-quality files using the High profile and CABAC, and lower quality, mobile-targeted files using the Baseline profile and CAVLC, you can’t check for this across multiple files with a single preset.
No biggie; it’s simple enough to create multiple stream-specific presets that check for adaptive-group consistency and individual quality and conformance, though the workflow to apply these presets is slightly different. In either case, you start by clicking Browse in the Post Job window (Figure 2) and choosing the main manifest file for the adaptive group: .m3u8 for HLS and .ismv for Smooth Streaming.

Figure 2. Assigning templates to each file in the job
When applying a single template to all files, you choose the template and then click Add Job. When applying an individual template to each file, you click Add Job without choosing a template, which takes you to the dialog shown in Figure 2. Here’s where you manually assign a specific template to each stream.
This matching of stream to template is the process that Venera hopes to automate in the near term. As mentioned, until they do, the only way to test groups of adaptive files is via the browser-based user interface — adaptive streaming tests can’t be performed via watch folder or through the API.
Once you’ve assigned the templates, you choose Submit, after which you can monitor the job in the Job Monitor section (Figure 3). In terms of processing time, I tested two groups of files, both encodes of the copyright-free Big Buck Bunny movie, which is just less than 10 minutes long. The first was a group of six files processed for HLS, which took 2:46 (min:sec) to analyze. The second was a group of eight files processed for Smooth Streaming, which took 5:10 to analyze.
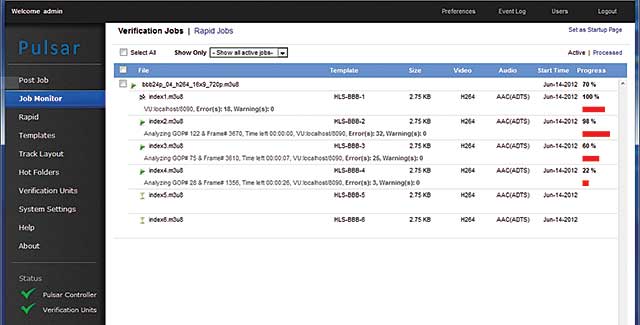
Figure 3. Pulsar processing away
CPU use during the testing maxed at around 14 percent on my 12-core HP Z800, mostly on one or two cores according to Windows Task Manager. When I mentioned these results to Venera, it responded that the August release should deliver additional performance enhancements. At least in the short term, I wouldn’t invest big dough in a multiple-core computer to run Pulsar, because it doesn’t appear to be particularly multiprocessor friendly.
Once processing is complete, you access reports in the Processed window of the Job Monitor pane, where you can view the report online, download the report, or view a PDF copy of the report. Reports with failures are presented in red so you can easily identify any problems.
Each report starts with a list of the adaptive files and the errors encountered within each file, which you can see on the top of Figure 4. Click the file name to jump to that report section, and then you can scroll through the individual errors. While there is no way to play the video from within the report, the report contains a frame for video quality-related issues such as excessive blockiness, so you can easily assess the damage yourself. Speaking of assessing damage, you can trigger email alerts for any jobs processed by the system, with the ability to attach the report to any emails.
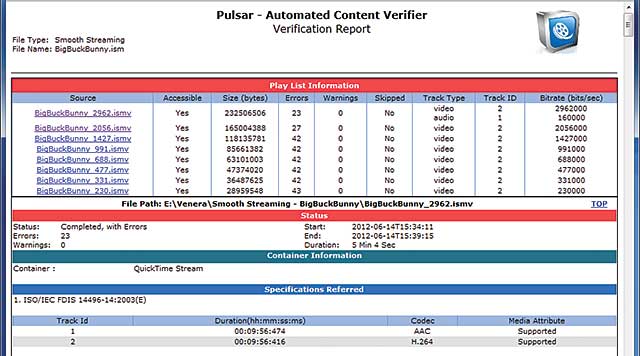
Figure 4. The Pulsar verification report, which is consolidated for all adaptive files in a group
Beyond these adaptive streaming-related features, Pulsar does have one very noteworthy option — specifically a feature called Rapid (Figure 5). In a nutshell, Rapid lets you interrogate the header of incoming files for conformance with specific video, container, and audio parameters and then automatically move the file depending upon whether it meets the specified conditions.
For example, in Figure 5, I’m checking to see if the resolution of an incoming ProRes file is 1280×720 and if the frame rate is 24 fps. If so, Rapid will move the file to a specific folder, which can be a watch folder that starts the encoding process in a third party encoder, or a Hot folder that starts a more extensive analysis in Pulsar. However, it could also be an FTP site that automates the delivery of encoded files to clients and customers.

Figure 5. Pulsar’s Rapid file triage feature.
Incoming files are grouped by the video codec, and you can create multiple checks for each codec. For example, you could check and place incoming 1080p ProRes files in one folder for encoding or more extensive QC testing, 720p files in another, and 360p in yet another. Files that don’t meet any of the specified folders either can be sent to yet another folder or can be deleted.
Because only the header is interrogated, rather than a complete analysis of the file, Rapid works very quickly, successfully analyzing and moving 10 source files in about a minute on my HP Z800. For many producers, Rapid could be very useful, though pricing was not set at the time of this review.
Overall, Pulsar appeared both functional and stable. If you’re still working without QC functionality, or your current solution can’t analyze HLS or Smooth Streaming files, it’s definitely worth a look. You can request a trial version at www.veneratech.com.
[This article appears as “Review: Venera Pulsar” in the August/September issue of Streaming Media magazine.]


