 Streaming Learning Center Where Streaming Professionals Learn to Excel

Related Articles


This is the final segment in a multiple-part series on webcasting JStreet.org’s national convention. In this segment, I’ll focus on monitoring and controlling audio volume. As you’ll see, understanding how loud is loud enough is a seemingly simple problem that becomes complex once you start asking a few questions.
Contents
Overview
Let’s start with your goals.
Monitor for Breaks and Other Problems
During the course of a one-hour webcast, or a series of webcasts throughout the day, your mind is going to wander. You’ll check email, check stock prices, check out particularly attractive members of the audience.
If the video stops streaming when you’re not staring at the screen, there’s only a very small chance that you’ll notice it visually. However, if you’re wearing headphones, and the audio stops, you’ll notice it immediately. So get in the habit of wearing your headphones throughout all sessions.
And remember to bring your headphones; in Figure 1 (below), you can see that I had to resort to my iPod earbuds because I left my headphones in Galax, and couldn’t find a set of headphones in any of the truck stops I shopped at on Interstate 81.
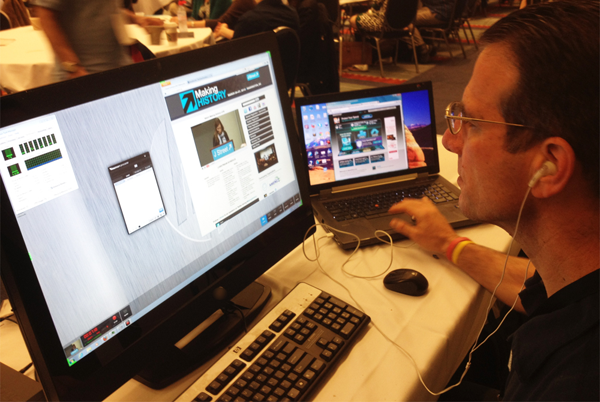
Figure 1. Always wear your headphones when broadcasting (and remember to bring them).
Ensure Consistent Levels to Your Audience
Your web viewers can and will adjust volume at their end to ensure optimal levels. If they have to do this once, it’s not a big deal. However, if they have to do it repeatedly throughout the webcast, it will be perceived as a problem. Since the client undoubtedly has folks watching the webcast online, it’s a problem that reflects poorly on your work. So, one key goal is to produce consistent levels throughout the webcast.
Recognize that audio volumes change every time a different speaker approaches the microphone, whether it’s on the podium or on the speakers’ table. Different presenters talk at different volumes at varying distances from the microphone. So whenever there’s a speaker change, you have to be ready to make a volume adjustment.
Complicating this is the possibility that there may be audio technician onsite making similar adjustments, and your shooter may be doing the same thing. So, once a speaker changes, you might adjust your levels, but then the audio tech or shooter makes their adjustments, so you have to adjust again. Bottom line is that anytime there’s a change, you’ve got to be riding the volume sliders.
All this is simple enough; let’s distill to a few rules
1. Wear headphones at all times to monitor any breaks, and also audio volume.
2. Be ready to adjust volume at every presenter change.
3. Be ready to adjust volume at every microphone change.
4. Monitor the adjustments the shooter and audio technician are making and adjust for these as well.
How Loud is Loud Enough?
All of the issues discussed so far relate to mechanics; the big question is, how loud is loud enough? More specifically, while you’re monitoring the sliders, what’s the proper volume level to target?
Figure 2 (below) shows the Livestream Procaster audio mixer. The top slider on the left controls the incoming volume from the capture device I was using (the Canopus AVDC300) while the master slider on the right controls all audio sources. The volume meter next to master provides the most useful guidance regarding outbound audio volumes, and ranges from – (negative) infinity, which is obviously too low, to +12 with a peaking indicator (OVR).

Figure 2. How loud is loud enough?
The mixer throws some pretty scary clues your way. First, the region from 0 dB to +6 dB is marked in yellow, while the area from +6 to +12 is marked in red. To me, that means caution and stop. Obviously, the OVR indicator is to be avoided at all costs.
But what is the desired level? We all know that when working with an audio editor like Adobe Audition, or video editor like Adobe Premiere Pro, the peak is 0 dB, and that levels beyond this are clipped and distorted. Does distortion start when levels exceed 0 dB in Procaster? Many TV and music producers target around -12 dB to leave headroom for later editing. Is that a good target for your webcast?
If you’re new to webcasting, you may find that the more you think about this, the more confused you’ll get. Fortunately, understanding three simple facts simplifies the analysis.
1. Analog volume meters are different from digital volume meters
Figure 3 (below) shows a waveform in Adobe Audition. You can see on the right that it shares the same bottom end as the Procaster meter, – infinity, but that the loudest end is 0 dB, which is just at the top and the bottom of both channels in the figure.
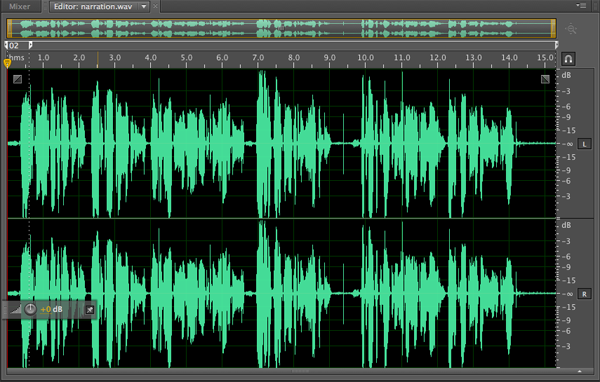
Figure 3. With digital volume meters (all the way on the right), 0 dB is as loud as it gets.
In fact, as you know, if you go beyond 0 dB, you’ll produce clipping, which is represented in Figure 3 by the slightly flat area on the bottom of both channels right at the 7-second mark. Excessive clipping causes distortion, and is to be avoided whenever possible. So, when webcasting, should you limit your webcast audio to 0dB?
The simple answer is no because analog meters are different than digital meters. Here’s a bit from the fabulous Sound on Sound website explaining why.
The majority of digital recorders, mixers, and converters use true peak-reading meters whose displays are derived from the digital data stream. As these don’t rely on analogue level-sensing electronics they can be extremely accurate.
Analogue meters all have a nominal alignment point–the zero reference–with a notional headroom above. The idea is that signal peaks are routinely allowed into the first 8dB or so of this headroom, though peaks of +12dBu will usually start to cause distortion which becomes more and more noticeable with increasing level until clipping occurs, usually at between +18dBu and +22dBu.
Digital systems, however, have no headroom above the maximum quantization level, and therefore a notional headroom must be created by choosing a ‘zero’ point well below this. Digital meters are scaled such that the maximum quantisation level is denoted as 0dBFS (full scale), so the alignment level is always a negative value below this point.
To simplify, while levels beyond 0 dB cause problems with digital metering systems, with analog style meters, you can go to +12 or higher without causing distortion. How high? Well, that depends upon the style of meter, leading us to fact 2.
2.There are multiple styles of analog meters
I won’t dwell on this, but note that there are multiple styles of analog volume meters, as shown in Figure 4 (below), which is a chart from the same Sound on Sound article referenced above. This leads to the third fact.
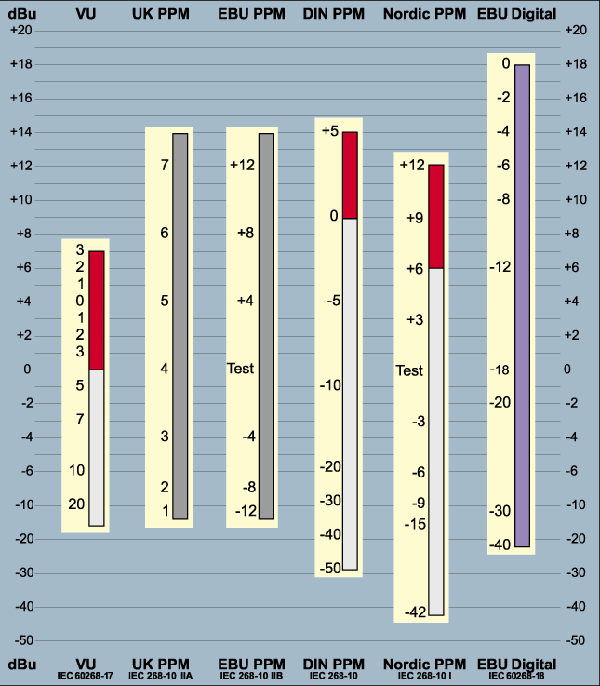
Figure 4. Different styles of analog meters
3.You have to know which style your webcasting tool uses
If you compare Figure 2 with Figure 4, it’s apparent that Livestream uses the Nordic meter, which I confirmed in an email. I also asked about the recommended approach to setting levels. Here’s the reply from my Livestream contact, who runs many of their high-profile webcasts:
If you let the audio just hit 0 in Procaster it will be too low. You need to get it to between +6 and +12 to get a nice normalized sound that sounds good in laptop speakers. Unless you sustain clip volume the OVR you shouldn’t clip your audio.
This is specific to Procaster and is somewhat counter-intuitive if you’ve been working with digital-style metering, but trust me—we ride the meter so that it hits between those all the time and it sounds great. If the input signal is not hot enough, I definitely recommend boosting it in Procaster.
Synthesis
OK, let’s take what we learned and synthesize some general-purpose lessons. First, regarding the Livestream mixer (Figure 5, below), you should target volume so that it stays within the 6-12 region, but seldom triggers the OVR light.
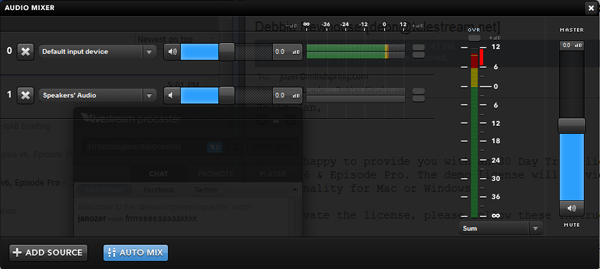
Figure 5. Optimal levels for the Livestream mixer. Same as Figure 1 for convenience.
Intuitively, you get the cleanest signal when you can increase volume without boosting gain, which is electronic amplification that can introduce noise into the signal. You can see that gain is set to 0 dB on both on the top slider on the left, and the master slider. If you can boost volume at the source without boosting gain there, you should do so. In other words, if the soundboard can boost volume, or the shooter, generally that’s preferred. What about if you have to boost gain in your mixer?
I asked the Livestream folks whether boosting gain with their tool would introduce audible noise into the audio stream. They responded that it almost never does, except when volumes are boosted so high that it produces clipping.
For working with other mixers, keep these rules in mind:
1. Most audio mixers use analog style meters with levels beyond 0 dB. Check the documentation that comes with the mixer (if any) for details, but in the absence of a manual, if there’s a clipping indicator, boost your volume so that it’s only occasionally triggered. If there is no clipping indicator, make sure you don’t flatline the audio volume at the top of the meter for extended periods.
2. When you need to boost volume, try to boost from the source if you can do so without boosting gain there. Don’t sweat if you have to boost gain in your mixing tool, but monitor to make sure that you’re not introducing noise into the signal.


