 Streaming Learning Center Where Streaming Professionals Learn to Excel

Related Articles


The thing about FFmpeg is that there are almost always multiple ways to accomplish the same basic function. In this post, we look at four approaches to scaling.
We found that if you’re scaling using the default -s function (-s 1280×720), you’re leaving a bit of quality on the table as compared to other methods. How much depends upon the metric you prefer; about ten percent if you’re a VMAF (hand raised here) or SSIM fan, much less if you still bow to the PSNR gods. More importantly, if you’re chasing throughput via techniques like cascaded scaling with fast scaling algorithms (flags=fast_bilinear), you’re probably losing quality without any meaningful increase in throughput.
That’s the TL/DR; here’s the backstory.
Contents
The Backstory
NETINT sells ASIC-based hardware transcoders. One key advantage over software-only/CPU-based encoding is throughput, so we perform lots of hardware vs. software benchmarking. When deriving the command string for software-only encoding, fairness dictates that we use the most efficient FFmpeg command string possible.
In addition, the NETINT T408 transcoder scales in software using the host CPU, so we have a vested interest in techniques that increase throughput for T408 transcodes. In contrast, the NETINT Quadra scales and performs overlays in hardware and provides an AI engine, which is why it’s designated a Video Processing Unit (VPU) rather than a transcoder.
One proposed scaling technique for accelerating both software-only and T408 processing is cascading scaling, where you create a filter complex that starts at full resolution, scales to the next lower resolution, then uses the lower resolution to scale to the next lower resolution. Here’s an example.
-filter_complex “[0:v]split=2[out4k][in4k];[in4k]scale=2560:1440:flags=fast_bilinear,split=2[out1440p][in1440p];[in1440p]scale=1920:1080:flags=fast_bilinear,split=3[out1080p][out1080p2][in1080p];[in1080p]scale=1280:720:flags=fast_bilinear,split=2[out720p][in720p];[in720p]scale=640:360:flags=fast_bilinear[out360p]”
So, rather than performing multiple scales from full resolution to the target (4K > 2K, 4K to 1080p, 4K > 720p, 4K to 360p), you’re performing multiple scales from lower resolution sources (4K > 2K > 1080p >720p > 360p). The theory was that this would reduce CPU cycles and improve throughput, particularly when coupled with a fast-scaling algorithm. Even assuming a performance increase (which turned out to be a bad assumption), the obvious concern is quality; how much does quality degrade because the lower-resolution transcodes are working from a lower-resolution source?
In contrast, if you’ve read this far, you know that the typical scaling technique used by most beginning FFmpeg producers is the -s command (-s 1280×720). For all rungs below 4K, FFmpeg scales the original source footage down to the target resolution using the bicubic scaling algorithm,
So, we had two proposed methods which I expanded to four, as follows.
- Default (-s 1280×720)
- Cascade using fast bilinear.
- Cascade using Lanczos
- Video filter using Lanczos (-vf scale=1280×720 -sws_flags lanczos)
I tested the following encoding ladder using the HEVC codec.
- 4K @ 12 Mbps
- 2K @ 7 Mbps
- 1080p @ 3.5 Mbps
- 1080p @ 1.8 Mbps
- 720p @ 1 Mbps
- 360p @ 500 kbps
I encoded two 3-minute 4K30p files, excerpts from the Netflix Meridian and Harmonic Football test clips using the x265 codec and ultrafast preset. You can see full command strings at the end of the article. I measured throughput in frames per second and measured 2K – 360p rung quality with VMAF, PSNR, and SSIM, compiling the results into BD-Rate comparisons in Excel.
I tested on a Dell Precision 7820 tower driven by two 2.9 GH Intel Xeon Gold (6226R) CPUs running Windows 10 Pro for Workstations in 64 GB of RAM. I tested with FFmpeg 5.0, a version downloaded from www.gyan.dev on December 15, 2022.
Performance
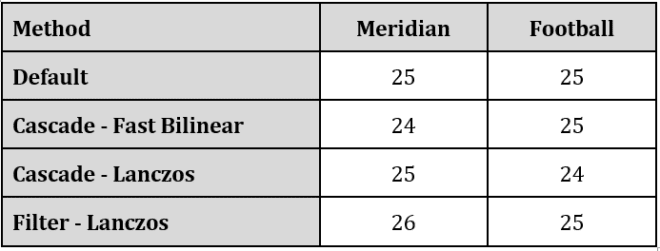
Let’s start with the performance results presented in frames per second. Basically, a nothing burger. With these two test files and the selected encoding parameters, cascading delivered negligible performance benefits.

I asked the engineer who suggested the cascading scaling approach why we saw no throughput increase. Here’s the brief exchange.
Engineer: It’s not going to make any performance difference in your example anyways but it does reduce the scaling load
Me: Why wouldn’t it make a performance difference if it reduces the scaling load?
Engineer: Because, as your example has shown, the x.265 encoding load dominates. It would make a very small difference.
Me: Ah, so the slowest, most CPU-intensive process controls overall performance.
Engineer: Yes, when you compare 1000+1 with 1000+10 there is not too much difference
What this means, of course, is that these results may vary by codec. If you’re encoding with H.264, which is much faster, cascading scaling might increase throughput. If you’re encoding with AV1 or VVC, almost certainly not.
Given that the T408 transcoder is multiple times faster than real-time, I’m now wondering if cascaded scaling might increase throughput when producing with the T408. You probably wouldn’t attempt this approach if quality suffered, but what about if cascaded scaling actually improved quality? Sound far-fetched? Read on.
Quality Results
Table 2 shows the combined VMAF results for the two clips. Read this by choosing a row and moving from column to column. As you would suspect, green is good, pink is bad. So, for the Default row, that technique produces the same quality as Cascade – Fast Bilinear with a bitrate reduction of 18.55%. However, you’d have to boost the bitrate by 12.89% and 11.24%, respectively, to produce the same quality as Cascade – Lanczos and Video Filter – Lanczos.
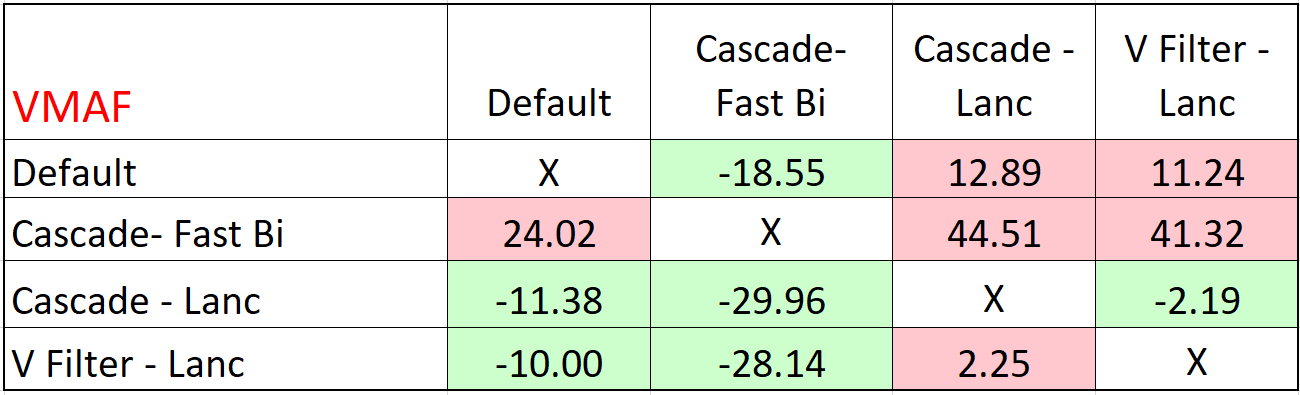
From a quality perspective, the Cascade approach combined with the fast bilinear algorithm was the clear loser, particularly compared to either method using the Lanczos algorithm. Even if there was a substantial performance increase, which there wasn’t, it’s hard to see a relevant use case for this algorithm.
The most interesting takeaway was that cascading scaling with the Lanczos algorithm produced the best results; slightly higher than using a video filter with Lanczos. The same pattern emerged for PSNR where Cascade – Lanc was green in all three columns, indicating the highest-quality approach.

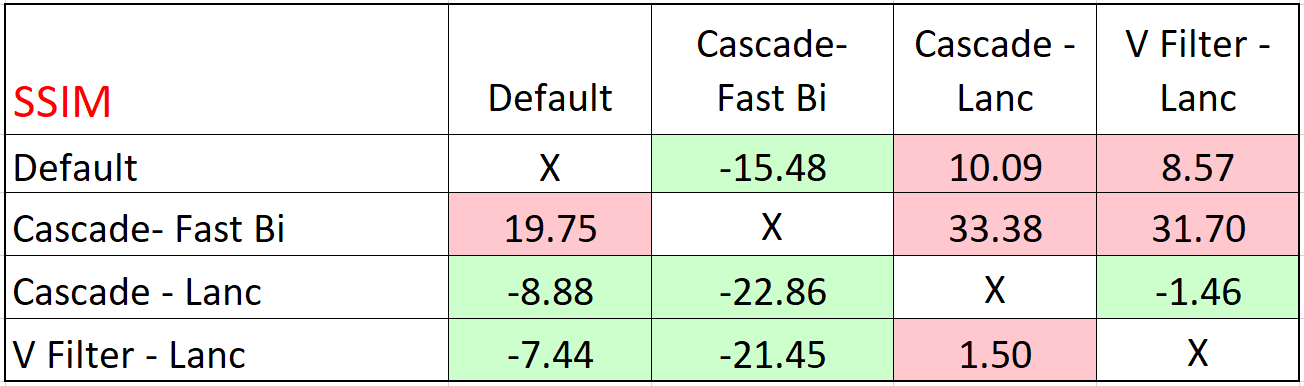
Ditto for SSIM.
The cascading approach delivering better quality than the video filter was an anomaly. Not surprisingly, the engineer noted:
Engineer: It is odd that cascading with Lanczos has better quality than direct scaling. I’m not sure why that would be.
Me: Makes absolutely no sense. Is anything funky in the two command strings?
Engineer: Nothing obvious but I can look some more.
Later analysis yielded no epiphanies. Perhaps they can come from a reader.
The Net Net
First, the normal caveats; your mileage may vary by codec and content. My takeaways are:
- Try cascading scaling with Lanczos with the T408,
- For software encodes, never use -s again. Either cascade or use the simpler video filter approach. I’ll probably opt for the video filter just for simplicity’s sake.
- With most software-based encodes, supposed faster scaling methods will likely never deliver meaningful performance increases and may significantly degrade quality.
Further, as we all know, there are several, if not dozens, of additional approaches to scaling; if you have meaningful results that prove one is substantially better than the other, please share them with me at janozer@gmail.com.
Finally, taking the macro view, it’s worth remembering that a $12,000 + workstation could only produce 25 fps or so when producing a live 4K ladder to HEVC using x265’s ultrafast preset. Sure, there are faster software encoders available. Still, for truly affordable live 4K transcoding on both an OPEX and CAPEX perspective, hardware encoding is the best answer.


Unfortunately, all scaling filters in FFMPEG are not exactly right: not done in linear space, not isotropic in response, not preserving chromaticity in cases of sub-sampled chroma, etc, etc.
Thanks for your comment. What’s the best alternative?