 Streaming Learning Center Where Streaming Professionals Learn to Excel

Related Articles


Creating batch files with variables is one of the more efficient ways to run FFmpeg. However, most producers build their batch files with variables inserted directly into the batch file, which means that you have to customize each batch file for different source files or encoding parameters. This is particularly inefficient when you’re encoding multiple files to different encoding parameters; in essence, you have to create a separate batch file for each file.
However, as you’ll learn in this blog post, you can build your batch files to accept variables supplied by the external command line. This allows a single batch file to customize encodes for any number of files by creating separate command lines in a master batch file.
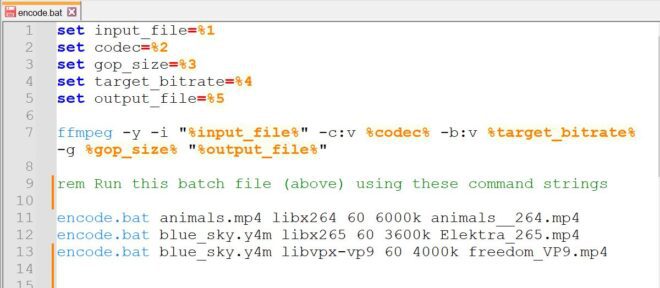
You see this in the three lines below. These execute the script contained in encode.bat but encode a different source file with different encoding parameters to three different codecs.
encode.bat animals.mp4 libx264 60 6000k animals_264.mp4

encode.bat Elektra.mp4 libx265 50 3600k Elektra_265.mp4

encode.bat freedom.mp4 libvpx-vp9 4800k freedom_VP9.mp4
By passing variables through the command line, you can create flexible and reusable scripts that streamline your workflow. This post shows you how and provides a practical example you can start using today.
Contents
Why Use Command-Line Variables in Batch Files?
As background, I’m updating my book, Video Encoding by the Numbers, which uses the results from dozens of encoding comparisons to recommend different encoding configurations. When I wrote the book back in 2016, I was just learning FFmpeg and didn’t use scripts with variables. When I tested x264 presets, for example, I had to create a batch file with 80 lines; eight clips times ten presets from ultrafast to placebo.
I encoded each file to unique encoding parameters, so I often had to change the file name, GOP size, and target bitrate, maxrate, and VBV buffer, as well as the file name. While I could and did copy and paste from file to file, this was time-consuming and error-prone.
Today, I create one batch file and customize encoding parameters for each file in the command string. So, it’s one batch file and an eight-file command string comprised solely of the parameters that I need to adjust. Faster, and much less error-prone.
In this fashion, using command-line variables in batch files allows you to customize the behavior of your script each time you run it. This technique is particularly useful for:
- Bulk Processing: When you need to encode multiple files with the same or slightly different settings.
- Consistency: Ensuring the same encoding settings are applied across different files, reducing the chance of human error.
- Efficiency: Automating repetitive tasks so you can focus on more creative aspects of video production.
Example: Encoding with Different Parameters
Let’s walk through a practical example. Suppose you need to encode multiple files using different codecs, GOP sizes, bitrates, and output file names. Let’s start with the batch file.
Create the Batch File
Save the following script as encode.bat. This batch file accepts variables for the input file, codec, GOP size, target bitrate, and output file name. It encodes the video using FFmpeg with the specified parameters.
Here’s the batch file which I’ll save as encode.bat.
set input_file=%1

set codec=%2

set gop_size=%3

set target_bitrate=%4

set output_file=%5

ffmpeg -y -i "%input_file%" -c:v %codec% -b:v %target_bitrate% -g %gop_size% "%output_file%"
How It Works
In our batch file, we deploy variables in the command string as normal. But rather than inserting the values in the batch file itself, we insert placeholders like %1, %2, etc. that we will supply in the command line argument. Here’s how this works:
When you run the batch file with this command
animals.mp4 libx264 60 6000k animals_264.mp4
set input_file=%1This assigns the value of the first argument in the command string to the variable input_file. So, %1 is replaced by animals.mp4.set codec=%2This command assigns the value of the second argument in the command string to the variable codec. So, %2 is replaced by libx264.set gop_size=%3This assigns the value of the third argument in the command string to the variable gop_size. So, %3 is replaced by 60.set target_bitrate=%4This assigns the value of the fourth argument in the command string to the variable target_bitrate. Here, %4 is replaced by 6000k.set output_file=%5This assigns the value of the fifth argument in the command string to the variable output_file. In this case, %5 is replaced by animals_h264.mp4.
By using these placeholders, you can reuse the same script to encode different files with different settings. So, you don’t have to create multiple batch files for different encoding tasks, streamlining your workflow and ensuring consistency.
Running the Batch File
To use the batch file, open a command prompt and run the script with the appropriate parameters. Here’s our example from above:
encode.bat animals.mp4 libx264 60 6000k animals_264.mp4
As noted, this command will encode animals.mp4 using the libx264 codec with a GOP size of 60 and a target bitrate of 6000k. The output file will be saved as animals_264.mp4.
Batch Processing Multiple Files
To encode multiple files with different settings, you can create another batch file that calls encode.bat with the required parameters for each file. You have to use the call function because you’re running a separate batch command, not consecutive command lines in a single file.
call encode.bat animals.mp4 libx264 60 6000k animals_264.mp4

call encode.bat Elektra.mp4 libx265 50 3600k Elektra_265.mp4

call encode.bat freedom.mp4 libvpx-vp9 60 4800k freedom_VP9.webm
I’ve saved this in a file named call.bat. This script will run each encoding task consecutively, ensuring that each file is processed with its specific parameters.
This is obviously a simple example, but as far as I know, any file you create with variables you should be able to run via the command string. The batch file that inspired this article performs the preset encoding described above using 2-pass encoding. I input one command line per file, and the script generates ten output files, from ultrafast to placebo.
Download the Script and Command Strings
To help you get started quickly, I’ve zipped encode.bat and call.bat into a zip file called encode_call.zip you can download here.
These are for Windows, but the technique should work by any OS supported by FFmpeg with minor changes to the two files. By integrating this batch file into your workflow, you can significantly streamline your video encoding process, ensuring consistency, and saving valuable time.


