Anyone can stream to Facebook Live, but if you want to deliver live video via a computer with streaming or encoding software, read on.
With 1.65 billion monthly active users, Facebook is the largest social network in the world. It’s no surprise that when the company introduced live streaming, the online video industry took notice. “If Facebook introduces a new technology,” said AOL Alpha GM and product director Drew Lesicko at Streaming Media East 2016, “we stop on a dime and rethink what we’re doing.” If you haven’t already begun streaming to Facebook Live, chances are good you’re looking to get started.
Facebook Live is a free live streaming service that lets you share your live events—personal or professional—right where they’ll have the most impact. The pieces are all in place, and the service functions very well. In some scenarios, operation is straightforward. For example, if you want to publish to a Page (as compared with a Profile, Event, or Group), it should be simple to do so from your mobile device or computer. You should also be able to monitor the event and check analytics (and Boost the event) once it is complete.
But if you want to publish to a Profile, Group, or Event, you may not be able to monitor the event when you’re live. As of mid-August, I can’t figure out how to access analytics when I publish that way. I’m sure this will get sorted out over the next few months, but if you’re stepping outside the box in these early days, you may become frustrated.
To minimize this frustration, you should identify two key data points when planning your event: where you want to broadcast from and where you want to broadcast to. The two origination options are your mobile device and computer, though it won’t be long before cameras can broadcast directly to Facebook Live. Destination points can include your Profile, any Page you own, any Groups that you belong to that enable live broadcasts, and most Event pages. Once you have that information, you’re ready to start streaming. Let’s begin with some Facebook Live basics.
Contents
Facebook Live Overview
Facebook Live events can last up to 90 minutes, and Facebook will capture the live videos and convert them to multiple bitrate files for video-on-demand (VOD) distribution. You can produce longer videos, though these will only be streamed live and won’t be saved or made available on-demand.
As currently configured, Facebook Live can only accept a maximum resolution of 720p, so broadcasters seeking 1080p or 4K distribution will have to find another solution. The actual broadcast resolution depends upon the originating device, and the videos I produced from an iPhone maxed out at 400×400, though I can’t say for sure that this is the limit. Videos produced from a computer or notebook can range up to 720p in resolution.
With this as background, let’s explore mobile operation.
Mobile Is Simple
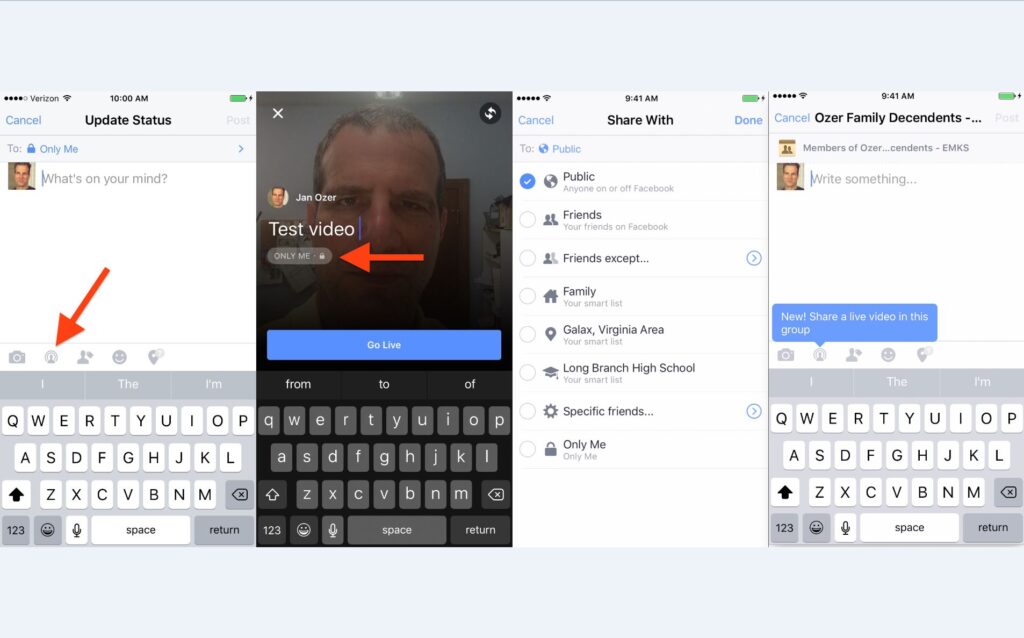
Mobile operation is app-based, and iOS and Android operation is similar. In both cases, you access the function from your Update Status screen, clicking the icon that looks like a person’s head surrounded by two circles (Figure 1, far left). This opens up the second screen, where you click the arrow to choose where to share the video and enter a description. Choose where to share the video on the third screen. When you click Done on the upper right, you’re returned to screen 2, where you click Go Live to start the live event. It’s easy.
Figure 1. Mobile operation is pretty simple.
Note that the Ozer Family Descendants group, shown on the far right, isn’t listed in screen 3. It should be, since it’s a Group I belong to, just like the Long Branch High School Group. Don’t worry. If your Group isn’t listed in your Share With screen, click over to the Group and choose Write Something. If live streaming is enabled for that Group, you’ll see the same icon, which is called out on the far right in Figure 1. Click it to start the simple wizard.
Use this same method for broadcasting to a Page. That is, if the Page isn’t listed in the Share With screen (e.g., my Streaming Learning Center Page), navigate to that Page in the app and choose Publish. The live broadcast icon should appear. Click that, enter a description if desired, and then click Go Live.
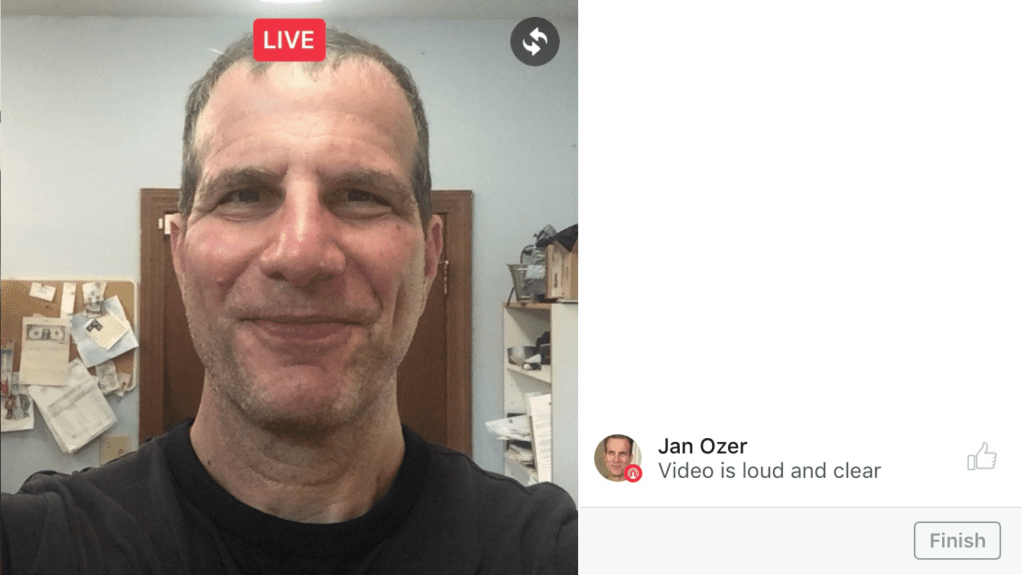
Once you’re live, you’ll see the screen in Figure 2, shown in landscape mode. As you can see, the app displays any comments on the right. Click Finish to end the broadcast. Again, it’s easy.
Figure 2. Here’s your broadcast screen, with comments on the right.
Now let’s transition over to the desktop, where simplicity starts to head south.
Facebook Live on the Desktop
To stream to Facebook Live, you’ll need a live streaming program such as Telestream’s Wirecast or the less functional (but free) Open Broadcaster Software (OBS), both of which I used in my tests. More and more software and hardware is supporting Facebook Live each day; unfortunately, Facebook does not keep a comprehensive list. Wirecast supports Facebook Live directly, while OBS supports it via the generic real-time messaging protocol (RTMP) server controls, highlighting that any live streaming program, such as Adobe Flash Media Live Encoder (FMLE), should be able to stream to Facebook Live. Let’s cover operation with OBS, and then come back to Wirecast.
When working with a program that doesn’t directly support Facebook Live, such as OBS, you start in Facebook. Specifically, you click over to the Page you want to broadcast the video to, and click Publishing Tools (Figure 3). Note that you won’t see this Publishing Tools option from your Profile, just a Page that you control. I add more on how to send a live broadcast to your Profile with OBS later.
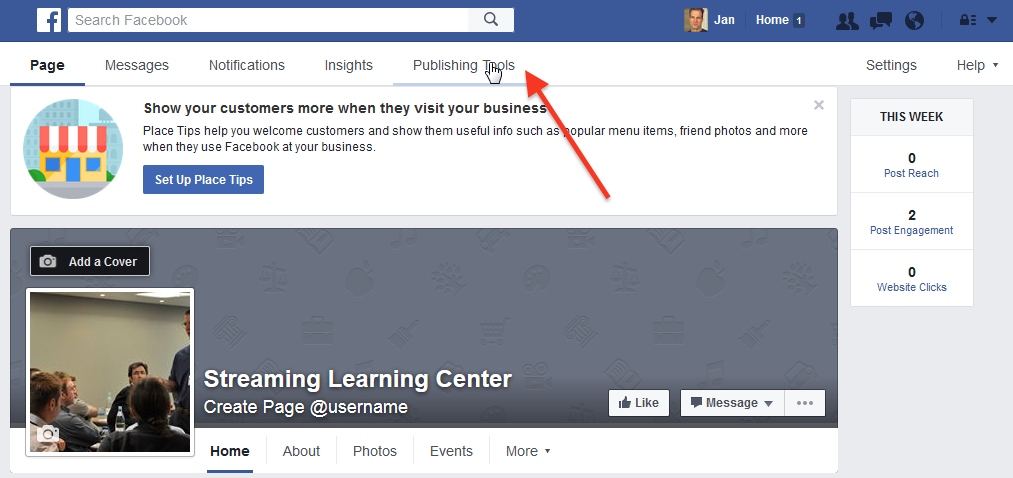
Figure 3. Starting the publishing wizard in Facebook on the desktop.
In Publishing Tools, click Videos on the far left (number 1 in Figure 4), then Live on the top right (number 2). This opens the screen in the center of the figure that contains the publishing information Server URL and the Stream Key. If you open the Stream Settings dialog in OBS, or the analogous screen in other programs, you’ll find fields into which you can copy and paste these values, as well as fields for your name and password.
Note that the Stream Key only remains valid for 24 hours. Once you’ve actually previewed the video, you only have 1 hour to go live. This should be plenty of time for pre-broadcast checks, but if you’re running a separate rehearsal, you’ll need a different Stream Key/Server URL combination.
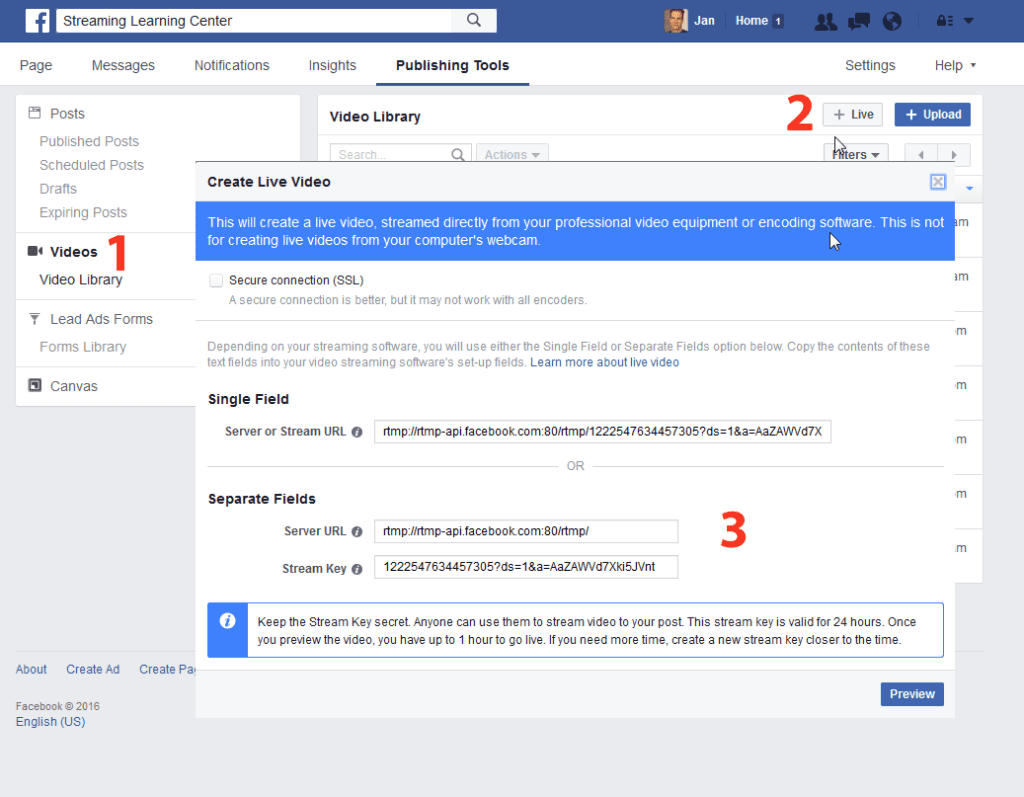
Figure 4. Here’s where you get your Server URL and Stream Key to paste into your live streaming program.
Configuring Your Stream
If a program doesn’t have a preset for Facebook Live, you’ll have to create one. Note that Facebook has three very specific requirements for the compressed stream you supply as the live input:
- Maximum 720p resolution at 30fps
- An I-frame at least once every 2 seconds throughout
- A maximum bitrate of 2500Kbps for both audio and video
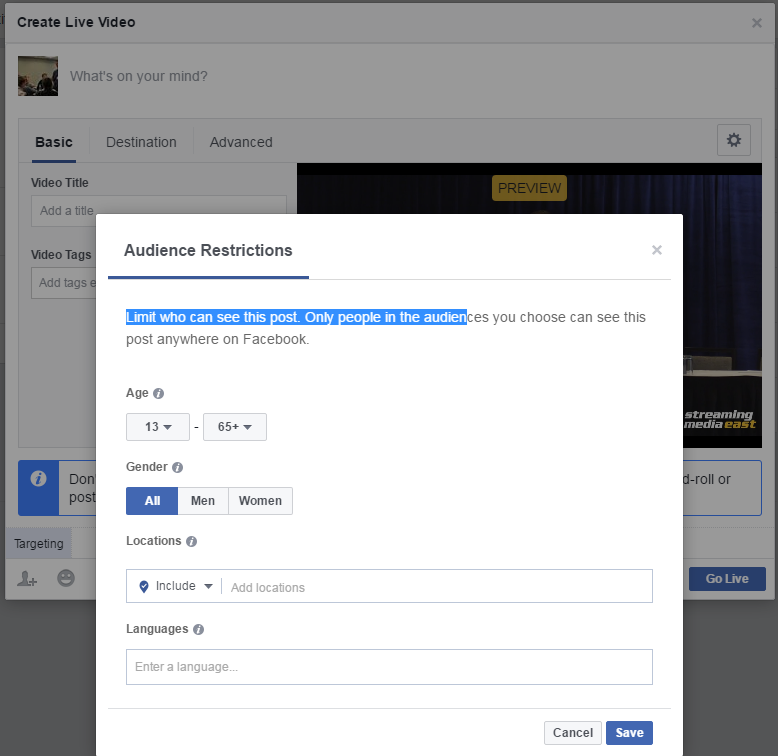
Configure your outbound stream to meet these requirements. When you’re ready to go live, start the outbound stream in OBS. Then click Preview on the bottom right of Figure 4 to move to the screen shown in Figure 5. Here you’ll add a few finishing touches before going live. Specifically, the Basic tab contains the title and any video tags, which is obviously critical for potential viewers to find your videos. The Destination tab contains the Server ID and Stream Key, while the Advanced tab lets you prohibit embedding and designate your broadcast a “Continuous Live Video” that extends beyond 90 minutes. Facebook will likely eventually let you target a Profile, Event, or Group from this screen, but I couldn’t when I wrote this review.
Figure 5. Final configurations before going live
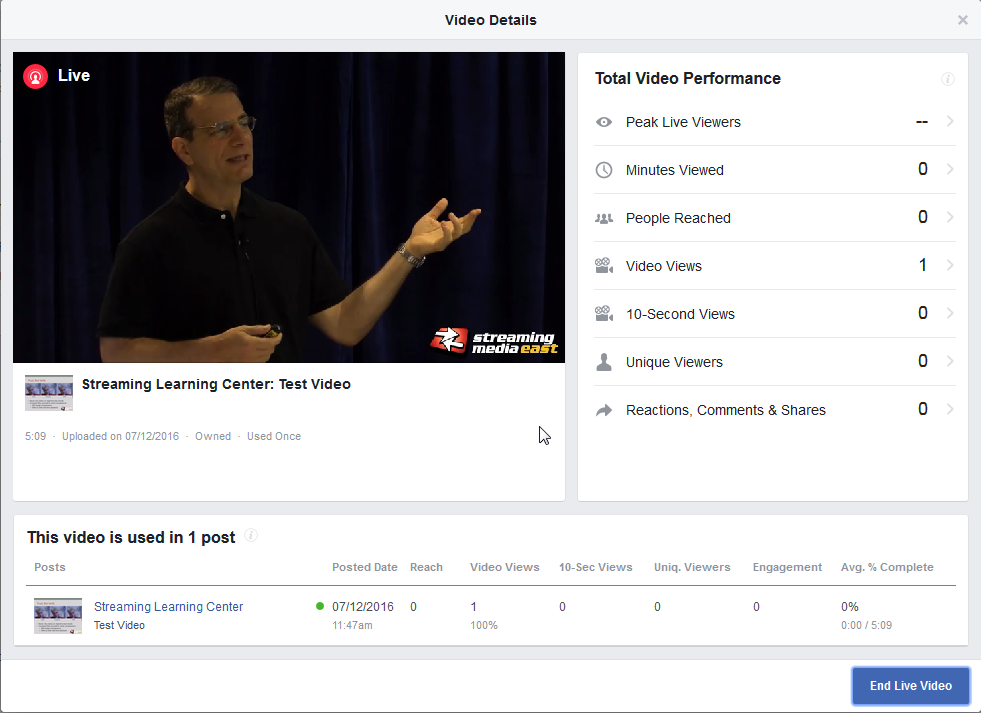
On the bottom left in Figure 5 are options for tagging people in the video, choosing your mood and location, and restricting your audience as shown in the figure. When you’re ready, click Save to close the Audience Restrictions screen (if open), and then click Go Live on the bottom right of Figure 5 to start the broadcast. You’ll automatically move to the Video Details screen shown in Figure 6, which is the control room from which you’ll monitor your live event.
Figure 6. The live broadcast control room
What are the gaps in this workflow? There aren’t many, except you can’t publish to your Profile or any Groups or Events, only the Page you started from back in Figure 3. This is a problem if your marketing department wants the broadcast somewhere else.
Facebook Live and Wirecast
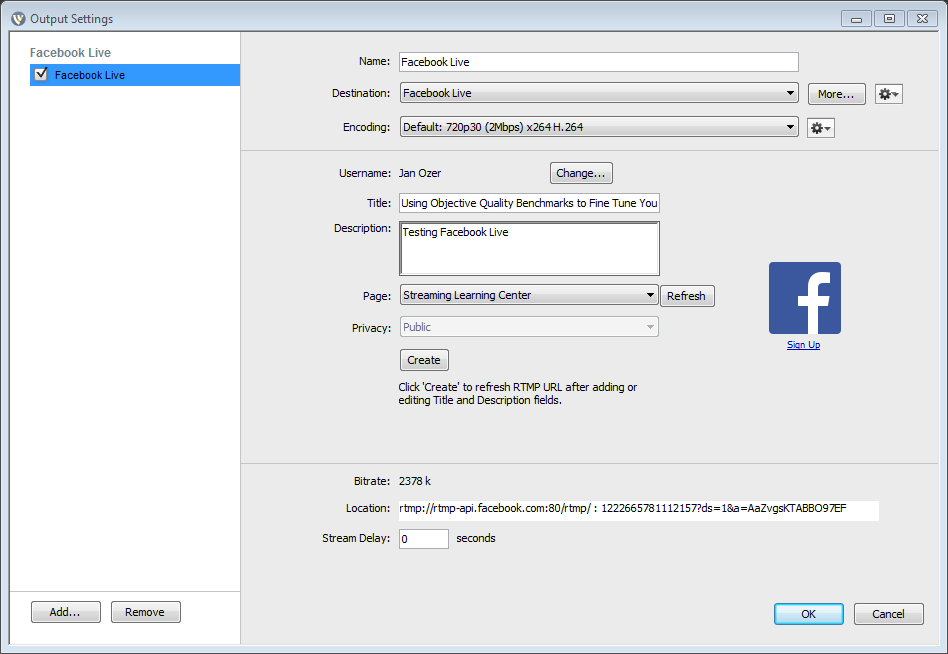
In Wirecast, you have a completely different workflow (Figure 7). Specifically, you start in Wirecast’s Output Settings dialog. Next, you click the Output Settings dialog, choose Facebook Live as the destination, and enter your credentials. This lets you skip over the steps shown in Figures 3–5, but you lose your ability to target your audience as shown in Figure 5. However, Telestream will likely address this in an upcoming release. In addition, Wirecast lets you publish on your Profile or any Page associated with the Profile, but not to a Group or Event.
Figure 7. Logging in to Facebook Live from Wirecast
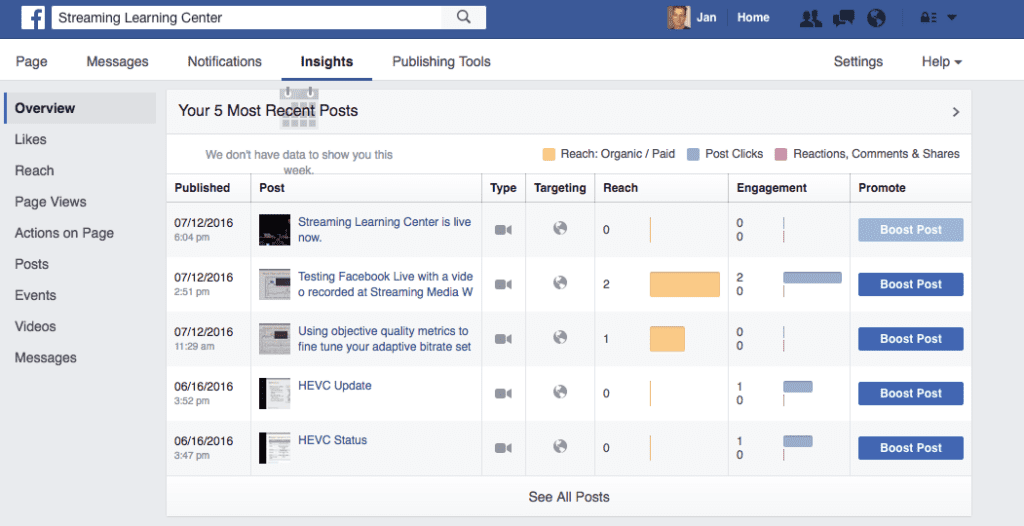
In addition, there’s the little matter of opening the screen shown in Figure 6, which you’ll want to see during the event. If you’re publishing to a Page, just click the Insights page (Figure 8) and select the event. This is also where you’ll go to find event analytics afterward, or to Boost the post once it’s been converted to VOD (you can’t Boost live events).
Figure 8. The Insights page, where you can open the Video Details page by clicking the event
How do you get to the Video Details screen shown in Figure 6 if you’re broadcasting to a Profile, Group, or Event? I emailed a product marketing person at Facebook (who never responded) and asked several vendors who work with the service, but I was unable to find out. If there isn’t a way to get there today, there almost certainly will be soon.
Using the Facebook Live API
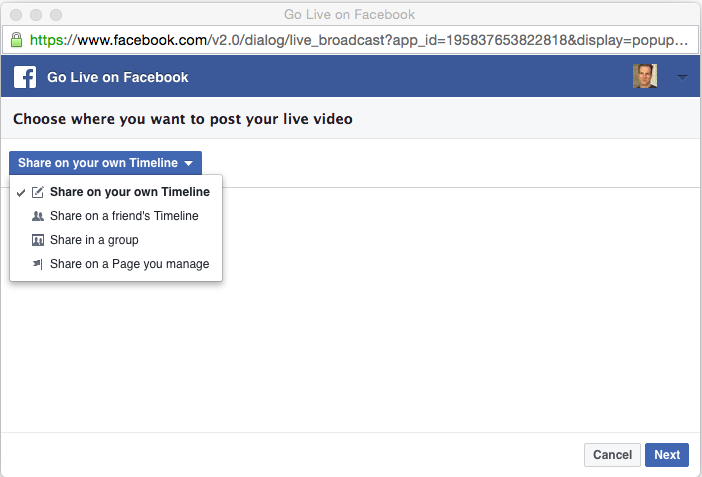
While you can’t stream directly to Profiles, Groups, or Events in the Facebook widget shown in Figure 4, developers can target these destinations through Facebook’s Live API (live.fb.com/api). One developer, the iag.Me Seriously Social site, has created a widget that everyone can use to broadcast to various locations supported in their Facebook accounts (Figure 9).
Figure 9. A third-party widget for broadcasting to a Group or Timeline
I used the widget to broadcast to my Profile Page. It seems secure, though I have no way of knowing for sure. This also doesn’t get you to the control screen shown in Figure 6. Once you complete the wizard shown in Figure 9, it disappears, rather than taking you to the Video Details screen.
I contacted Ian Anderson Gray, the owner of iag.Me, and asked if he knew of a way to access analytics when streaming to a profile, group, or event. He responded, “The Facebook Live Video Details screen is only available to pages at the moment. Hopefully, Facebook will roll this out to profiles and groups soon. It may be possible for a developer to create this, but I am not sure.”
So there it is. As you stream live to a Page, you should have no trouble managing the event or accessing the analytics once it’s over. Otherwise, the control and analytics side is unclear. But I’m sure these issues will be addressed in the next few months—perhaps even by the time you’ve read this article.
 Streaming Learning Center Where Streaming Professionals Learn to Excel

