 Streaming Learning Center Where Streaming Professionals Learn to Excel

Related Articles


I produced my first live webcast on May 8, 2010. Like everything else, there were some huge lessons that didn’t become obvious until I was there in the chair, broadcasting live. If you’ve got your first live webcast coming up, perhaps you’ll find them useful
By way of background, this was an event sponsored by Grayson Landcare, a “community-based group of volunteers working on conservation projects that contribute to environmental, social and economic outcomes.” The event was their First Annual Save Green: Money and Energy Expo, and they had a six hour lineup of speakers on how to build green, and how to generate power via solar, wind and other alternative energy options.
A buddy of mine was one of the directors for the event, and she asked me to shoot for DVD and YouTube distribution in the Historic 1908 Courthouse in Independence, Virginia. As long as I had a camera on site, I figured we could stream live, as well, and she agreed. We quickly checked to make sure that the Courthouse had connectivity in the auditorium where the speakers would give their talks, and when we learned that they did, the deal was done.
Choosing a WebCast Provider
My first consideration was choosing the service to stream the live video. There are a number of free services like UStream and LiveStream, but these are advertising supported and very low touch. Though you can upgrade to a non-advertising based service, I wasn’t sure how many events Landcare would be running, so didn’t want to commit to a monthly plan.
In addition, I wanted technical support if necessary, and was uncomfortable with the prospect of getting quick answers from a primarily UGC site. So, I decided to try to run the webcast through Atlanta-based Multicast Media, a fee-based live streaming service provider. I had gotten acquainted with Multicast at some StreamingMedia events, and was impressed by their product offering and client list, which includes Delta Airlines, the University of Pennsylvania and many others. I contacted the company, and they were kind enough to offer run this charity event gratis.
Choosing a Real Time Encoder
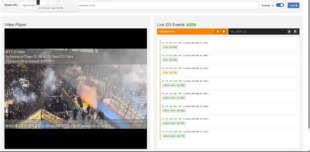
The second consideration was how to produce the stream to send to Multicast Media’s streaming servers. I considered three options. First, was Telestream Wirecast ($449), which gave me sexy titles and the easy ability to post informational slides between speakers (Figure 1). I was familiar with Wirecast, having reviewed it in the past, and this familiarity ultimately proved to be the deciding factor.

Figure 1. Telestream Wirecast gave me lower third titles and the ability to post informational slides between speakers.
Briefly, Wirecast can mix feeds from different sources, including multiple FireWire based cameras which you can switch between by clicking the feed with your mouse. You display and hide titles, background and foreground images the same way. I would run the show on my 2.2 GHz MacBook Pro, which had one FireWire port that I connected to a single Canon XH A1.
Beyond WireCast, I also considered using Adobe’s Flash Media Live Encoder, which is free, but doesn’t offer the fancy titles and wasn’t a tool that I was familiar with. Thinking that I needed a backup system in the unlikely event that the MacBook Pro failed, I loaded the program on my Hewlett Packard 8710w notebook, which I took along as a backup system, along with my Sony HDR-FX1 as a backup camera.
The other encoding tool I considered was the Viewcast Niagara 2120, a standalone encoding appliance that I could have preconfigured and used without a computer at the event. In many ways, the Niagara was the most advanced option, since I could have encoded and distributed multiple streams, including streams targeted for mobile devices. However, I was hoping to just get through this first webcast, not hit a home run, so decided to use the tool I was most familiar with.
Getting Connected
Equipment choices settled, I focused on connecting WireCast to Multicast Media’s servers. Multicast Media, who hosts over 60,000 live events a year, makes this simple via a “Get Code” tab in their server control software. Click this, and you’ll see the URLs for the primary and fallback streaming server, the stream name, and login name and password (Figure 2).

Figure 2. Enter this login information into your encoder and you should be up and running.
Once you have this information, you copy and paste them into the corresponding entry fields in your encoding tool, as you can see in Figure 3, which shows the entry fields in the backup Flash Media Live Encoder. Click Connect, enter user name and password, and you’re up and running. Once connected, Multicast Media lets you run a test feed that is only visible in the server control software. Using this test feed, I got both WireCast and the Flash Media Live Encoder configured and tested two days before I went live, which helped me sleep better both nights.

Figure 3. Here’s where I entered the connection information in the Flash Media Live Encoder.
Embedding the Player
Multicast Media’s Get Code page also contained the codes for embedding the live stream into Grayson Landcare’s website, which took just a couple of moments. As you can see in Figure 4, embedding is simple, you just copy the codes and paste them into your web page, just like with YouTube or Vimeo videos.
Figure 4. The embed codes used to create the player on the Grayson Landcare web site.
Choosing Encoding Parameters
After getting connected, my thoughts turned to the stream configuration I would use for the event. First, understand that in most instances, the encoding configuration set in your encoding tool (WireCast in my case) will be streamed to your viewers; it won’t be re-encoded by the service provider. You have multiple factors to consider when setting your encoding configuration, the two critical factors being the upload bandwidth from your event site, and the bandwidth of your viewers.
Before the event, I measured on-site upload bandwidth using www.speedtest.net, and it averaged 700 kbps. This meant that my stream configuration would have to be well under this figure — otherwise, I would have trouble getting data to the server, which obviously stops the show for remote viewers.
I also knew that some viewers would watch from Australia, Indonesia and other far flung locals. Optimally, I could have offered multiple streams via the ViewCast box, a large stream for US consumption and smaller one for overseas, but I didn’t have the outgoing bandwidth for both. To be safe, I went with 320×240 resolution, 15 frames per second, with video at 250 kbps and audio at 32 kbps. As shown in Figure 5, I used the H.264 codec configured to the Main profile. 
Figure 5. The encoding configuration that I used for the webcast.
If you’re operating in a bandwidth constricted environment, like I was, be sure to choose constant bit rate encoding rather than variable, because data rate spikes associated with variable bit rate encoding can overwhelm the outgoing bandwidth and stop the outgoing stream, which can also pause the show at the receiving end (and ultimately did).
In Figure 5, the “Limit peak bit rate” check-box performs this function, a detail that I missed during setup, which forced me to make some fast adjustments after I went live. More on this below.
At the Show
That Saturday, I arrived at the Courthouse at about 8:30 AM, an hour before the show, and first set up the XH A1 and wireless microphone. For those who care about such things, I was using the AKG MicroPen MP40, discretely taped to the auditorium microphone, transmitting wirelessly to the SR 40 receiver that I connected to an XH A1 XLR ports. Lighting (of course) would be totally au natural – couldn’t very well fire up the tungstens for a green event. Fortunately, the auditorium was flanked with large windows both left and right, and Mother Nature cooperated with a sunny day that provided lots of beautiful indirect light. I set the zebras at 75, configured exposure manually and had no trouble painting the subject’s faces with zebras all day long.
Next, I booted up the MacBook Pro, ran www.speedtest.org to confirm my earlier bandwidth findings, and ran WireCast, which immediately found the XH A1 and connected to the Multicast Server. Then I logged into the server in a browser to check the test stream, which was also good. I opened up another browser window, and surfed to the Grayson Landcare page with the embedded video so I could monitor the live stream at the event.
Everything looked grand as the countdown clock counted backwards – 3, 2, 1, Live. Playing the director, I cued the first speaker, but as I zoomed out of my initial wide establishing shot to a medium close up, the video I was monitoring on the Grayson Landcare website stopped dead as Ogg Theora after Google’s VP8 launch. I quickly checked WireCast’s outgoing bandwidth monitor, and noticed that it was up in the low four figures, somewhere north of 1100 kbps. So much for 250 kbps video and 32 kbps audio, eh?
I flashed back to the bandwidth testing I had performed in my office, which was static camera only, and realized that the data rate was spiking with the camera motion. I checked the encoding preset, noticed the “Limit peak bit rate” check-box, cursed myself for not seeing it beforehand, and clicked the check-box. The data rate had already stabilized with the static camera, so I couldn’t tell if I had fixed the problem or not.
Next time I zoomed the camera out, I learned the bad news – the data rate spiked again and the video stopped again on the Grayson Landcare site. I should say that this wasn’t a total calamity – the video simply started playing again a few moments later with no content lost, but the stoppage was frustratingly avoidable. I maintained a stable medium shot till the first speaker finished, then stopped the broadcast, unchecked and checked the Limit peak bit rate check-box, restarted the broadcast, zoomed around to see if the problem persisted, and found it solved.
Again, check outgoing bandwidth on-site, make sure your outgoing stream is comfortably less than the outgoing bandwidth, and make sure you’re producing a constant bitrate stream.
What else would I do differently? Well, when the last speaker stood up in a madras shirt, I saw the data rate start to strain against the upper limit and quality drop noticeably, and remembered that I should have advised the speakers to wear conservative, solid colors. I also realized that I had gotten lucky with the background, which was a solid beige that contrasted well with the clothing worn by all the speakers. Had the background been wallpaper with a herringbone pattern or other fine detail, the quality of the entire webcast could have been compromised.
As part of your live event prep, determine what the background is going to be, make sure that it’s compressible. If you’d like a guide to choosing a compressible background and clothing, download the PDF from my Streaming Media East presentation Video Production for Streaming, which covers both topics in detail. I just forgot to apply the lessons to my own first webcast.
Finally, if you haven’t used a program like Wirecast before, create a short checklist for stopping and starting each segment, particularly if you have multiple speakers rather than one long show. This is especially true if you’re running multiple pieces of gear, like recording tape in the XH A1 and driving the webcast, as well as working sound and lighting. I made several small omissions early on, like forgetting to press record on the camera, and these mistakes stopped once I created and observed the checklist.
So that’s my first live webcast. Though all I remember are the mistakes, the ratings apparently were high from LA to Australia to Sri Lanka, no doubt, in part, because of the big outgoing pipes of Multicast Media. In fact, my buddy has asked if I want to go to Sri Lanka next year to observe Landcare in action overseas. I’ve already suggested that we produce a documentary of the event, which of course I’ll write about in an article entitled “My First Documentary.” I’ll be sure to read all of my own training manuals before I start shooting that one, though, I promise.


