 Streaming Learning Center Where Streaming Professionals Learn to Excel

Related Articles


The combination of Eventstream, Eventbrite, and YouTube Live lets anyone charge for a live webinar, generating leads they can use to grow their business. While a strong contender, the help system could be a lot more helpful.
Ustream, Livestream, YouTube Live, and other live streaming services are affordable and work well, but lack two key features. First, you can’t collect viewers’ contact information easily, which makes it harder to generate leads. Second, none of those services allow you to charge for your streams. Eventstream, by contrast, supplies both features by integrating the reservations and payment processing capabilities of Eventbrite with the aforementioned live streaming providers, as well as several others. As an added bonus, if you record the event, you can continue to make the on-demand version available with Eventstream.
Eventstream (and Eventbrite) are free for free events, making the combination a natural for organizations hosting webcasts or similar events for lead generation. If you’re charging for your event, you’ll have to pay Eventstream 5 to 7 percent on top of Eventbrite fees. I tested the system with a recent paid webinar and found that given Eventstream’s ease of use and functionality, it’s a price well worth paying.
Contents
Getting Started
In essence, to use Eventstream, you have to learn how to use two completely different systems: Eventstream and your selected reservation system. When I tested, Eventbrite was the only supported reservation system, but Eventstream will add other platforms soon, including Cvent and RegOnline, which are services for hosting and promoting virtual or brick-and-mortar live events. Using polished tools within the system, you create an event, build a landing page, send invitations, register attendees, collect fees for paying events, and download reports and analytics.
I first used Eventbrite for a brick-and-mortar training seminar I produced in New York City in 2013. This time, I used Eventbrite and Eventstream to produce a webinar titled “Content-Aware Encoding: Applying Lessons Learned from Netflix’s Per-Title Optimization Blog Post.” The webinar was held on Feb. 26, 2016, and we had 28 viewers who each paid $31.59 for the privilege. Not a huge sum, but testing a new platform for paying customers always adds a certain frisson that helps focus one’s attention, which makes this review all the more realistic.
At a high level, the division of labor between Eventbrite and Eventstream works like this: You create your event in Eventbrite, which handles the reservations and payment processing, culminating with a confirmation email with an order number sent to the registrant. Then you set up your event in Eventstream, which supplies a playback page and player that registrants use to watch the stream, plus a control room for managing the event. To watch the event, the registrants enter the Eventbrite order number into a field in the Eventstream viewing page, which opens the Eventstream player. Note that Eventstream also creates landing and registration pages you can use along with or instead of the Eventbrite pages.
Setting Up in Eventbrite
Start by setting up the event in Eventbrite, inputting the event title and date, filling out the landing page information, and creating the tickets (Figure 1). As you might be able to see in the figure, Eventbrite adds a fee to your ticket price, which increased my round $29 ticket price to a messier $31.59. You can juggle the ticket price to try to achieve a nice round number, but in my tests, that proved elusive; prices always seemed to add up to $31.99 or $32.01, never exactly $32.

Figure 1. Setting the price for the webinar
This grumble aside, Eventbrite is a highly flexible reservation system with fabulous features, including the ability to create customizable tracking links and multiple discount codes and ticket types. You can create a ticketing widget on a Facebook page, integrate registrant data with MailChimp, and send a SurveyMonkey survey to attendees right after the event to solicit feedback. If you decide to use the Eventbrite/ Eventstream combination, budget time to learn how to leverage these Eventbrite features, since they will enable you to produce higher-quality and more profitable events.
Setting Up in Eventstream
Once you’re set up in Eventbrite, you’re ready to jump over to Eventstream to create your event and link the two there. In Eventstream, you’ll log in and create a new event. You’ll have two authentication options for the new event: password-protected or Eventbrite. To link to the Eventbrite event, you’ll select the latter, and then sync the two accounts by entering your Eventbrite name and password and enabling the sync. Once accomplished (and you’ll only need to do this once), you can select the event that you just set up in Eventbrite via a drop-down menu. Basic event information (title, time, and description) will flow in from Eventbrite, although pictures included on the Eventbrite landing page and associated formatting will not, so you’ll have to fix both.
After creating the event and importing the Eventbrite data, Eventstream will open in the Event Setup Page, where you’ll customize the Eventstream landing page and viewer. The landing page is pretty simple stuff; just reinsert any images and reformat the page as desired using a WYSIWYG HTML editor or insert the embed code from the selected live streaming platform. I used YouTube Live for my event, which meant that I had to create the event in YouTube Live, make it unlisted (YouTube doesn’t provide embed codes for private events), and then copy the embed code into the proper field in the Eventstream Viewer Configuration window. (See Figure 2.)

Figure 2. Copying the YouTube Live embed code into Eventstream
One criticism of the Eventstream system is that there’s very little help provided beyond three videos detailing the workflow under Support. It’s a good idea to watch these before getting started, since they are comprehensive, but skimmable text docs would be useful as well. I didn’t watch the videos (of course) and so it wasn’t clear to me which embed code Eventstream was looking for in Figure 2. Even changing “Embed Code” to “Embed Code from Live Streaming System” would have done the trick. This is a pretty minor grumble, however; watch the videos, and you should be fine.
Once you’ve completed the event setup, you’ll have the landing page shown in Figure 3 (on the previous page), which is available as a separate webpage on the Eventstream site and can also serve as the viewing page. Or you can create your own viewing page by embedding the Enter the Webcast section shown on the lower right of Figure 3 into a page on your website.

Figure 3. The Eventstream Landing page
Now that you’ve got the URL for the viewing page, return to Eventbrite and add this to the automatic order confirmation sent out by Eventbrite so your registrants will know how to view the event. In addition, Eventbrite automatically sends an email to registrants 48 hours before the event, and you should add viewing information to this email as well. If you don’t take these steps, you’ll have late registrants on event day emailing to ask what they have to do to watch the event, which will just make everyone unhappy.
Not to be pedantic, but you should be as detailed as possible as to what the viewer will have to do to watch the event. I bought a ticket for my event and ran through the entire viewing process just to be sure. During this exercise, I learned that the Eventbrite ticket number comes with a number before the actual ticket number; if you leave that in when you copy and paste the ticket number, you get an error. The ticket number as sent by Eventbrite also includes an extra space at the end of the number, and if you copy and paste the number with the space, you also get an error. I can’t say how many registrants would have encountered these issues, but I made sure that the instructions included in the confirmation and reminder letter mentioned them both.
With this done, you’re ready to go. Nothing left to do except worry about how many registrants you’ll actually get, and to complete your planning and event preparation.
Game Day
On game day, create the live stream as you would ordinarily with your streaming system. YouTube Live does a nice job with this, with excellent setup and preview capabilities, and, of course, it’s free. Then you open the Eventstream Control Room (Figure 4) to run the event. After going live in your live streaming system, nothing happens in the Eventstream player until you push the Open Event button in the Control Room, which toggles to the Close Event button seen in Figure 4. This starts feeding the live stream to the Eventstream player.

Figure 4. The Eventstream Control Room a few moments before going live
Just be sure the video isn’t available to all comers on the landing page in your live streaming system, since that would irritate the paying customers (and might cost you some revenue). Again, with YouTube Live, I simply had to make the event unlisted, so no one could find it without knowing the specific URL.
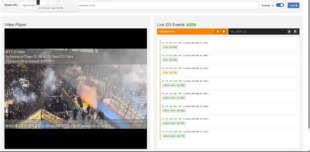
After starting the webcast, you can publish a text message to all viewers by typing it into the Publish a Message box in Figure 4 and clicking the Push Live button; these messages appear in the text box on the bottom of the player (Figure 5). Beyond that, the control room lets you manage and answer questions either directly to the viewer or to all viewers. It also displays the total number of viewers, their locations, and the browsers used to view the event, among other data. Multiple users can log in to the Control Room simultaneously, enabling a moderator other than the speaker to answer or prioritize questions and push out messages to the viewers.

Figure 5. The Eventstream player showing webinar content
In the event setup page, you can choose an image to display in the player between the time the viewer logs in and when the stream goes live. During the event, it’s pretty simple, essentially displaying the video from the live streaming system, with the ability to receive broadcasts and ask questions via the fields on the bottom. New features on the Eventstream road map include the ability to add third-party social media and polling widgets into the viewing page. For example, producers who have Twitter walls at their event will then be able to show the wall virtually beneath the webcast.
Once the webcast is complete, press Close Event in the control room to stop the feed to the Eventstream player, and shut down the live stream in your live streaming service. Then you can download simple analytics with the name and email address of all viewers, as well as when they joined and left the webcast, and any questions that they asked. This is complemented by multiple sales related reports from Eventbrite.
On-Demand Operation
Note that you can also use the Eventstream/Eventbrite combination for VOD events, either for live events you just finished producing, or for VOD content that was never live. In Eventbrite, you just have to indicate that the event is VOD, or live then VOD, and leave the system open for registration and ticket purchase rather than closing it after the event.
In Eventstream, copy the embed code from your platform into the player setup, so the player retrieves the video from there instead of your live streaming system. You might be able to use the same embed with your live streaming service provider if it delivers VOD files as well as live, as most do. I uploaded the archived video saved by YouTube to online video platform Wistia and served the VOD video from there, which allowed me to make the webcast available as a pay-per-view asset. On the road map is a playlist feature that would allow you to break a longer video into shorter, bite-sized pieces, which is always useful for long-form content.
Overall, Eventstream is the glue that ties two complementary services together, making both more functional and useful to the event producer. As a bonus, you also get viewer/moderator chat and viewer analytics you can’t get from Eventbrite. Given Eventstream’s ability to work with live and VOD events, the service helps extend the tail of your live events for lead generation and monetization.


