Streaming Learning Center Where Streaming Professionals Learn to Excel

Related Articles


The H.264 codec is still the most widely used video compression technology — aka codec in the world and likely will be for the next few years. For this reason, every streaming media professional should know what the H.264 codec is and how to encode with H.264.
This beginner’s guide to encoding H.264 will describe what H.264 is, detail the critical compatibility-related parameters, and show how to encode to H.264 for adaptive bitrate streaming, live streaming, and creating mezzanine files for uploading to a cloud encoding service.
Contents
What is H.264
H.264 is a video compression standard set by two standard-setting organizations, the Moving Pictures Experts Group (MPEG) and the International Telecommunications Union (ITU). Each group used a unique name; MPEG called the standard Advanced Video Coding (AVC) while the ITU called it H.264. The names are interchangeable and refer to the same technology.
H.264 is a “lossy codec,” which means that it throws information away during encoding, converting the pixel-related data into other data structures that it uses to reproduce the original frames as closely as possible. As with all lossy codecs, the lower the data rate the lower the quality, so the more you compress the file the worse it looks.
H.264 defines a codec specification and there are multiple implementations, which means that there are many H.264 codecs, all of which create files that should play in all H.264 players. The most prominent H.264 codec is x264, which is the codec in popular open-source encoding tool FFmpeg, and many tools based upon FFmpeg, like HandBrake (Figure 1).
In Figure 1, you see two H.264 codecs, x264 and the Nvidia NVEnc codec which is accelerated by hardware in the NVIDIA graphics card. Beyond these two, companies like MainConcept, Beamr, AWS Elemental, and many others have developed H.264 codecs.
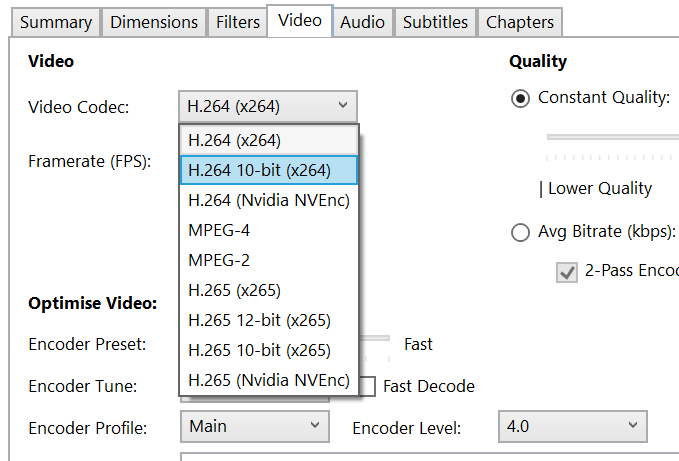
What’s important to know is that some H.264 encoding parameters, like Profile, Level, and Entropy Coding technique, are the same for all H.264. All H.264 encoders should allow you to set these parameters and you see Encoder Profile and Encoder Level on the very bottom of Figure 1. Profile and Level control the compatibility of the video file that you produce, so are critical parameters to understand.
Some other encoding controls are specific to the different H.264 codec implementations. For example, presets, which control a defined set of encoding parameters to trade-off encoding speed and quality, are different for all H.264 codecs. The x264 codec is famous for its presets ranging from Ultrafast to Placebo and you’ll see these in most encoders that use the x264 codec. However, you won’t see these options available in the AWS Elemental MediaConvert or the Adobe Media Encoder because they use different H.264 codecs.
In addition, note that each encoding tool makes different H.264 encoding options available to customers encoding with that tool. The Adobe Media Encoder is designed for content creators, not compressionists, so exposes the bare minimum of H.264 encoding parameters. AWS Elemental takes a similar approach with the GUI of MediaConvert but does expose some advanced parameters not available in the Adobe encoder.
Handbrake is for compression enthusiasts, and exposes a significant number of H.264 and x264 parameters, with the ability to add more via an advanced settings dialog. In general, when you’re first starting out, it’s best to stick to the default settings and not try to adjust settings that you don’t know.
Setting Generic Encoding Parameters
You can’t produce an H.264 file without setting a few file-related parameters. Here are the most critical parameters.
Setting Resolution/Bitrate/Frames Per Second
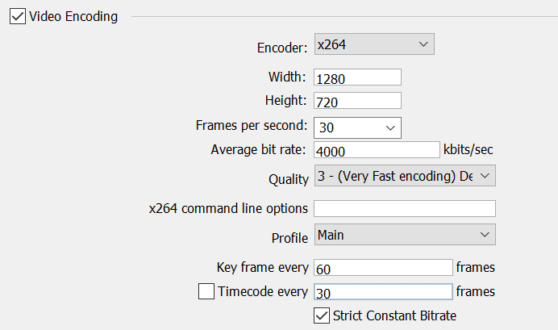
Every time you encode a video file with any codecs you set certain encoding parameters like those shown in Figure 2 (from Telestream Wirecast), including:

- Width and Height (or resolution): the width and height of the video file in pixels.
- Frames per second: The number of frames per second in the video file.
- Data rate: the amount of data per second in the video file.
I’ll discuss considerations for these parameters in the target-specific encoding section below.
Key Frame Interval (I-Frame Interval) or GOP Size
H.264 deploys three kinds of frames; I-frames, also called key frames, P-frames, and B-frames. I-frames are complete frames stored without reference to any other frame, in essence, complete JPG (a still image compression technology) frames. P-frames and B-frames leverage redundancies from other frames to encode more efficiently. For more on this topic, see here, here, and here.
I-frames are the least efficient frame but are necessary to start playing back the video file, whether for direct playback or trancoding. They also help reset quality. In Figure 2, showing encoding parameters for live encoding, you see a key frame every 60 frames (or a GOP size of 60 frames or 2-seconds), which is relatively short. That’s because if the stream gets interrupted, you need a key frame for the transcoding engine in the cloud to decode the file and restart transcoding. If the key frame interval was 10 seconds, overall file quality might improve slightly, but any interruption could cause a delay of up to ten seconds until Wirecast sent the next keyframe.
One distinction you sometimes see in encoding requirements (see Figure 9 below) is the difference between an open GOP and a closed GOP. For more than you ever want to know about this topic, see here. For the purposes of this discussion, understand that almost all encoders producing H.264 produce closed GOPs. So, if you see a requirement for a closed GOP in an encoding specification, don’t feel like you need to find a control in your encoder to close each GOP.
You also see the requirement for closed GOPs expressed as a requirement for I-frames that are also IDR Frames. In essence, an IDR frame is an I-frame deployed in a closed GOP, so the requirement is the same. See here for more on IDR frames.
I’ll discuss the I-frame strategy for each target below.
Bitrate Control Technique
The bitrate control technique refers to how the bitrate assigned to the file is allocated to the different file sections. With constant bitrate encoding (CBR), which is selected in Figure 2, the same data rate is consistently applied to all sections of the file. So, if a movie shifted from an easy-to-encode close-up of the hero to a hard-to-encode fight scene, the data rate would be the same for each scene.
In contrast, variable bitrate encoding (VBR) adjusts the data rate applied to each scene to optimize file quality. So, the encoder would allocate a lower bitrate to the close-up and a higher bitrate to the fight scene. The overall bitrate would be about the same but:
- The quality of the VBR file would be slightly higher.
- The bitrate of the CBR file would be more consistent and easier to deliver over tight constraints.
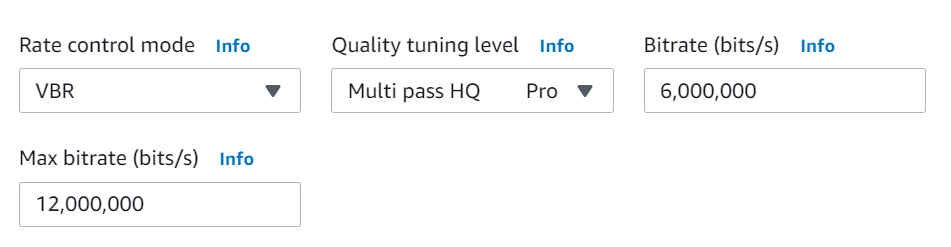
In general, you should use VBR in all applications where CBR isn’t strictly required, and the only application that falls into that category is live encoding and transcoding. When using VBR, you should enable two passes so the encoder can scan the file and gauge scene quality, and then encode. That’s the multi pass option shown in Figure 3 from AWS Elemental MediaConvert.
You should also set the target bitrate, and for files you’ll be streaming to viewers (as opposed to files encoded for archival or to upload), set the maximum bitrate to limit the data rate variability in the file. This technique is called “constrained VBR” and in Figure 3 we’re constraining the bitrate to 200% of the target. For more on choosing and using different bitrate control techniques, see here.
I’m covering these parameters at a high level so I can make comprehensive recommendations later in the article. If you want to excel at H.264 encoding, you have to understand how these parameters impact quality, encoding time, and compatibility at a very deep level. They are covered in detail in my courses Introduction to Adaptive Bitrate Encoding and Streaming Media 101, and my book Video Encoding by the Numbers.
H.264-Specific Parameters
Having covered the generic encoding parameters, let’s move to the H.264-specific parameters.
H.264 Profiles
There are three profiles available in most H.264 encoding tools, Baseline, Main, and High. Why do they exist?
When H.264 was created back in 2003, the developers anticipated that different devices would playback the encoded video, from very low-power portable players like the iPod with relatively weak CPUs and low RAM memory to expensive AC-powered set-top boxes, computers, and television sets with more powerful processors and capacious RAM. So, the developers created different profiles that used different compression techniques that use more or less power or RAM (Figure 3 from Wikipedia).
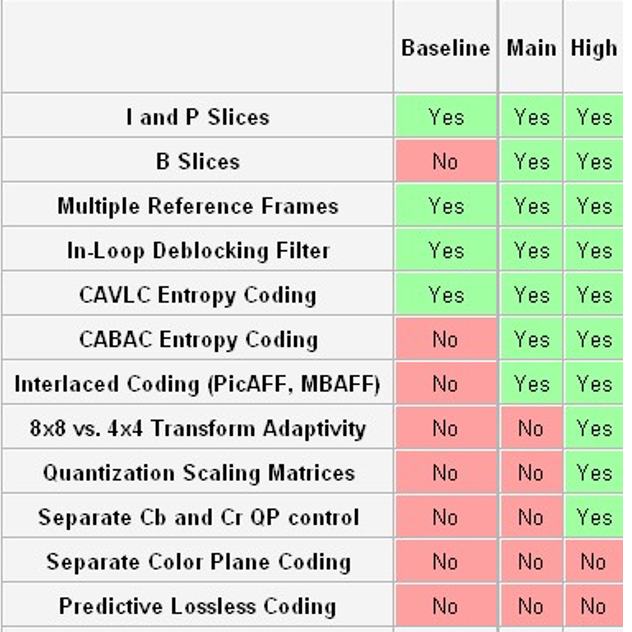
You see that the Baseline profile uses the fewest techniques so produces the lowest quality but is easiest to decode. In contrast, the High profile uses the most advanced techniques, so produces the highest quality but is the hardest stream to decode.
All this mattered back in 2003 because devices were primitive and inexpensive and developers couldn’t afford to put powerful CPUs and sufficient RAM to playback video encoded with the High profile. So, if you were targeting these devices, you simply encoded video using the Baseline profile.
Fast forward to 2021 and any device manufactured in the last five years can play videos encoded using the High profile. Still, when encoding video for adaptive streaming to multiple target devices (discussed below) many producers encode one or two rungs on the bottom of the ladder using the Baseline profile for compatibility with very old legacy devices.
A couple of things to know about the three profiles. First, the overall quality difference is more significant for hard-to-encode videos like sports than easy-to-encode videos like talk shows. Second, the biggest quality delta is between the Baseline and Main profile; the difference between Main and High is modest.
Finally, if you’re concerned about encoding costs, Baseline is the fastest to encode, but in the tests I’ve performed, High actually encodes faster than Main, so it’s a bit better quality than Main plus less expensive to encode if you’re running your own encoding farm.
H.264 Levels
Levels set limits on resolution and bitrate for the different profiles – you can see the specs for Level 4, 4.1, and 4.2 in Figure 5 from Wikipedia. During the early days of smartphones, Apple and other manufacturers posted the profile and level that each device supported. For example, this document shows that the iPhone 6/6s, which debuted in 2014, support the High profile to Level 4.2.
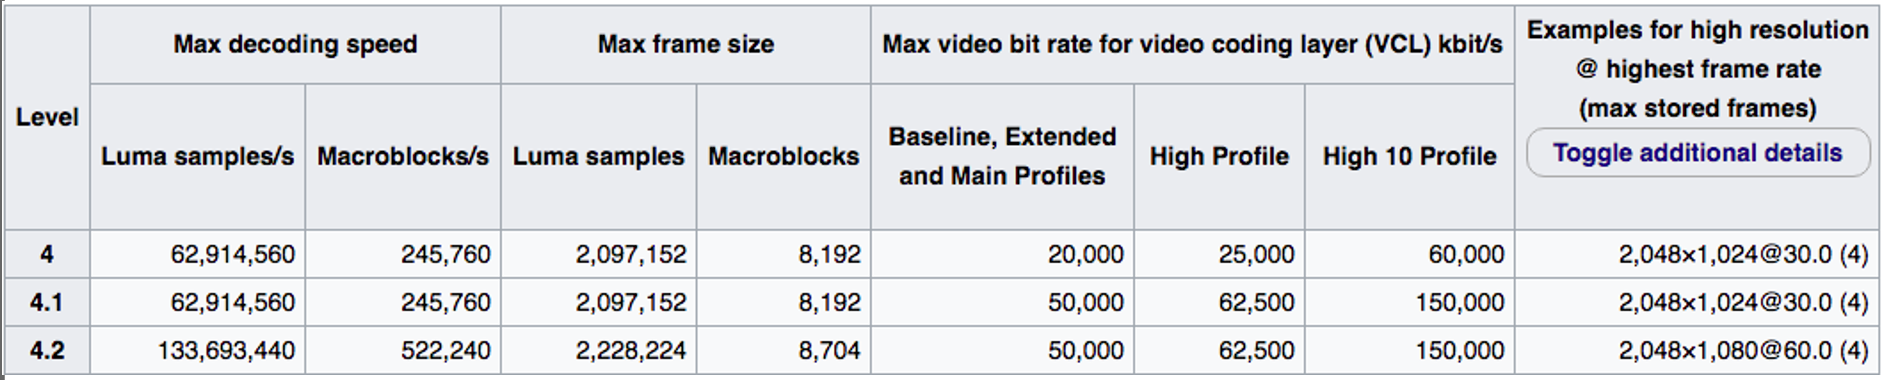
As you can see in Figure 5, this means that the device can play video configured up to 204×1024 @ 30 fps at a bitrate of 62,500 Kbps, which is far higher than you could ever deliver or otherwise play on that phone. So, unless you’re targeting very old legacy devices, you probably don’t need to worry about levels since practical constraints, like available bandwidth, will typically dictate encoding parameters far more conservative than those dictated by the level. Probably, for this reason, you seldom see supported levels for H.264 on the spec sheets of most modern smartphones or tablets.
On the other hand, when encoding for transcoding in another live or VOD service, always check the services’ specifications to see if there’s a level limitation. You’ll see an example of this below. When there is a level limitation, make sure that you configure your encode accordingly.
Entropy Coding Technique
Entropy coding refers to how the compressed audio/video data is stored in the file. Both options available in H.264, CABAC and CAVLC, are lossless, meaning that the data you unpack is the same data you packed.
A good analogy is how tightly you pack a suitcase. If you’re traveling internationally, you might take a lot of time and really fold your clothes neatly, so you can store them in a 15″ suitcase you can easily place in the overhead compartment. If you’re driving, you might quickly throw your clothes into a 19″ bag that will easily fit in your trunk. You have the same clothing at both destinations, but the CABAC 15″ suitcase was more efficiently packed than the CAVLC 19″ suitcase.
Of the two, CABAC is the more efficient but is only available for the Main and High profiles. You’d use CABAC to pack that tight suitcase. CAVLC is less efficient but very slightly easier to decode during playback and is the only option when encoding using the Baseline profile.
So, you have to use CAVLC when encoding with the Baseline profile. When encoding with the Main or High presets, use CABAC unless the encoding specifications supplied by your transcoding vendor specify otherwise.
Note that this option isn’t available in all encoders. For example, you can’t choose between CAVLC and CABAC in the Adobe Media Encoder, or even Handbrake (without scripting), though you can in AWS Elemental MediaConvert. If the option isn’t listed, don’t sweat, you should expect that the encoder uses CAVLC when encoding with the Baseline profile, and CABAC when encoding with the Main and High profiles.
Encoding Presets
Encoding presets tradeoff encoding time against encoded quality allowing the producer to control both encoding time (and cost) and quality. You see in Figure 2 the Quality parameter; that’s where you choose the preset. As mentioned above, the x264 codec uses presets ranging from Ultrafast to Placebo, and these are available in most encoders that use this codec, like Wirecast shown in Figure 2 (and Handbrake in Figure 1, though the presents aren’t shown in the figure).
However, neither the AWS Elemental MediaConvert Encoder nor the Adobe Media Encoder offer these same presets because they neither use the x264 codec. Even though the codecs deployed in these products have their own presets that define their own quality/encoding time tradeoffs, neither company gives access to those presets in their respective program’s user interfaces, probably to simplify operation for users unfamiliar with H.264 encoding. So, if you don’t see a preset in your encoder, don’t worry about it.
Other Related Encoding Parameters
There are a couple of other topics to consider when encoding H.264 files.
Encoding AAC Audio
When encoding video you typically encode audio as well. In almost all cases when encoding H.264, you’ll also encode at least one audio file using the AAC codec, for Advanced Audio Coding, which was formalized by the same two standards bodies as H.264. You may also want to include additional audio files using Dolby Digital or some higher quality format, but you’ll almost always include at least one stream of AAC audio for compatibility with devices that don’t support Dolby.
Container Formats for H.264 Encoded Video
According to Wikipedia, “A container format (informally, sometimes called a wrapper) or metafile is a file format that allows multiple data streams to be embedded into a single file, usually along with metadata for identifying and further detailing those streams.” Typically, the file extension identifies the container. In your office work, you work with containers like .xlsx (Excel), .docx (Word), and .pptx (PowerPoint), or .txt for the simple text file and .rtf for rich text format.
When you produce H.264 encoded files, you have to choose the container format. For single files encoded as mezzanine files or for local playback, the most common containers are:
- MP4 (.mp4) – the container defined in the MPEG specification
- QuickTime (.mov) – Apple’s QuickTime container
- Matroska (.mkv) – the open source Matroska container
When encoded for adaptive streaming, the files are typically formatted as either:
- MPEG-2 transport streams (.ts) – used in HTTP Live Streaming (HLS)
- Fragmented MPEG files (.fmp4, others) – used for DASH, newer versions of HLS, and other HTTP-based ABR formats.
Typically, your choice of container is dictated by the target device or operation. If you’re encoding for upload for YouTube, you should use the MP4 container. This is true for most services, but you should definitely check first. Whether for YouTube or other services, f you don’t have an encoder that you’re familiar with, there are a number of MP4 compressors that you can use.
When encoding for adaptive bitrate delivery, you need to use the container format supported by the technology or technologies that you are using to deliver to your viewers.
H.264 Encoding for Different Targets
With this as background, let’s cover encoding H.264 for three targets:
- Adaptive bitrate streaming – encoding for direct distribution to viewers on a range of devices connecting over a range of connection types and speeds.
- Live – encoding live video for transmission to the cloud for transcoding into an encoding ladder and distribution.
- Mezzanine file – encoding a high-quality file to upload to a service to create the encoding ladder.
Encoding H.264 for Adaptive Bitrate (ABR) Streaming
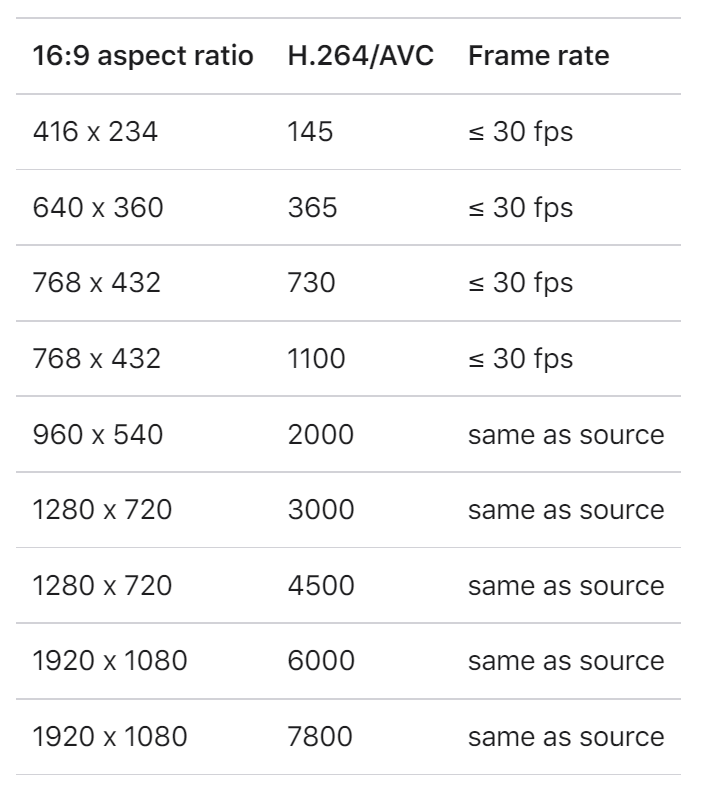
When encoding directly for ABR streaming you encode the same source file to multiple resolutions, bitrates, and frame rates to create what’s called an encoding ladder (Figure 6). Figure 6 shows the suggested encoding ladder from the Apple HLS Authoring Specification. The largest resolution will typically be the source resolution with resolutions dropping as shown.
Profile/Level/Entropy Coding
The Apple spec contains a number of useful directives, like “For H.264, you SHOULD use High Profile in preference to Main or Baseline Profile.” However, it also says (in seeming contradiction), that ” For maximum compatibility, some H.264 variants SHOULD be less than or equal to High Profile, Level 4.1.” So, you’re free to encode a rung or two at the bottom of the ladder using the Baseline or Main profile. Apple doesn’t address entropy coding in the document, so use CABAC if encoding with the Baseline profile, CAVLC otherwise.
Resolution/Bitrate/Bitrate Control/Frame Rate/Keyframe
The configurations in Figure 6 show how the file resolution, bitrate, and frame rate may change from the top to the bottom of the ladder. In particular, note that the document recognizes that lower rungs may retain better quality at frame rates lower than the source, particularly if the source is 60 fps. Accordingly, some producers drop lower rungs to 30 fps (for 60 fps source) or 12/15 fps (for 24/30 source).
Note that Apple makes it clear that the encoding ladder is simply “one possible set of bit rate variants.” The document goes on to indicate that codec, resolution, frame rate, content and other factors “make universal encoding recommendations for content difficult. HLS Authoring Specification for Apple Devices includes initial bit rate recommendations that you should evaluate against your content, constraints and encoding workflow.” So, use the encoding ladder shown as a guide; not as a requirement.
Regarding bitrate control, the specification differentiates between live and on-demand encoding:
- “1.29. For live/linear content, the measured peak bit rate MUST be less than 125% of the BANDWIDTH attribute.” This seems to suggest that a CBR-like approach is preferred.
- “1.30. For VOD content, the peak bit rate SHOULD be no more than 200% of the average bit rate.” So, this means 200% constrained VBR as shown in Figure 3.
Regarding key frames, the spec says “Key frames (IDRs) SHOULD be present every two seconds.”
Note that when encoding for ABR delivery, you also want the I-frame to be evenly divisible into the segment duration (see here for more on segments). In this regard, the Apple specification states “7.5. Target durations [for segments] SHOULD be 6 seconds” and “Video segments MUST start with an IDR frame.” Obviously, 2 divides evenly into 6; if you choose a different key frame interval, be sure to set your segment size accordingly.
Container
For the container, the specification says “The container format for H.264 video MUST be fragmented MP4 (fMP4) files or MPEG transport streams.” Sounds simple enough, but recognize that not all legacy HLS devices can play fMP4 files. So, if you go that route, you may lose some viewers.
Encoding Preset
Apple doesn’t comment on the preset to be used when encoding for ABR streaming. However, when you consider that you’ll have to encode each file nine times to create your encoding ladder, cost is definitely a consideration. For this reason, at least with the x264 codec, many producers use the default Medium preset for their encoding ladders which produces very good quality much faster than higher-quality presets (click here to download a handout from a presentation on choosing an H.264 preset).
Encoding H.264 for Live Transcoding
When encoding for ABR distribution, you’re attempting to create multiple streams that deliver a good experience to a range of devices. When encoding for live transcoding, you’re sending a single stream to the cloud where a separate service will transcode the incoming stream into an encoding ladder. Your goals are to get the highest quality stream possible to the cloud transcoding facility and to meet the specifications of your transcoding service.
So, when choosing your H.264 encoding parameters for live streaming, you want to check two things. First, go to www.speedtest.net (NOT www.speedtest.com) and check your upload bandwidth. Typically, you’ll want your outbound stream no more than 60% of your available bandwidth to ensure that it reaches the cloud transcoder without interruptions.

Resolution/Bitrate/Bitrate Control/Frame Rate/Keyframe
You’ll also want to check the encoding parameters recommended by the service. Figure 8 shows the encoding recommendations for Facebook Live, which covers resolution, bitrate, frame rate, and Key frame interval.
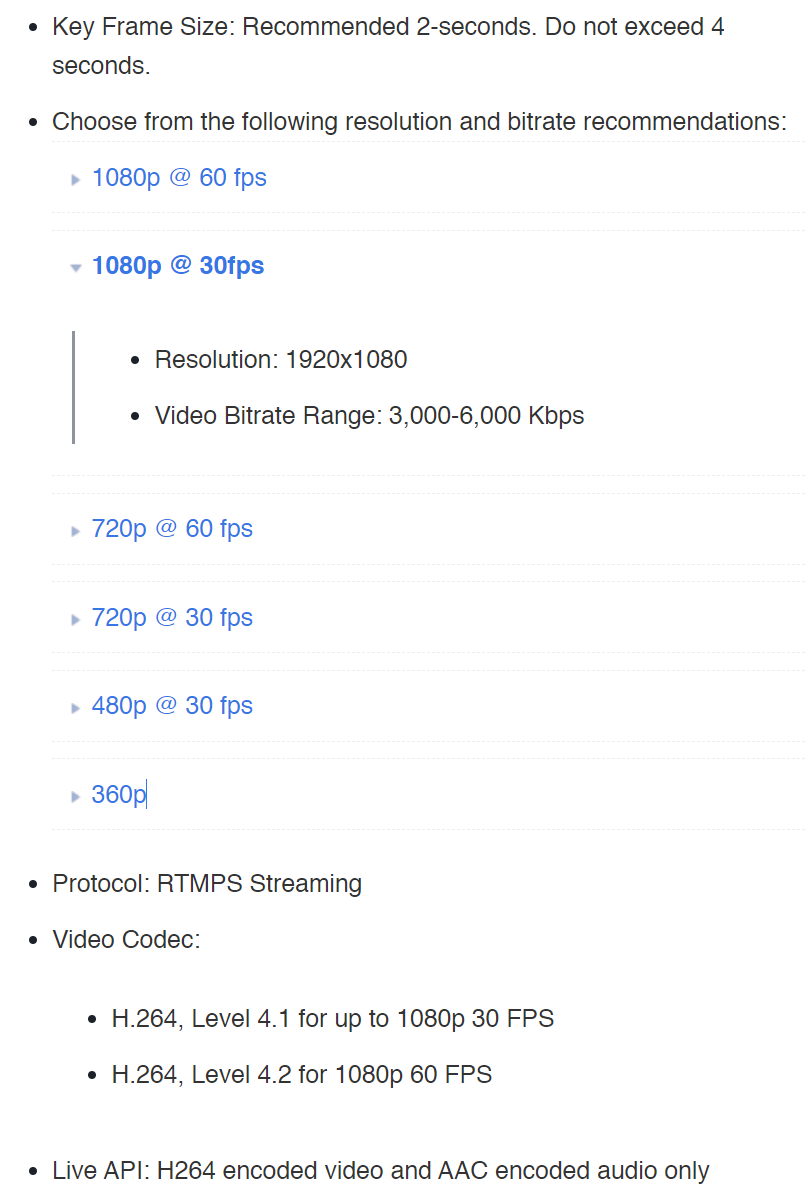
Assuming you have sufficient upload bandwidth, you should follow the specs as shown. However, if your upload bandwidth is limited you should use a lower data rate and perhaps even a lower resolution to optimize quality.
Profile/Level/Entropy Coding
What about the H.264 profile? Since Facebook doesn’t define it you should be able to use the High profile. You also see that you shouldn’t exceed level 4.1 for 1080p 30 videos, though at 6 Mbps you’re well within that constraint.
Facebook doesn’t specify the entropy coding technique, so if the encoding tool enabled this option (few live encoders do) use CAVLC.
Container Format
Because we’re producing a live stream in this use case, there is no container format. Instead, you need to deliver the stream using the RTMPS protocol (or SRT), which should be set by default.
Encoding Preset
What about encoding preset? If you’re using a software-based encoder, like Wirecast is using in Figure 2 with the x264 codec, you need to choose a preset that can produce the desired output in real time on your capture/encoding computer. That’s why you see the Very fast preset used in Figure 2; the quality is lower than the Medium preset you might use to produce a video-on-demand encoding ladder, but it will definitely keep up with the 1080p 30 fps necessary to supply the live stream.
Encoding Mezzanine Files with the H.264 Codec
Mezzanine files are intermediate files that you upload to a service for transcoding into the encoding ladder. You create a mezzanine file, for example, to upload to YouTube or to Brightcove or Kaltura, the latter two both full-service online video platforms. You also encode a mezzanine file to upload to a cloud encoding service like Bitmovin, Encoding.com, or Hybrik.
When encoding for upload to a service, check the service’s recommended upload parameters which are typically supplied in a help section. Figure 9 shows YouTube’s recommendations and they are very specific. 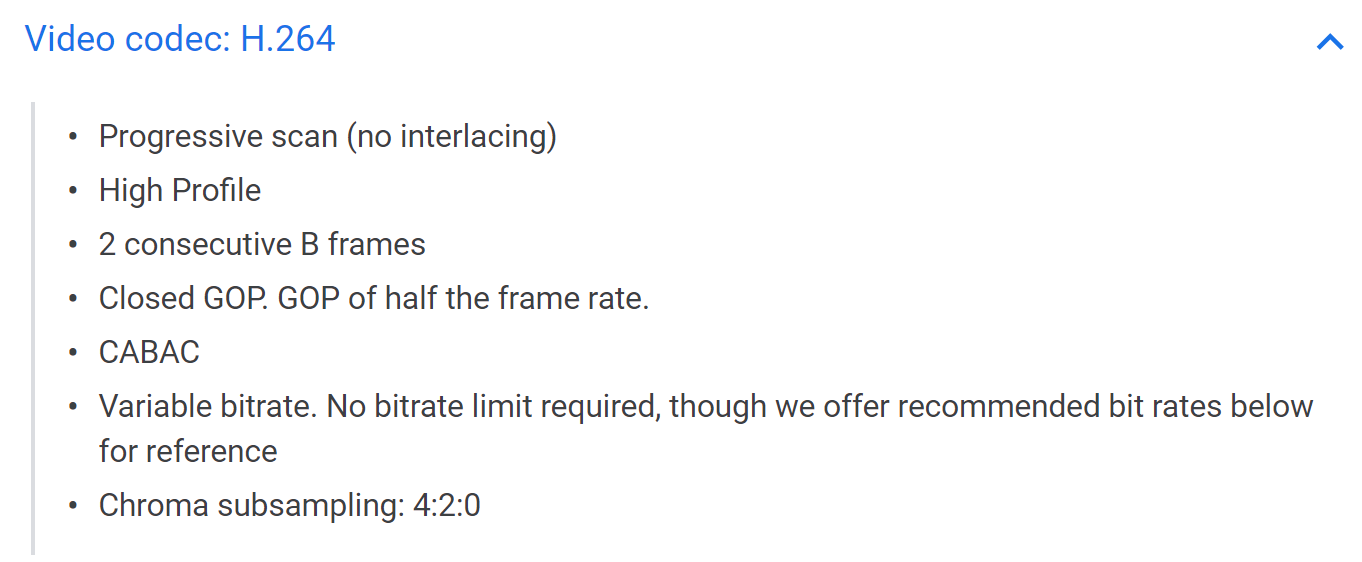
Figure 9. Recommended H.264 encoding parameters for creating a mezzanine file for uploading to YouTube.
Profile/Level/Entropy Coding
YouTube specifies the High Profile with no level-related limitation. The CABAC recommendation was a bit of a surprise but when you’re receiving hundreds of hours of video each minute, even a slight reduction in decoding requirements makes a difference.
Resolution/Bitrate/Bitrate Control/Frame Rate/Keyframe
YouTube supports up to 4K resolution and recommends that you upload at the source resolution, so 1080p for HD video, 2160p for 4K. Never increase video resolution when producing the mezzanine file.
As shown in Figure 9, YouTube recommends VBR encoding with data rates varying by resolution (shown elsewhere at the same link) with 1080p 30 fps at a recommended bitrate of 8 Mbps. I’ve spent a lot of time analyzing the optimal data rate for mezzanine files which you can read about here and watch here. The Cliffnotes version is that data rates much higher than 8 Mbps won’t result in noticeably higher quality in the transcoded files.
YouTube recommends uploading at the source frame rate and using a key frame interval of half the frame rate, so 12 for 24 fps, 15 for 30 fps, and so on. As mentioned above, virtually all encoders produce closed GOPs when encoding with H.264 so if your encoder doesn’t show this option, I wouldn’t worry about it.
Regarding the “2 consecutive B frames” requirement, if your encoder supports this I would choose 2 but if it doesn’t, I wouldn’t worry about it. I use the Adobe Media Encoder to encode Mezzanine files for upload to YouTube and B-frames aren’t an option. In general, probably less than 1% of YouTube contributors know what a B-frame is so I’m sure YouTube can accept files that don’t precisely match these specs.
Container Format and Preset
YouTube does specify the MP4 container format.
Regarding preset, unlike when encoding for ABR delivery, you’re only producing this file a single time, so cost is much less of a factor. I would use a very high-quality preset to optimize the quality of the mezzanine file and those produced from it.
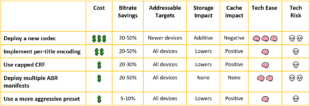
Figure 10 shows a table that summarizes these recommendations. Click the file to view it at full resolution in a separate window.