Streaming Learning Center Where Streaming Professionals Learn to Excel

Related Articles


When it comes to producing video for streaming, choosing the right camera is Priority #1. The challenge is to choose the camera that is right for your application, at the right price, without short-changing your ability to do better work in the future. For those who are buying a camcorder in 2011, let’s turn these goals into features to look for in a new camcorder.
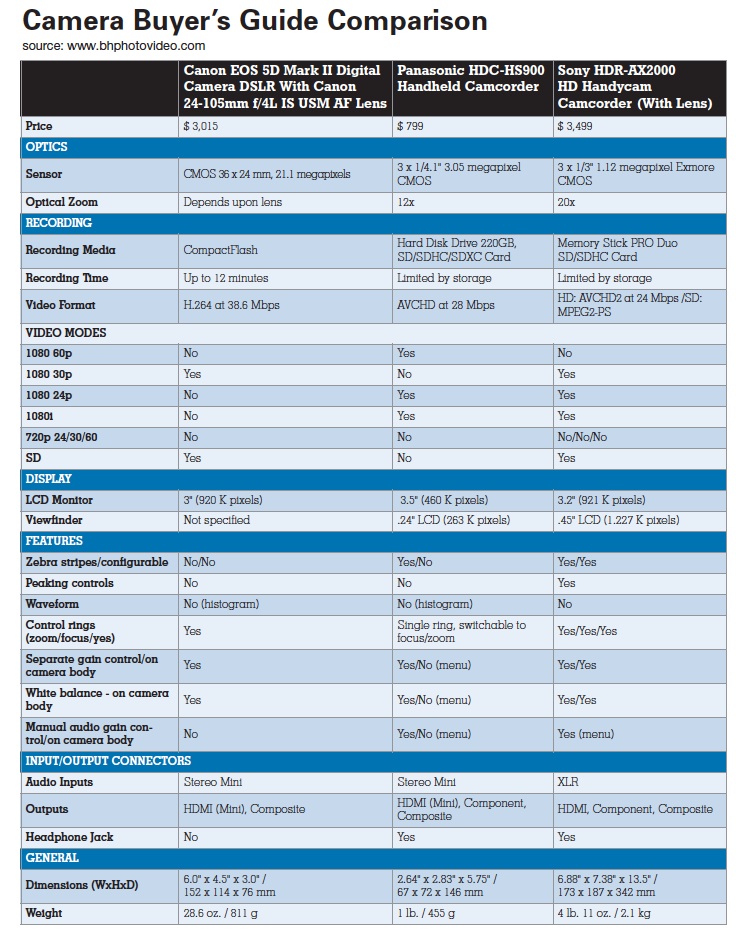
Let’s start with some givens. If you’re shooting primarily or solely for streaming, shoot in progressive mode, which delivers better quality than interlaced footage. So make sure that whatever camcorder you buy can shoot in 30p at up to 1080p resolution. Virtually all camcorders do at this point, but it’s worth a check. (For a chart comparing three leading cameras, see page 2 of this article.)
Contents
DSLR vs. Camcorder
Beyond this absolute, the biggest choice facing most streaming producers is whether to buy a DSLR for video or a traditional camcorder. In general, DSLR cameras feature much larger CMOS sensors than the CCDs or CMOS used in traditional camcorders. This translates to much narrower depth of field, or the ability to focus on specific components in the frame while other regions are out of focus. Shallow depth of field is a great technique to focus your viewer’s attention and also makes the video easier to compress, since the blurry regions have very little detail. For these reasons, manipulating depth of field is a very popular technique among high-end web producers.
Another benefit of the large CMOS sensors is low-light sensitivity, so DSLRs can typically capture higher-quality video than camcorders in low-light conditions. The final benefit is interchangeable lenses, which helps pros get the look they want under a variety of shooting conditions.
Balanced against these advantages are a host of negatives; none insurmountable, but many worth considering, particularly by video newbies. For me, the lack of feedback like zebra stripes or a waveform monitor are very significant deficits, particularly when shooting live events where light conditions frequently change. Both forms of monitoring show which regions in a frame are properly exposed, and which are too light or too dark. Stray too far in either direction and the damage can be irreparable. Experience helps, and lots of pros shoot live events with DSLR cameras, but most shooters will feel more comfortable with zebra stripes guiding their real-time exposure adjustments.
Next up on the DSLR con-list is generally poor audio connectivity and audio monitoring tools. For example, most prosumer camcorders offer XLR connectors with manual gain control, volume meters, and headphone jacks, which lets you connect to and effectively monitor professional microphones or sound boards. Most DSLR camcorders offer only stereo inputs, and though there are volume meters, there usually isn’t a headphone jack. You can record using a separate device, but that adds more gear to buy and worry about during the shoot, and another synch-step during editing.
If you’re a relatively new shooter, you’ll probably bemoan the lack of continuous auto-focus, though this is starting to appear in newer DSLRs. You can engage auto-focus during setup, of course, but once you start shooting, if your subject moved or you moved the camera, you may have to focus manually. This can be a huge deal during live events, particularly since DSLRs typically don’t have “peaking” feedback that shows when your subject is in crisp focus.
Another issue with DSLRs is powered zoom. With many traditional camcorders, you can set zoom speed, so you can smoothly zoom in and out at any speed. With DSLRs, all zooming is manually controlled, which is great for quick adjustments, but much harder to accomplish smoothly.
Finally, many DSLR camcorders have recording duration limits, some as short as 12 minutes. Again, while this isn’t a big deal for many shoots, it can be a significant production hassle for live events, since you’ll have to keep track of and synch five files per camera per hour of production. Sure, some third party programs can help automate this synching (Singular Software’s PluralEyes), but working with fewer files is certainly easier.
Don’t get me wrong; there are plenty of shooters using DSLRs for live event shoots and getting great results. In addition, the DSLR market is fast-moving, and we’re starting to see cameras without these issues. Overall, though, where it’s easy to recommend a DSLR for use in customer testimonials, interviews and other controlled shoots, if you’re buying for live production you’ll probably be happier with a traditional camcorder.
If you’ve got the budget and want the DSLR look, you might consider a new breed of camcorders that combine DSLR chips with a camcorder form-factor and feature set, like the Panasonic AG-AF100, which costs $4,545 (B&H Photo) and features a 4/3″ CMOS chip. With the AG-AF100, you get DSLR depth of field, low-light performance and interchangeable lenses, plus camcorder features like zebra stripes and peaking indicators, unlimited recording time, XLR-audio input, and auto focus during zoom with some lenses. A cheaper alternative is the Sony NEXVG10 ($1,798 B&H Photo), which offers a similar DSLR chip, but less prosumer camcorder functionality (no zebras, no XLRs).
Which Camcorder?
Once you make the decision to go the camcorder route, which should you buy? The features table includes two camcorders, one a high-end consumer (Panasonic HDC-HS900), the other a moderately priced prosumer (Sony HDR-AX2000), to illustrate the features available in both categories.
Both units feature 3 CMOS sensors, one each for red, green and blue pixels, though the Sony’s are slightly larger, which should translate to better quality, superior low-light sensitivity and a narrower depth of field, though nowhere near that offered by the Canon EOS 5D Mark II.
On the other hand, in terms of pixel count, the Panasonic’s sensors capture 3.05 megapixels, which is more than the 2.073 megapixels required for full resolution 1080p capture (1920×1080). In contrast, the sensors on the Sony capture only 1.12 megapixels. To produce the full 1080p frame, the camera has to interpolate the actual captured pixels upward. I’m sure some Sony marketing type could explain how this is done without quality loss, but in my experience, full-resolution capture always delivers a slightly sharper frame.
While the Sony can shoot in 1080i, 1080 24p, and 1080 30p, it can’t shoot in 1080 60p, which enables very smooth slow motion. The HDC-HS900 can shoot in 1080 60p, but lacks any SD formats, as well as the XLR audio connectors available on the Sony. Neither camcorder offers 720p, which is a popular format for web production.
Though the Panasonic’s LCD panel is slightly larger, at 3.5″ compared to the Sony’s 3.2″, the Sony has twice the pixel count, which should translate to a much sharper image. The difference between viewfinders is ever more stark, with Sony’s nearly twice as large with over four times as many pixels. If you’re shooting on a sunny day and need to use the viewfinder, Sony’s will be much more usable.
Beyond these basics, many of the differences between the two camcorders relate to convenience items like control location. Some controls, like quality modes, are seldom accessed during a shoot, so can be safely buried in the camcorder’s menu. Others, like gain control, aperture, focus and zoom, and even white balance, need to be quickly accessible on the camera body so you can quickly adjust to changing conditions, particularly during live shoots.
With the Sony, all of these controls are separately available on the camera body. With the HDC-HS900, you’ll have to enter the touchscreen menu to adjust gain and white balance, which is impossible to do quickly, and difficult to accomplish without jarring the camcorder. You’ll have to toggle a selector to switch between zoom and focus on the HS900’s control ring, which is daunting during a live shoot.
Though the HDC-HS900 does offer zebra stripes, they don’t appear to be configurable (I checked the manual, but not the camera itself). This is important, because often you want zebras set at 100, to avoid blowing out your whites, while in interviews you want them set between 70 – 80 to ensure proper exposure on the face.
When operating in manual focus mode, Sony provides peaking controls that help ensure a sharp focus, while the Panasonic doesn’t. Neither camcorder offers a waveform monitor, though Panasonic does offer a histogram.
Simply stated, the Sony is configured for run-and-gun manual operation, while the HS900 isn’t. If you’ll be shooting in manual mode under a range of conditions, the Sony will deliver much more usability and superior quality. If most of your shoots are locked-down interviews under controlled conditions, you should be able to get very good results with the Panasonic.
If I can go material girl on you for a moment, don’t underestimate the credibility that a prosumer-looking camcorder gives you. If you’ll be shooting visiting VIPs, clients and/or live events in public situations, you want a camcorder that looks as professional as the video you’re trying to produce. Ultimately, you’ll be judged by the quality of that video, but if you show up with a consumer camcorder, your first impression may not be that great.
What Format?
Finally, lets talk about formats and storage mediums. At this point, it’s tough to recommend any tape-based camcorder. Though I dearly love my Canon XH A1’s, which feature full HD-resolution CCDs that capture the sharpest video that I’ve seen, I average about one drop out every other tape, which means a second or two loss of video that I have to work around. Plus tape-based capture is a hassle compared to capturing from an SD card, particularly if you’ve captured multiple shorter shots. This is why I chose the Sony HDR-AX2000 over the tape-based XH A1S, the successor to my cameras, which has exceptionally high user ratings on the Canon site. Canon has a newer, SD-card based camcorder with full HD-resolution CCDs, but it cost over $6,000.
What about AVCHD compared to HDV and other formats? At similar data rates, the H.264-based AVCHD should deliver better quality than the MPEG-2 based HDV, though at 25 Mbps or so, any difference is negligible. AVCHD is more computationally intensive, and requires the most memory, so MPEG-2 is definitely easier to edit. Assuming you’ve got a multiple-core, 64-bit computer with 8 GB of RAM or so, you shouldn’t notice the difference. If you’re still running 32-bit Windows, you should avoid AVCHD like the plague, or upgrade your workstation.
How Much Should You Spend on a Camcorder?
When do you need to spend more than $4,000 – $5,000 on a camcorder? There are a few scenarios. If you’re shooting live events for television output, genlocking is a valuable feature that synchronizes all video streams, but can add $2,000 – 3,000 in price. If you’re working with a mixer or real time capture device that can only accept serial digital input (SDI), you’ll need to spend extra for SDI output.
If you want configurable controls over frame rate so you can shoot at any speed from 1 – 60 fps, you’ll need a more expensive camcorder, and devices in the $6,000 – $10,000 range also deliver more precise control over picture quality, with configurable controls over options like gamma and knee. Finally, if you want higher-quality storage formats, like 50 Mbps MPEG-2, AVC-Intra or Red format, you’ll need to stretch the budget as well.
What to do before buying? For low-end camcorders, the web site I trust the most is camcorderinfo.com, which does the most comprehensive reviews that I’ve seen. CNET is a also a good site to check. For professional camcorders, I prefer the reviews on B&H Photo, while Amazon is best for consumer reviews.